Администрирование

Развёртывание и конфигурация готовых систем.

Subsections of Администрирование

Alpine Linux

Installation on ESXi

External Link

  • Enable Community repo in file /etc/apk/repositories
  • Install: apk add --update open-vm-tools
  • Enable at boot: rc-service open-vm-tools start rc-update add open-vm-tools

Network Config

External Link In file: /etc/network/interfaces

DHCP: iface eth0 inet dhcp

STATIC:

iface eth0 inet static
        address 192.168.1.150/24
        gateway 192.168.1.1

DNS

In file: /etc/resolv.conf

nameserver 8.8.8.8
nameserver 8.8.4.4

Configue CGROUPS for k8s

External Link rc-update add cgroups

Bugfix:

echo "cgroup /sys/fs/cgroup cgroup defaults 0 0" >> /etc/fstab

cat > /etc/cgconfig.conf <<END
mount {
  cpuacct = /cgroup/cpuacct;
  memory = /cgroup/memory;
  devices = /cgroup/devices;
  freezer = /cgroup/freezer;
  net_cls = /cgroup/net_cls;
  blkio = /cgroup/blkio;
  cpuset = /cgroup/cpuset;
  cpu = /cgroup/cpu;
}
END

sed -i '/^default_kernel_opts/s/=.*$/="quiet rootfstype=ext4 cgroup_enable=cpuset cgroup_memory=1 cgroup_enable=memory"/' /etc/update-extlinux.conf
update-extlinux
apk add --no-cache iptables curl

Ansible

Articles in section

Installation

Do not install Ansible from local OS repo - it is usually older in version there. Use latest Python pip repo to install a fresh version.

sudo apt install python3-distutils
wget http://bootstrap.pypa.io/get-pip.py
sudo python3 get-pip.py
sudo pip3 install ansible
ansible --version
Tip

Ansible will be the latest version supporting current Python in OS. So to get latest Ansible , Python must be updated as well!

Warning

Do not update the default Python in OS - it is used by system services, which may break!

Build Python:

sudo apt install build-essential zlib1g-dev libncurses5-dev libgdbm-dev libnss3-dev libssl-dev libsqlite3-dev libreadline-dev libffi-dev curl libbz2-dev

wget https://www.python.org/ftp/python/3.9.15/Python-3.9.15.tgz

tar -xf Python-3.9.15.tgz

cd Python-3.9.15
./configure --enable-optimizations

make -j 8

Installing Python:

  • Best way is to do checkinstall, create a .deb file to share with the team.
  • Use altinstall parameter to install Python in an alternative path. This is simpler & better than using Python virtualenv.
sudo make altinstall # now Python 3.9x is installed on separate path, while Python 3.7 in OS is unchanged

sudo python3.9 -m pip install --upgrade pip

sudo python3.9 -m pip install ansible

ansible --version # now ansible is the latest version

Architecture

graph LR
I[(Inventory)] --> R1(Role01);
M(Modules) --> R1;
I[(Inventory)] --> R2(Role02);
M(Modules) --> R2;
I[(Inventory)] --> RN(Role N);
M(Modules) --> RN;
R1 -->|include role| P(Playbook);
R2 -->|include role| P(Playbook);
RN -->|include role| P(Playbook);
P --> C(Ansible Config);
C --> Py(Python);
Py-->|SSH|Client01;
Py-->|SSH|Client02;
Py-->|SSH|Client_N;

Folder Structure

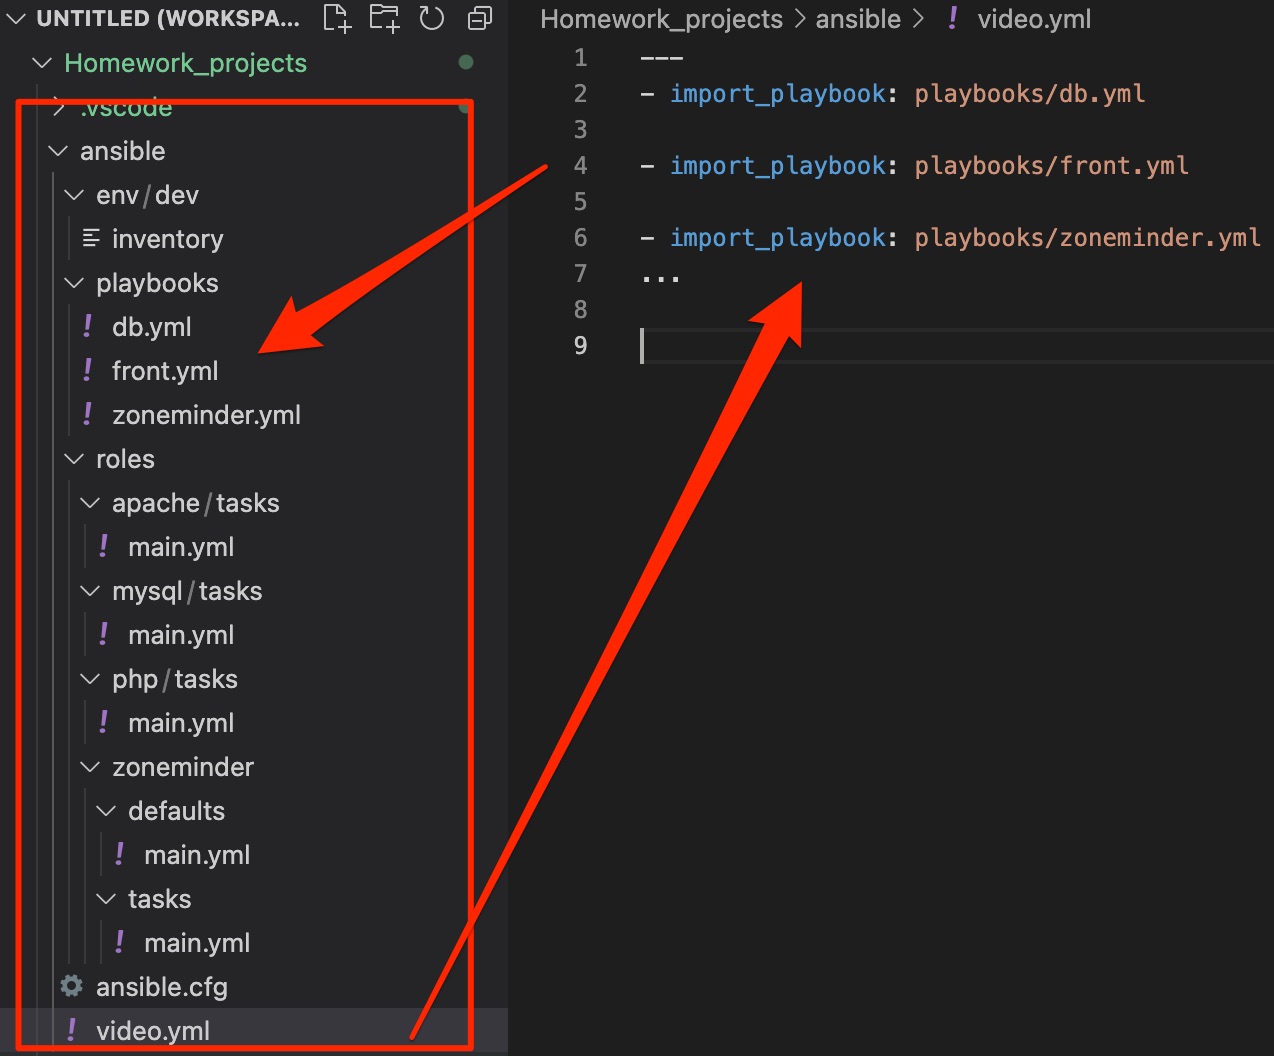
video.yml - main program:

---
- import_playbook: playbooks/db.yml
- import_playbook: playbooks/front.yml
- import_playbook: playbooks/zoneminder.yml
...

front.yml - role example:

---
- name: front-end play
  hosts: all
  gather_facts: yes
  become: yes

  tasks:
    - name: include role apache
      include_role:
        name: apache

    - name: include role php
      include_role:
        name: php
...

apache / tasks / main.yml - tasks example:

---
- name: install apache
  apt:
  name: apache2

- name: Enable service apache2
  ansible.builtin.systemd:
    name: apache2
    enabled: yes
    masked: no

- name: Make sure apache2 is running
  ansible.builtin.systemd:
    state: started
    name: apache2
...

Role structure

Directories inside a role:

- defaults - variable values by default
-- main.yml

- vars - variables defined by role (for other roles)
-- main.yml

- tasks - jobs to be completed
-- main.yml

- handlers - actions to be taken after checks
-- main.yml

- files - static files to be copied into client machine
- templates

Subsections of Ansible

Inventory

Initialization

Create inventory file with IP addresses. Check computers in inventory by doing a ping:

ansible all -i inventory -u vagrant -m ping -k
# -i - <inventory file>
# -u - <username>
# -m - <select module>
# -k - <interactive password prompt>
ansible all -i inventory -u admin -m ping -k -vvv # debug mode with verbosity 3

Inventory examples:

[db]
vm ansible_host=192.168.1.98 ansible_user=aagern

[app]
vm ansible_host=192.168.1.98 ansible_user=aagern

[front]
vm ansible_host=192.168.1.98 ansible_user=aagern

[all:vars]
ansible_ssh_extra_args="-o UserKnownHostsFile=/dev/null -o StrictHostKeyChecking=no"
ansible_python_interpreter=/usr/bin/python3
web1 ansible_ssh_host=192.168.33.20
db1 ansible_ssh_host=192.168.33.30

[webservers]
web1

[dbservers]
db1

[datacenter:children]
webservers
dbservers

[datacenter:vars]
ansible_ssh_user=vagrant
ansible_ssh_pass=vagrant

Configuration

Order of precedence for the config file:

  1. $ANSIBLE_CONFIG env variable  (first place to be searched)
  2. ./ansible.cfg - local file in the working directory
  3. ~/.ansible.cfg - user home directory
  4. /etc/ansible/ansible.cfg - global config (last place to be searched)

First config file found wins, Ansible stops looking for other config files.

Environment override

Specify: $ANSIBLE_

Override settings on the fly:

$ export ANSIBLE_FORKS=10

[defaults] forks - how many parallel processes does Ansible handle. Default=5, production recommended=20

host_key_checking - check host key before sending commands. Default=True (for production), for dev/test systems =False (easy control)

log_path - Ansible logging. Default=Null, produstion recommended - set path all Ansible users can write to.

Target patterns

Patterns to choose hosts/groups:

  • OR pattern: group1:group2

Example:

ansible webservers:dbservers -i inventory -m service -a "name=iptables state=stopped" --sudo
  • NOT pattern: :!group2
  • Wildcard pattern: web.lab.local*
  • REGEX pattern: ~web[0-9]+
  • AND pattern: group1:&group2 - apply to hosts BOTH in group1 and group2 (intersection)
  • Complex patterns

Complex pattern example: webservers:&production:!python3 # apply to web servers in production but not in the Python3 group

Modules

Help on modules

ansible-doc -l # all installed modules list
ansible-doc <module-name> # module man
ansible-doc -s <module-name> # playbook snippets code examples on module

Module examples

Copy module

  • Copies a file from the local box to a remote system - useful for copying config files to remote system
  • can do backups
  • can do remote validation

Fetch module

  • Copy a file from remote system to local box
  • validate file using md5 checksum

Setup module

  • Gather info and facts on remote system
  • Inventory analysis of the system
ansible -i inventory web1 -m setup # gather all available system info
ansible -i inventory web1 -m setup -a "filter=ansible_eth*" # gather info on NICs
ansible -i inventory all -m setup --tree ./setup # form an inventory of files in /setup/ folder with info on targeted systems

Apt module (for Debian systems) / Yum module (RedHat systems)

  • Install, update, delete packages
  • Can update entire system Example for Yum:
ansible webservers -i inventory -m yum -a "name=httpd state=present" -u vagrant --sudo
# name - name of package (Apache)
# present - if package is not there, install. If it is there - do nothing and report "changed: false" (idempotence test)

Service module

  • Start/stop/restart services
  • Set autostart option for services
ansible webservers -i inventory -m service -a "name=httpd state=started enabled=yes" -u vagrant --sudo

# name - name of service (Apache)
# state = started/stopped - make idempotence test and change if necessary
# enabled = yes/no - autostart on system boot

Playbooks

General tasks usage

# Tasks in a playbook are executed top down. Tasks use modules.
tasks:
  - name: Name the task for readability
    module: parameters=go_here

# Example:
  - name: Deploy Apache Configuration File
    copy: src=../ansible/files/configuration/httpd.conf

          dest=/etc/httpd/conf/

Playbook execution: ansible-playbook my_playbook.yml

Playbook example:

---
# -------- Global play declaration
- hosts: webservers    
  ## ----- Variables per play
  vars:
    git_repo: https://github.com/repo.git
    http_port: 8081
    db_name: wordpress

  ## ------------------------
  ### ---- Declare user to run tasks
  sudo: yes
  sudo_user: wordpress_user

  ### ------------------------------
  gather_facts: no # dont't gather facts with SETUP module (default gathers facts - expensive in time)
  remote_user: root
  tasks:

# --------------------------------
  - name: Install Apache
    yum: name=httpd state=present
  - name: Start Apache
    service: name=httpd state=started

Including files

Use “- include” and “- include_vars” directives to include playbook files:

tasks:
- include: wordpress.yaml
  vars:
    sitename: My Awesome Site
    
- include: reverse_proxy.yaml
- include_vars: variables.yaml

Register task output

Use the output of one task for another task:

tasks:
- shell: /usr/bin/whoami
  register: username

- file: path=/home/myfile.txt
  owner: {{ username }}

Debugging tasks with Debug module

Add screen output and print content of variables:

tasks:
  - debug: msg="This host is {{ inventory_hostname }} during execution"

  - shell: /usr/bin/whoami
    register: username
    
  - debug: var=username

Input during playbook execution

Promt user during execution:

- hosts: web1
  vars_prompt:
  - name: "sitename"
    prompt: "What is the new site name?"

  tasks:
    - debug: var=username

Playbook handlers

A handler can be informed to execute a task (restart service) only if state=changed.

  • Run after all tasks
  • Run only once no matter how many times they are called

Handlers syntax is the same as tasks syntax:

  tasks:
  - name: Copy Apache Config files
  - copy: src=../files/httpd.conf
          dest=/etc/httpd/config/

    notify:
      - Apache Restart

  handlers:
  - name: Apache Restart
    service: name=httpd state=restarted

“When” condition

Commence a task if condition is True:

tasks:
- name: Install Httpd Package
  apt: name=httpd state=present
  when: ansible_os_family == "RedHat"

- name: Install Apache2 Package
  yum: name=apache2 state=present
  when: ansible_os_family == "Debian"

Check output of previous task as condition to run next task:

tasks:
- name: Stop iptables now
  service: name=iptables state=stopped
  register: result
  ignore_errors: yes   # supress default stop on error

- debug: msg="Failure!"
  when: result|failed  # Debug message will only be shown if task has failed
                       # other conditions are "result|success", "result|skipped"

Checking variables with WHEN condition

Bring variable check to BOOL check:

- name: "test"
  hosts: local
  vars_prompt:
    - name: "os_type"
      prompt: "What OS? (centos or ubuntu)"
      default: "centos"
      private: no
  vars:
    - is_ubuntu: "{{os_type == 'ubuntu'}}"
    - is_debian: "{{os_type == 'debian'}}"
  tasks:
    - debug: msg="this shows the conditional if variable equals ubuntu"
      when: is_ubuntu|bool
      
    - debug: msg="this shows the conditional if variable equals centos"
      when: is_centos|bool

eBPF

Статьи в разделе

eBPF File monitoring

History

Early approach: periodic scanning of the file-system and comparing the expected state with the actual state. Limitations:

  • can only be used to detect modifications and not reads to files;
  • unreliable because a modification can go undetected if the file is modified, then returned back to its original state before the scanning occurs:
    • A quick attacker can read/modify target file, and clean up their tracks before the periodic scan.

Later approach: in-kernel inotify:

  • addresses unreliability - executed inline with the operation;
  • no way to associate or filter operations using the execution context (e.g., pid or cgroup) of the process doing the operation -> no way to filter events based on which Kubernetes workload performed the file access;
  • lack of flexibility in the actions taken when a file is accessed:
    • When a monitored file is accessed,  it will send an event to user-space and it’s up to the user-space agent to do the rest:
      • Example: when monitoring the directory /private/data, the sequence of operations would be:
  1. Agent adds /private into the directories to be watched
  2. Application creates /private/data directory
  3. inotify sends an event to the agent that a directory /private/data was created
  4. Agent adds /private/data to the directories to be watched

If a file was created and/or accessed in /private/data/* between steps 2 and 4, there will be no inotify event for the access prior to it being added to the watch list.
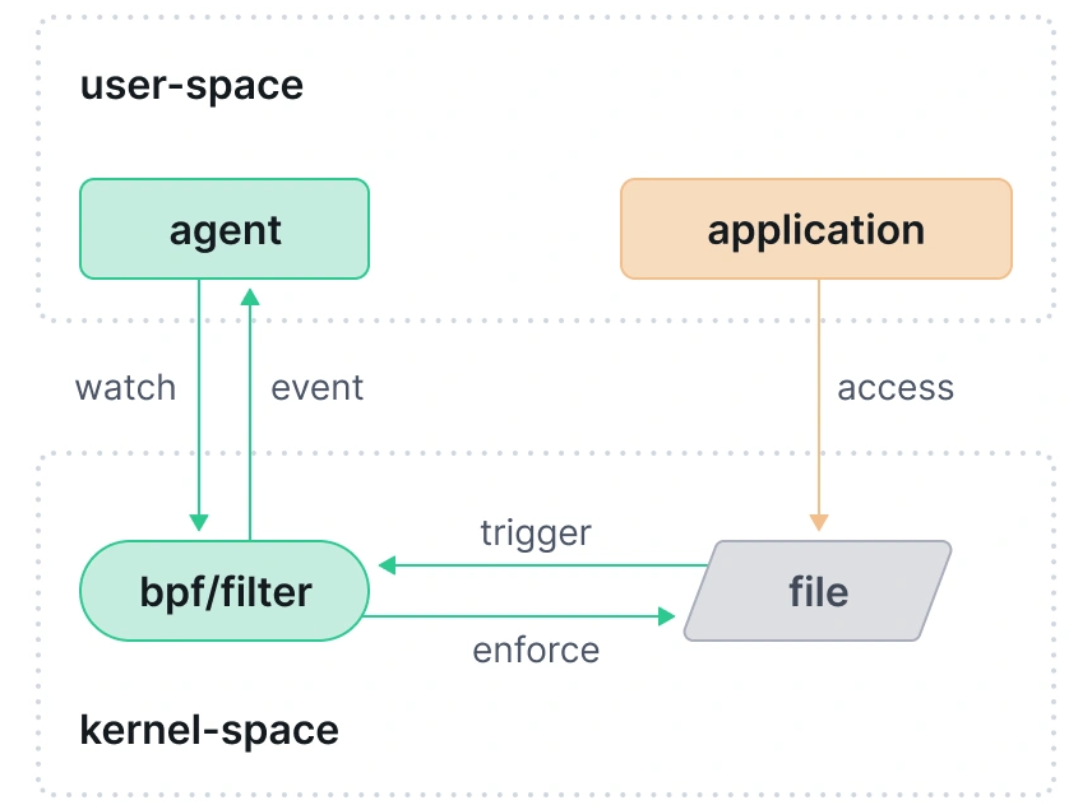
  • Possible to modify the kernel to add execution context to inotify events:
    • long process, might take years until a new kernel reaches production.

eBPF allows FIM implementation to correlate file access events with execution context such as process information (e.g., credentials) and its cloud native identity (e.g., k8s workload), perform inline updates to its internal state to avoid races, as well as implement inline enforcement on file operations.

Path-based FIM with eBPF

Install eBPF hooks (kprobes, specifically) to track file operations and implement File Integrity Monitoring (FIM).

  • install these hooks into system calls: the open system call to determine when a file is opened and for what access (read or write):
    • Hooking into system calls, however, might lead to time-of-check to time-of-use (TOCTOU) issues: the memory location with the pathname to be accessed belongs to user-space, and user-space can change it after the hook runs, but before the pathname is used to perform the actual open in-kernel operation:

Hooking into a (kernel) function that happens after the path is copied from user-space to kernel-space avoids this problem since the hook operates on memory that the user-space application cannot change. Hence, instead of a system call we will install a hook into a security_function. Specifically, we will hook into the security_file_permission function which is called on every file access (there is also security_file_open which is executed whenever a file is opened). Information about the process and its parent such as binary, arguments, credentials, and others. In cloud-native environments, the events also contain information about the container and the pod that this process belongs to.

If no filtering is applied, we get a file-all policy: generate events for every file access:

  • Many file accesses happen in a system at any point in time, and monitoring all of them is not a good practice because generating an event for each one incurs significant overhead;
  • file-all policy does not inform users about what file was actually accessed;
  •  We create a second version of the policy where sensitive ssh server private keys are monitored:

Tetragon policy with filtering of SSH keys:

apiVersion: cilium.io/v1alpha1
kind: TracingPolicy
metadata:
  name: "sensivite-files"
spec:
  kprobes:
  - call: "security_file_permission"
	syscall: false
	args:
	- index: 0
  	   type: "file" #(struct file *) получаем путь
	selectors:
	- matchArgs: 	 
  	- index: 0
    	operator: "Equal"
    	values:
    	- "/etc/shadow"
    	- "/etc/sudoers"
    	- "/etc/ssh/ssh_host_ecdsa_key"
  • Filtering in-kernel & deciding at the eBPF hook whether the event is of interest to the user or not, means that no pointless events will be generated and processed by the agent;
  • The alternative is to do filtering in user-space tends to induce significant overhead for events that happen very frequently in a system (such as file access). For more details, see Tetragon’s 1.0 release blog post.

 * security_file_permission - the eBPF hook is called on every file access in the system  * Use security_file_open and have the eBPF hook be executed whenever a file is opened. However, it means that if a file is already opened before the hook is installed, the hook will not be called and certain accesses may be missed  * Hooks into other functions such as security_file_truncate or security_file_ioctl for other operations;

eBPF lets you do observability and do inline enforcement by stopping an operation from happening by modifying the request.

Example of denying /usr/bin.cat ssh files access:

      matchBinaries:
      - operator: "In"
        values:
        - "/usr/bin/cat"
      matchActions:
      - action: Override
        argError: -1

It is impossible to do proper enforcement without in-kernel filtering, because by the time the event has reached user-space it is already too late if the operation has already executed.

Path FIM limitations

  • Paths are taken from from 
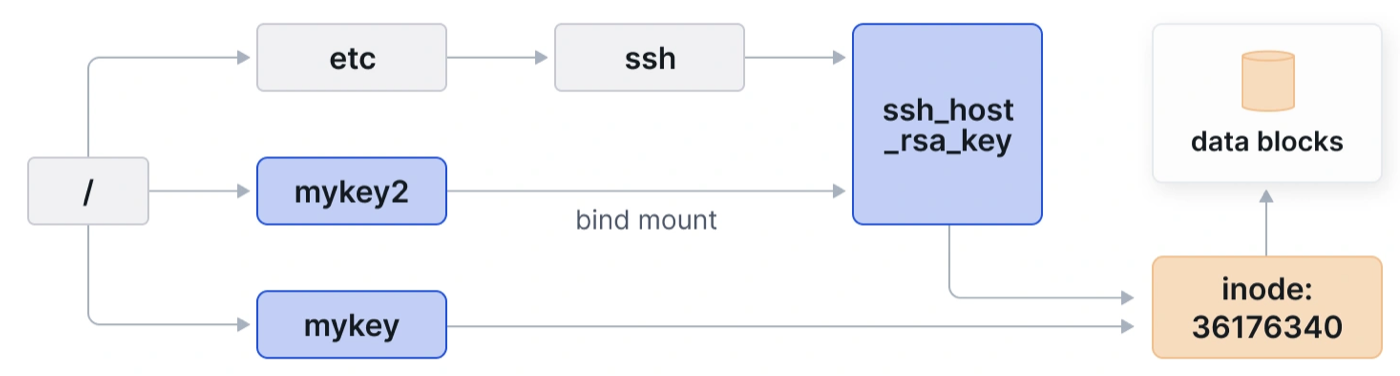
struct file arguments of functions such as security_file_open;
  • The same file can have multiple names in a Linux system:
    • If a policy monitors /etc/ssh/ssh_host_rsa_key but the same underlying file is accessed via a different name, the access will go unnoticed;
    • Same file can have multiple names are hard links, bind mounts, and chroot.
  • Hard link to the file /etc/ssh/ssh_host_rsa_key named, for example, /mykey accesses via /mykey will not be caught by policies such as file-ssh-keys:
    • Creating hard links requires appropriate permissions (when  fs.protected_hardlinks  is set to 1, creating a link requires certain permissions on the target file);
    • bind mount requires CAP_SYS_ADMIN;
    • chroot requires CAP_CHROOT.
  • We need the ability to monitor file accesses regardless of the name with which the file is accessed.

inode-based FIM with eBPF

An inode number uniquely identifies an underlying file in a single filesystem. Example:

# stat /etc/ssh/ssh_host_ecdsa_key | grep Inode
Device: 259,2   Inode: 36176340	Links: 1
# ln /etc/ssh/ssh_host_ecdsa_key /key
# stat /key | grep Inode
Device: 259,2   Inode: 36176340	Links: 2
# touch /key2
# mount --bind /etc/ssh/ssh_host_ecdsa_key /key2
# stat /key2 | grep Inode
Device: 259,2   Inode: 36176340	Links: 2

Диаграмма работы сканера

sequenceDiagram
autonumber
actor U as User
participant A as Агент
participant S as Сканнер
participant F as Файл
participant B as Программа eBPF
participant I as Карта inodes
U->>A: политика
activate A
activate U
A->>S: шаблон
S->>F: получить inode
activate F
activate S
F-->>S: inode
S->>I: обновить список inodes
deactivate S
activate I
F->>B: событие
deactivate F
activate B
loop Синк в ядре
B->>I: запрос списка inodes
I-->>B: список inodes
end
deactivate I
B-->>A: событие
deactivate B
A-->>U: уведомление
deactivate A
deactivate U

Subsections of eBPF

Tetragon Filemon

File access traces with Tetragon

Tracing policies can be added to Tetragon through YAML configuration files that extend Tetragon’s base execution tracing capabilities. These policies perform filtering in kernel to ensure only interesting events are published to userspace from the BPF programs running in kernel. This ensures overhead remains low even on busy systems.

https://tetragon.io/docs/getting-started/file-events/

Tetragon 1.0: Kubernetes Security Observability & Runtime Enforcement with eBPF

https://isovalent.com/blog/post/tetragon-release-10/#observability-benchmarks-understanding-tetragon-performance

File Monitoring with eBPF and Tetragon (Part 1)

https://isovalent.com/blog/post/file-monitoring-with-ebpf-and-tetragon-part-1/

Grafana Loki

Installation

Create dirs for Loki:

cd ~
mkdir promtail
mkdir loki
mkdir grafana

Create a Docker-Compose file

vim docker-compose.yml

version: "3"

networks:
loki:

services:
loki:
image: grafana/loki:2.4.0
volumes:
- /home/aagern/loki:/etc/loki
ports:
- "3101:3100"
restart: unless-stopped
command: -config.file=/etc/loki/loki-local-config.yaml
networks:
- loki

promtail:
image: grafana/promtail:2.4.0
volumes:
- /var/log:/var/log
- /home/aagern/promtail:/etc/promtail
restart: unless-stopped
command: -config.file=/etc/loki/promtail-local-config.yaml
networks:
- loki

grafana:
image: grafana/grafana:latest
user: "1000"
volumes:
- /home/aagern/grafana:/var/lib/grafana
ports:
- "3000:3000"
restart: unless-stopped
networks:
- loki
Note

The config files MUST be in the inner container directory!

Loki Configs

wget https://raw.githubusercontent.com/grafana/loki/master/cmd/loki/loki-local-config.yaml
 
wget https://raw.githubusercontent.com/grafana/loki/main/clients/cmd/promtail/promtail-local-config.yaml

Promtail config

server:
http_listen_port: 9080
grpc_listen_port: 0
 
positions:
filename: /tmp/positions.yaml
 
clients:
- url: http://loki:3101/loki/api/v1/push
 
# Local machine logs
scrape_configs:
- job_name: local
static_configs:
- targets:
- localhost
labels:
job: varlogs
__path__: /var/log/*log
 
#scrape_configs:
#- job_name: docker
# pipeline_stages:
# - docker: {}
# static_configs:
# - labels:
# job: docker
# path: /var/lib/docker/containers/*/*-json.log

Create the containers

cd ~
sudo docker-compose up -d --force-recreate
sudo docker ps

Data Sources

Go to Grafana :3000 First login/password = admin/admin

Add New Data Source… → Loki
http://loki:3100

Explore {job=varlogs} |= “Network”

Docker logs

scrape_configs:
- job_name: docker
 pipeline_stages:
  - docker: {}
  static_configs:
   - labels:
   job: docker
   path: /var/lib/docker/containers/*/*-json.log

Install a Docker Driver https://grafana.com/docs/loki/latest/clients/docker-driver/

docker plugin install grafana/loki-docker-driver:latest --alias loki --grant-all-permissions
sudo docker plugin ls

Check config: https://grafana.com/docs/loki/latest/clients/docker-driver/configuration/

{
"debug" : true,
"log-driver": "loki",
"log-opts": {
"loki-url": "http://localhost:3100/loki/api/v1/push",
"loki-batch-size": "400"
}
}
  • Config: vim /etc/docker/daemon.json
  • Restart Docker: sudo systemctl restart docker

Subsections of Linux CLI

CMD Hotkeys

Базовый терминал

Список всех команд: stty -a

  • Ctrl+W для удаления предыдущего слова.
  • Ctrl+U для удаления всей строки.
  • Ещё несколько возможностей, не связанных с редактированием текста (например, Ctrl+C для прерывания процесса, Ctrl+Z для его приостановки и так далее).

Readline (bash, psql, python3)

Если есть программа вроде nc без поддержки readline, то можно выполнить rlwrap nc, чтобы эту поддержку в неё встроить.

  • Ctrl+E (или End) для перехода в конец строки (из emacs).
  • Ctrl+A (или Home) для перехода в начало строки (из emacs).
  • Ctrl+влево/вправо для перемещения вперёд/назад на 1 слово.
  • Стрелка вверх для возврата к предыдущей команде.
  • Ctrl+R для поиска по истории.

Спец-ПО

Atuin - прекрасный инструмент для поиска по истории оболочки

disown

Необходимо «спасти» уже запущенный процесс и перенести его в фон, даже если забыл сделать это заранее:

# приостановить текущий процесс:
Ctrl+Z

# отправить его в фон:
bg

# отвязать от текущего терминала (теперь он не умрёт при закрытии сессии):
disown

du

Поиск больших файлов

Быстро найти, какие файлы или папки съедают больше всего места:

du -h --max-depth=1 | sort -hr | head -10

# ТОП-10 самых больших файлов
find . -type f -exec du -h {} + | sort -hr | head -10

grep

GREP рекурсивный поиск текста в файлах и папках

grep -Rnw '/path/to/somewhere/' -e 'pattern'
  • -r or -R is recursive ; use -R to search entirely
  • -n is line number, and
  • -w stands for match the whole word.
  • -l (lower-case L) can be added to just give the file name of matching files.
  • -e is the pattern used during the search

Filters

--exclude, --include, --exclude-dir flags used for efficient searching.

  • This will only search through those files which have .c or .h extensions:
    grep --include=\*.{c,h} -rnw '/path/to/somewhere/' -e "pattern"
  • This will exclude searching all the files ending with .o extension:
    grep --exclude=\*.o -rnw '/path/to/somewhere/' -e "pattern"
  • For directories it’s possible to exclude one or more directories using the --exclude-dir parameter. For example, this will exclude the dirs dir1/, dir2/ and all of them matching *.dst/:
    grep --exclude-dir={dir1,dir2,*.dst} -rnw '/path/to/search/' -e "pattern"

history

history

Команда выводит все команды с номерами. Далее можно указать номер команды и выполнить её повторно

history
!297 # выполнить 297-ую команду

fc

Команда позволяет исполнить сразу несколько команд из истории history.

fc 297 299

Появится текстовый редактор, где будут команды из диапазона. Можно их отредактировать, а после выхода из редактора они все будут исполнены.

Linux Containers

Статьи в разделе

Контейнеры

Изолированные единицы ПО.

  • Не делятся. Запускаются на 1 хосте. 2 хоста не могут запустить 1 контейнер;
  • Имеют корневой процесс, от которого работают дочерние процессы внутри контейнера;
  • Должны быть изолированными;
  • Должны исполнять набор типовых функций (требует уточнения).

Subsections of Linux Containers

Docker

Замена Docker exec

Способ попасть внутрь контейнера без docker exec.  Это спасает, если контейнер завис или внутри нет bash sh.

# Узнаём PID контейнера
docker inspect --format '{{.State.Pid}}' <container_id>

# Заходим:
nsenter --target <PID> --mount --uts --ipc --net --pid

Попадаем внутрь окружения контейнера, как в обычный chroot.

Images

В проекте Docker впервые предложили паковать контейнеры в послойные образы в 2013. Это позволило переносить контейнеры между машинами.

skopeo, jq

Проверим работу с образами на утилите skopeo и пробном контейнере:

skopeo copy docker://saschagrunert/mysterious-image oci:mysterious-image
sudo apt install tree
tree mysterious-image

Видим, что мы скачали индекс образа (image index) и blob. Изучим индекс:

jq . mysterious-image/index.json
{
  "schemaVersion": 2,
  "manifests": [
    {
      "mediaType": "application/vnd.oci.image.manifest.v1+json",
      "digest": "sha256:bc2baac64f1088c56c259a21c280cde5a0110749328454a2b931df6929315acf",
      "size": 559
    }
  ]
}

По сути индекс есть манифест более высокого уровня, который содержит указатели на конкретные манифесты для определённых ОС (linux) и архитектур (amd).

jq . mysterious-image/blobs/sha256/bc2baac64f1088c56c259a21c280cde5a0110749328454a2b931df6929315acf
  },
  "layers": [
    {
      "mediaType": "application/vnd.oci.image.layer.v1.tar+gzip",
      "digest": "sha256:0503825856099e6adb39c8297af09547f69684b7016b7f3680ed801aa310baaa",
      "size": 2789742
    },
    {
      "mediaType": "application/vnd.oci.image.layer.v1.tar+gzip",
      "digest": "sha256:6d8c9f2df98ba6c290b652ac57151eab8bcd6fb7574902fbd16ad9e2912a6753",
      "size": 120
    }
  ]
}

Image manifest указывает на расположение конфига и набора слоёв для образа контейнера на конкретной ОС и архитектуре. Поле size указывает общий размер объекта. Теперь можно исследовать далее:

jq . mysterious-image/blobs/sha256/0503825856099e6adb39c8297af09547f69684b7016b7f3680ed801aa310baaa
{
  "created": "2019-08-09T12:09:13.129872299Z",
  "architecture": "amd64",
  "os": "linux",
  "config": {
    "Env": [
      "PATH=/usr/local/sbin:/usr/local/bin:/usr/sbin:/usr/bin:/sbin:/bin"
    ],
    "Cmd": [
      "/bin/sh"
    ]
  },
  "rootfs": {
    "type": "layers",
    "diff_ids": [
      "sha256:1bfeebd65323b8ddf5bd6a51cc7097b72788bc982e9ab3280d53d3c613adffa7",
      "sha256:56e2c46a3576a8c1a222f9a263dc57ae3c6b8baf6a68d03065f4b3ea6c0ae8d1"
    ]
  },
  "history": [
    {
      "created": "2019-07-11T22:20:52.139709355Z",
      "created_by": "/bin/sh -c #(nop) ADD file:0eb5ea35741d23fe39cbac245b3a5d84856ed6384f4ff07d496369ee6d960bad in / "
    },
    {
      "created": "2019-07-11T22:20:52.375286404Z",
      "created_by": "/bin/sh -c #(nop)  CMD [\"/bin/sh\"]",
      "empty_layer": true
    },
    {
      "created": "2019-08-09T14:09:12.848554218+02:00",
      "created_by": "/bin/sh -c echo Hello",
      "empty_layer": true
    },
    {
      "created": "2019-08-09T12:09:13.129872299Z",
      "created_by": "/bin/sh -c touch my-file"
    }
  ]
}

Распакуем базовый первый слой из архива и изучим его:

$ mkdir rootfs
$ tar -C rootfs -xf mysterious-image/blobs/sha256/0503825856099e6adb39c8297af09547f69684b7016b7f3680ed801aa310baaa
$ tree -L 1 rootfs/
rootfs/
├── bin
├── dev
├── etc
├── home
├── lib
├── media
├── mnt
├── opt
├── proc
├── root
├── run
├── sbin
├── srv
├── sys
├── tmp
├── usr
└── var

Это файловая система ОС! Можно изучить версию дистрибутива

$ cat rootfs/etc/issue 
Welcome to Alpine Linux 3.10
Kernel \r on an \m (\l)

$ cat rootfs/etc/os-release 
NAME="Alpine Linux"
ID=alpine
VERSION_ID=3.10.1
PRETTY_NAME="Alpine Linux v3.10"
HOME_URL="https://alpinelinux.org/"
BUG_REPORT_URL="https://bugs.alpinelinux.org/"

Распакуем следующий слой и изучим его:

$ tar -C layer -xf mysterious-image/blobs/sha256/6d8c9f2df98ba6c290b652ac57151eab8bcd6fb7574902fbd16ad9e2912a6753 
$ tree -L 1 layer/
layer/
└── my-file

1 directory, 1 file

Тут лежим доп файл, созданный командой "/bin/sh -c touch my-file" - это можно увидеть в секции history. По сути исходный Dockerfile выглядел так:

FROM alpine:latest
RUN echo Hello
RUN touch my-file

Buildah

В 2017 году Red Hat разработали инструмент для создания образов контейнеров по стандарту OCI - как аналог docker build.

Создадим Dockerfile vim Dockerfile и впишем в него:

FROM alpine:latest
RUN echo Hello
RUN touch my-file

Запустим сборку контейнера на базе этого файла - buildah bud Buildah поддерживает много команд:

buildah images # список образов
buildah rmi # удалить все образы
buildah ps # показать запущенные контейнеры

Почему вдруг buildah ps показ запущенных контейнеров, когда это инструмент для их СОЗДАНИЯ? А потому что в процессе создания как в buildah, так и в docker идёт запуск промежуточных контейнеров, их модификация в runtime. Каждый шаг модификации создаёт записи в history. Это потенциальная проблема ИБ: можно влезть в контейнер, пока он собирается (и запущен), если там что-то большое, и модифицировать его.

Например, приготовим манифест:

FROM debian:buster
RUN apt-get update -y && \
    apt-get install -y clang

Начнём сборку:

docker build -t clang

Залезем в работающий контейнер:

> docker ps
CONTAINER ID        IMAGE               COMMAND                  CREATED             STATUS              PORTS               NAMES
05f4aa4aa95c        54da47293a0b        "/bin/sh -c 'apt-get…"   11 seconds ago      Up 11 seconds                           interesting_heyrovsky

> docker exec -it 05f4aa4aa95c sh
# echo "Hello world" >> my-file

После сборки можно удостовериться, что созданный файл на месте:

> docker run clang cat my-file
Hello world

Создание контейнеров без Dockerfile

У buildah есть императивные команды к любой команде из Dockerfile, типа RUN или COPY. Это даёт огромную гибкость, т.к вместо огромных Dockerfile можно делить процесс создания контейнеров на части, между ними запускать любые вспомогательные инструменты UNIX.

Создадим базовый контейнер с Alpine Linux и посмотрим как он работает:

buildah from alpine:latest
buildah ps

Можно запускать команды в контейнере, а также создать в нёс файл:

> buildah run alpine-working-container cat /etc/os-release
NAME="Alpine Linux"
ID=alpine
VERSION_ID=3.20.3
PRETTY_NAME="Alpine Linux v3.20"
HOME_URL="https://alpinelinux.org/"
BUG_REPORT_URL="https://gitlab.alpinelinux.org/alpine/aports/-/issues"

echo test > file
> buildah copy alpine-working-container test-file file
86f68033be6f25f54127091bb410f2e65437c806e7950e864056d5c272893edb

По-умолчанию, buildah не делает записи history в контейнер, это значит порядок команд и частота их вызова не влияют на итоговые слои. Можно поменять это поведение ключом --add-history или переменной ENV BUILDAH_HISTORY=true.

Сделаем коммит нового контейнера в образ для финализации процесса:

buildah commit alpine-working-container my-image
buildah images # новый образ теперь в локальном реестре

Можно выпустить образ в реестр Docker, либо на локальный диск в формате OCI:

> buildah push my-image oci:my-image
> jq . my-image/index.json
{
  "schemaVersion": 2,
  "manifests": [
    {
      "mediaType": "application/vnd.oci.image.manifest.v1+json",
      "digest": "sha256:bd3f673eb834eb86682a100768a14ae484b554fb42083666ba1b88fe4fe5c1ec",
      "size": 1189
    }
  ]
}

Теперь сделаем в обратную сторону: удалим образ my-image из реестра и вытащим его с диска из формата OCI:

buildah rmi my-image
buildah images
buildah pull oci:my-image

Контейнер alpine-working-container при этом ещё работает. Запустим CLI в контейнере:

buildah run -t alpine-working-container sh
ls
cat file

Проведём mount файл-системы контейнера на локальную (В ДРУГОМ ТЕРМИНАЛЕ):

> buildah unshare --mount MOUNT=alpine-working-container
> echo it-works > "$MOUNT"/test-from-mount
> buildah commit alpine-working-container my-new-image
  • buildah unshare создаёт новое пространство имён, что позволяет подключить файловую систему как текущий не-root пользователь;
  • --mount автоматически подключает, путь кладём в переменную среды MOUNT;
  • Далее мы делаем commit на изменения, и mount на автомате убирается при покидании buildah unshare сессии.

Мы успешно модифицировали файловую систему контейнера через локальный mount. Проверим наличие файла:

> buildah run -t alpine-working-container cat test-from-mount
it-works

Вложенные контейнеры

У buildah нет даемона, значит, не нужно подключать docker.sock в контейнер для работы с Docker CLI. Это даёт гибкость и возможность делать вложенные схемы: установим buildah в контейнер, созданный buildah:

> buildah from opensuse/tumbleweed
tumbleweed-working-container
> buildah run -t tumbleweed-working-container bash
# zypper in -y buildah

Теперь вложенный buildah готов к использованию. Нужно указать драйвер хранения VFS в контейнере, чтобы получить рабочий стек файловой системы:

# buildah --storage-driver=vfs from alpine:latest
# buildah --storage-driver=vfs commit alpine-working-container my-image

Получили вложенный контейнер. Заложим его в хранилище на локальной машине -> для начала заложим образ в /my-image:

buildah --storage-driver=vfs push my-image oci:my-image

Выходим из вложенного контейнера (В ДРУГОМ ТЕРМИНАЛЕ) и копируем образ из рабочего контейнера путём mount его файловой системы:

> buildah unshare
> export MOUNT=$(buildah mount tumbleweed-working-container)
> cp -R $MOUNT/my-image .
> buildah unmount tumbleweed-working-container

Теперь мы вытаскиваем образ контейнера из директории прямо в локальный реестр buildah:

> buildah pull oci:my-image
> buildah images my-image

ВАЖНОЕ ЗАМЕЧАНИЕ: все действия с buildah не потребовали sudo. Buildah создаёт всё необходимое для каждого пользователя в папках:

  • ~/.config/containers, конфигурация
  • ~/.local/share/containers, хранилища контейнеров

Декомпозиция Dockerfile в несколько разных с помощью CPP макросов.

podman

Инструмент для замены Docker. podman использует buildah как API для создания Dockerfile с помощью podman build. Это значит, что они разделяют одно хранилище под капотом. А это значит, что podman может запускать созданные buildah контейнеры:

buildah images
podman run -it my-image sh
/ # ls

Kernel

External link:

chroot

  • Впервые в Minix и UNIX Version 7 (released 1979)
  • В Linux этот syscall - функция ядра kernel API function.
> mkdir -p new-root/{bin,lib64}
> cp /bin/bash new-root/bin
> cp /lib64/{ld-linux-x86-64.so*,libc.so*,libdl.so.2,libreadline.so*,libtinfo.so*} new-root/lib64
> sudo chroot new-root

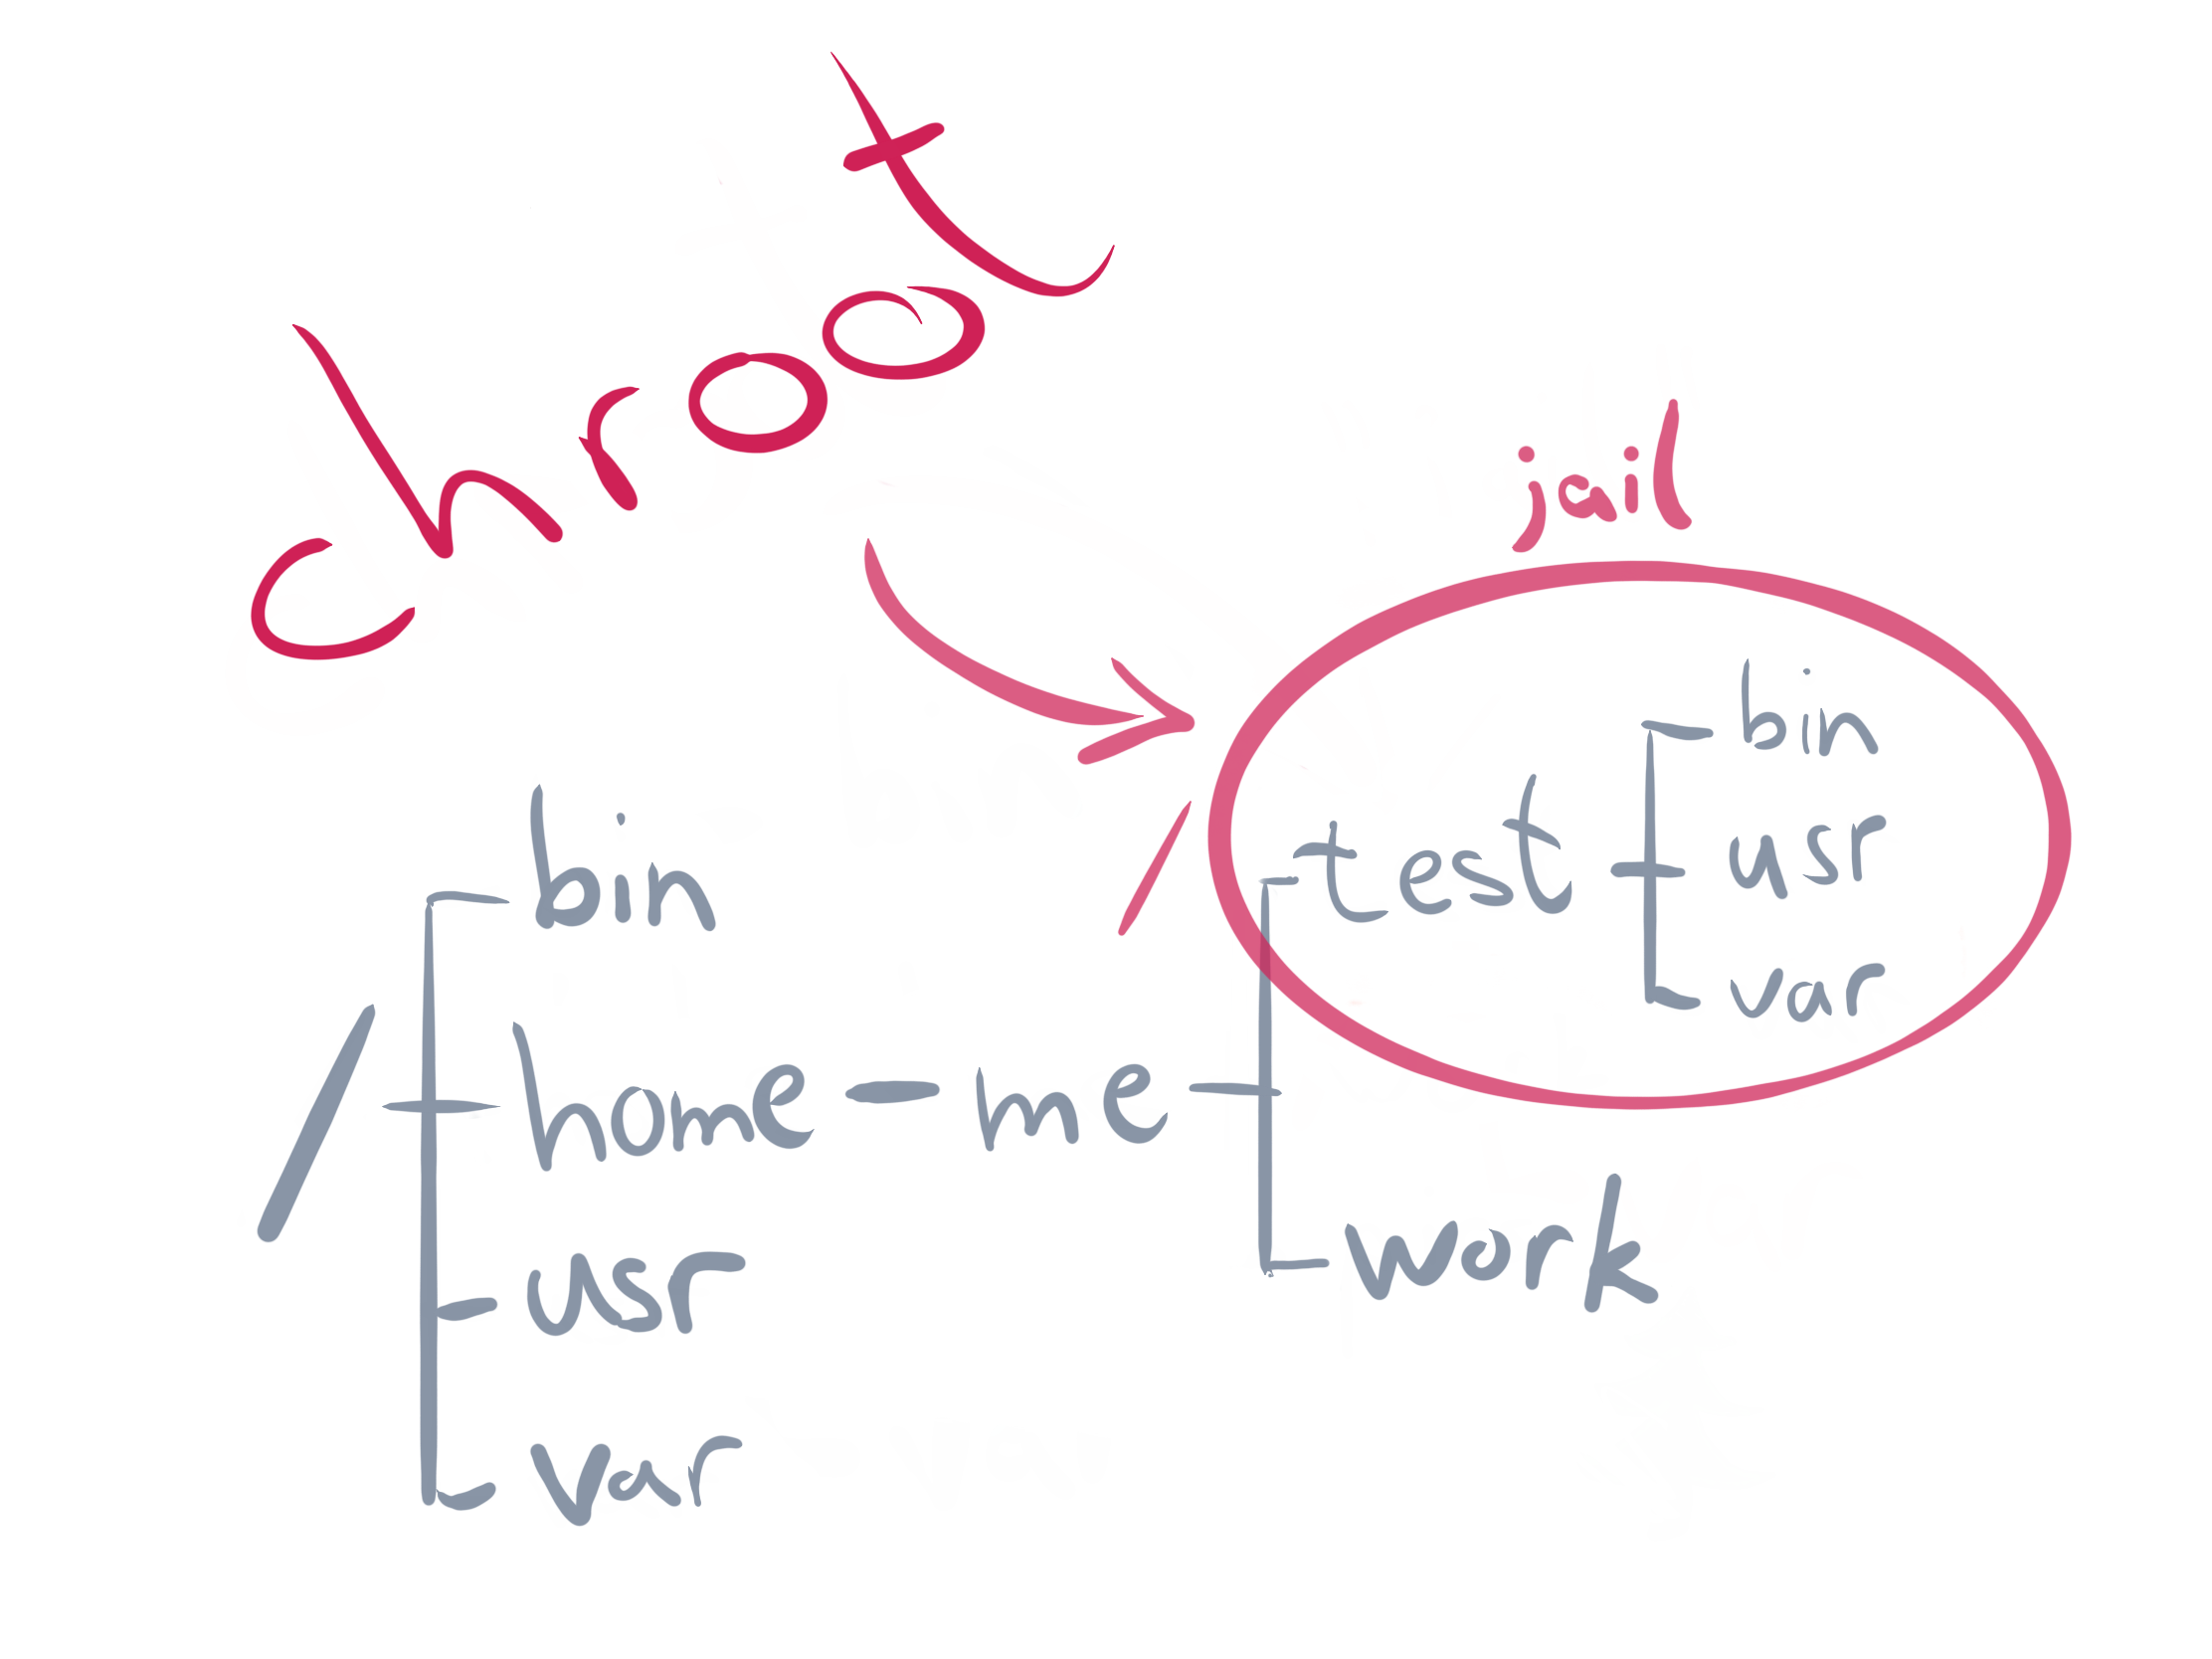
chroot - утилита, которая предназначена для изоляции файловой среды приложения. Создана в Minix 1.7. Для процессов и ОЗУ не подходит, но вдохновила создание Namespaces в Linux позднее.

Пример работы

Для работы bash в новой среде chroot необходимо внести его копию в папку jail:

mkdir $HOME/jail
mkdip -p $HOME/jail/bin
cp -v /bin/bash $HOME/jail/bin
cp -v /bin/ls $HOME/jail/bin

Далее нужно увидеть зависимости и перенести их:

ldd /bin/bash
ldd /bin/ls

Либо, гораздо проще перенести разом все библиотеки:

cp -a /usr jail/
cp -a /lib jail/
cp -a /lib64 jail/

Далее, заход в окружение:

sudo chroot $HOME/jail /bin/bash
bash-5.0# ls
bin  lib  lib64  usr


#### Побег из chroot
```c
#include <sys/stat.h>
#include <unistd.h>
int main(void)
{
    mkdir(".out", 0755); // нужны права root в контейнере 
    chroot(".out");
    chdir("../../../../../"); // относительный путь за пределы корня
    chroot(".");
    return execl("/bin/bash", "-i", NULL);
}
  • Only privileged processes with the capability CAP_SYS_CHROOT are able to call chroot.
  • Modern systems use pivot_mount (calling process must have the CAP_SYS_ADMIN capability). - has the benefit of putting the old mounts into a separate directory on calling.

Linux Namespaces

  • Задача: обернуть системные ресурсы в уровень абстракции;
  • Introduced in Linux 2.4.19 (2002), became “container ready” in 3.8 in 2013 with the introduction of the user namespace;
  • Seven distinct namespaces implemented: mnt, pid, net, ipc, uts, usercgroup; time and syslog introduced in 2016;
  • функция clone . Создаёт дочерние процессы. Unlike fork(2), the clone(2) API allows the child process to share parts of its execution context with the calling process, such as the memory space, the table of file descriptors, and the table of signal handlers. You can pass different namespace flags to clone(2)to create new namespaces for the child process.

unshare(2) - отсоединение частей контекста выполнения процесса.

setns(2) позволяет запрашивающему процессу присоединяться в разные namespaces.

proc - Besides the available syscalls, the proc filesystem populates additional namespace related files. Since Linux 3.8, each file in /proc/$PID/ns is a “magic“ link which can be used as a handle for performing operations (like setns(2)) to the referenced namespace.

> ls -Gg /proc/self/ns/
total 0
lrwxrwxrwx 1 0 Feb  6 18:32 cgroup -> 'cgroup:[4026531835]'
lrwxrwxrwx 1 0 Feb  6 18:32 ipc -> 'ipc:[4026531839]'
lrwxrwxrwx 1 0 Feb  6 18:32 mnt -> 'mnt:[4026531840]'
lrwxrwxrwx 1 0 Feb  6 18:32 net -> 'net:[4026532008]'
lrwxrwxrwx 1 0 Feb  6 18:32 pid -> 'pid:[4026531836]'
lrwxrwxrwx 1 0 Feb  6 18:32 pid_for_children -> 'pid:[4026531836]'
lrwxrwxrwx 1 0 Feb  6 18:32 user -> 'user:[4026531837]'
lrwxrwxrwx 1 0 Feb  6 18:32 uts -> 'uts:[4026531838]'

mnt namespace

Ввели в 2002 первым, ещё не знали, что понадобится много разных, потому обозвали флаг клонирования CLONE_NEWNS, что не соответствует флагам других namespaces. С помощью mnt в Linux можно изолировать группу точек монтирования для групп процессов.

> sudo unshare -m
# mkdir mount-dir
# mount -n -o size=10m -t tmpfs tmpfs mount-dir
# df mount-dir

We have a successfully mounted tmpfs, which is not available on the host system level:

> ls mount-dir
> grep mount-dir /proc/mounts

The actual memory being used for the mount point is laying in an abstraction layer called Virtual File System (VFS), which is part of the kernel and where every other filesystem is based on.

> grep mount-dir /proc/$(pgrep -u root bash)/mountinfo

Можно создавать на лету гибкие файловые системы. Mounts can have different flavors (shared, slave, private, unbindable), which is best explained within the shared subtree documentation of the Linux kernel.

uts namespace (UNIX Time-sharing System)

Ввели в 2006 в Linux 2.6.19. Можно отсоединить домен и имя хоста от системы.

> sudo unshare -u
# hostname
nb
# hostname new-hostname
# hostname
new-hostname

And if we look at the system level nothing has changed, hooray:

exit
> hostname
nb

ipc namespace

Ввели в 2006 в Linux 2.6.19. Можно изолировать связи между процессами. Например, общую память (shared memory = SHM) между процессами. Два процесса будут использовать 1 идентификатор для общей памяти, но при этом писать в 2 разных региона памяти.

pid namespace (Process ID)

Ввели в 2008 в Linux 2.6.24. Возможность для процессов иметь одинаковые PID в разных namespace. У одного процесса могут быть 2 PID: один внутри namespace, а второй вовне его - на хост системе. Можно делать вложенные namespace, и тогда PID у 1 процесса будет больше. Первый процесс в namespace получается PID=1 и привилегии init-процесса.

> sudo unshare -fp --mount-proc
# ps aux

Флаг --mount-proc нужен чтобы переподключить proc filesystem из нового namespace. Иначе PID в namespace будут не видны.

net namespace (Network)

Ввели в 2009 в Linux 2.6.29 для виртуализации сетей. Каждая сеть имеет свои свойства в разделе /proc/net. При создании нового namespace он содержит только loopback интерфейсы. Создадим:

> sudo unshare -n
# ip l
# ip a
  • Каждый интерфейс (физ или вирт) присутствует единожды в каждом namespace. Интерфейсы можно перемещать между namespace;
  • Каждый namespace имеет свой набор ip, таблицу маршрутизации, список сокетов, таблицу отслеживания соединений, МЭ и т.д. ресурсы;
  • Удаление net namespace разрушает все вирт интерфейсы и перемещает оттуда все физические.

Применение: создание SDN через пары виртуальных интерфейсов. Один конец пары подключается к bridge, а другой конец - к целевому контейнеру. Так работают CNI типа Flannel.
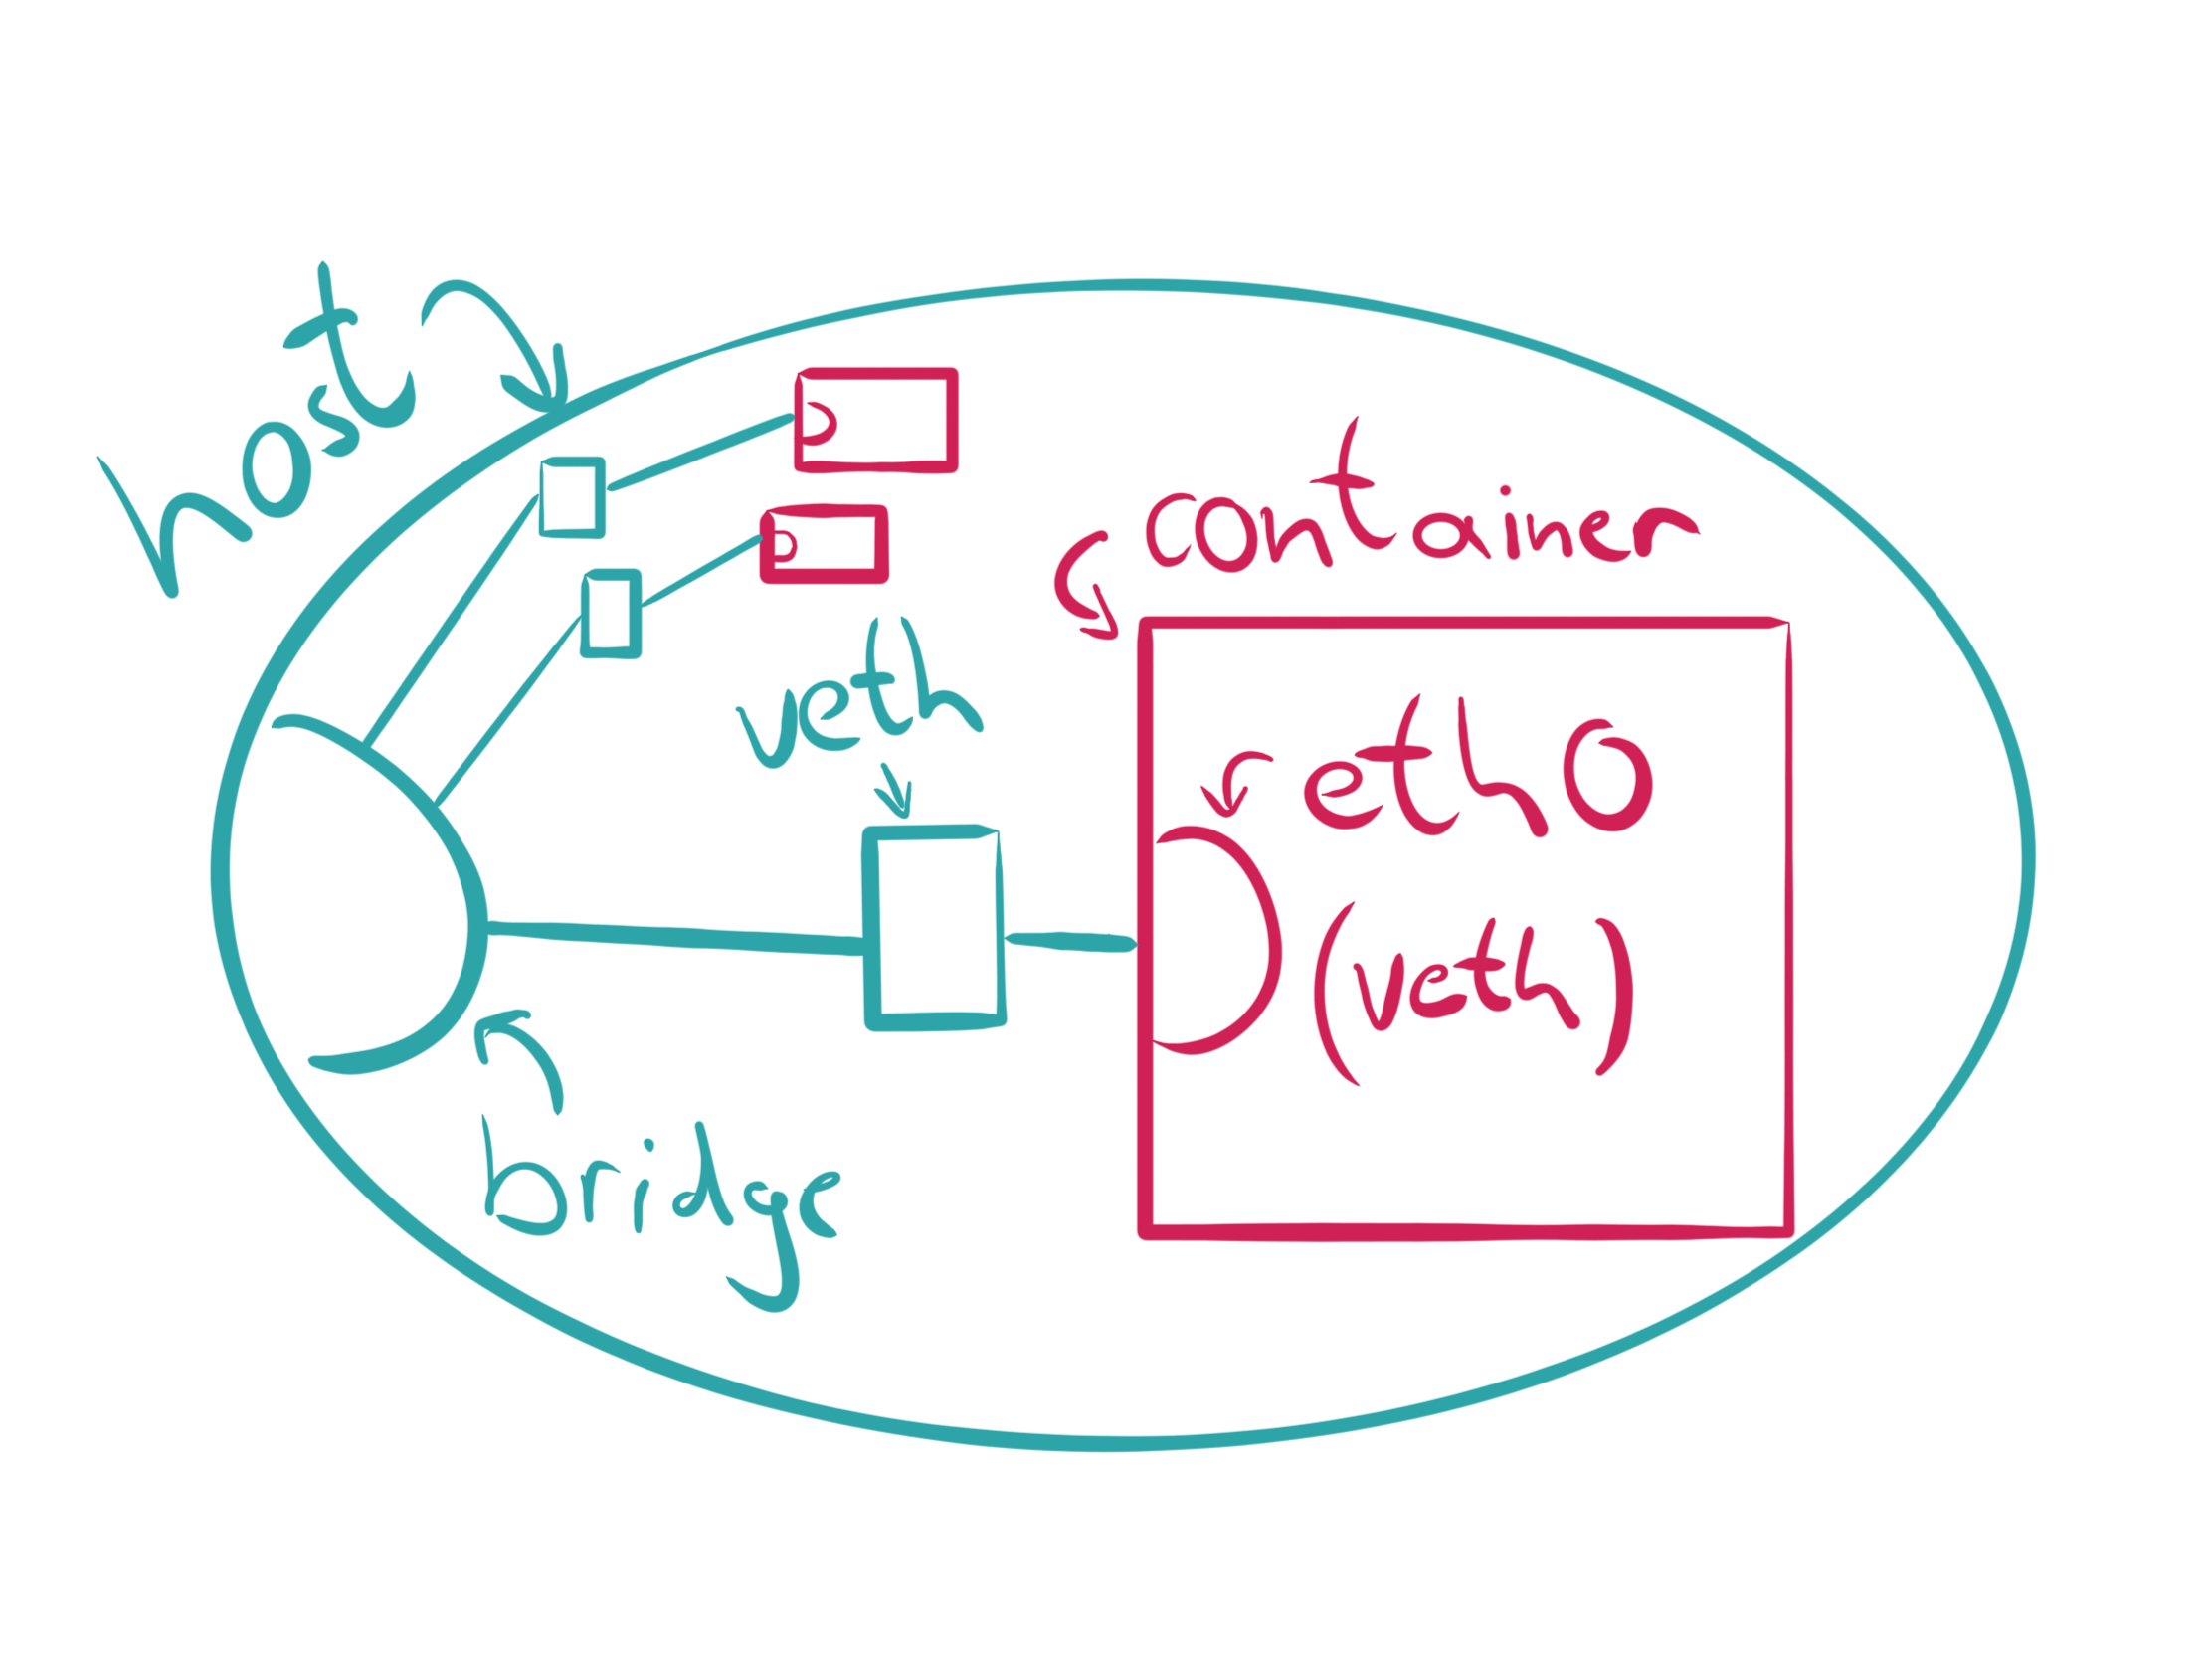
Создадим новый net namepsace:

> sudo ip netns add mynet
> sudo ip netns list
mynet

Когда команда ip создаёт network namespace, она создаёт it will create a bind mount for it under /var/run/netns too. This allows the namespace to persist even when no processes are running within it.

> sudo ip netns exec mynet ip l
> sudo ip netns exec mynet ping 127.0.0.1

The network seems down, let’s bring it up:

> sudo ip netns exec mynet ip link set dev lo up
> sudo ip netns exec mynet ping 127.0.0.1

Let’s create a veth pair which should allow communication later on:

> sudo ip link add veth0 type veth peer name veth1
> sudo ip link show type veth

Both interfaces are automatically connected, which means that packets sent to veth0 will be received by veth1 and vice versa. Now we associate one end of the veth pair to our network namespace:

> sudo ip link set veth1 netns mynet
> ip link show type veth

Добавляем адреса ip:

> sudo ip netns exec mynet ip addr add 172.2.0.1/24 dev veth1
> sudo ip netns exec mynet ip link set dev veth1 up
> sudo ip addr add 172.2.0.2/24 dev veth0
> sudo ip link set dev veth0 up

Теперь можно связываться в обе стороны:

> ping -c1 172.2.0.1
> sudo ip netns exec mynet ping -c1 172.2.0.2

It works, but we wouldn’t have any internet access from the network namespace. We would need a network bridge or something similar for that and a default route from the namespace.

user namespace

Ввели в 2012-2013 в Linux 3.5-3.8 для изоляции пользователей, групп пользователей. Пользователь получает разные ID внутри и вовне namespace, а также разные привилегии.

> id -u
1000
> unshare -U
> whoami
nobody

После создания namespace, файлы /proc/$PID/{u,g}id_map раскрывают соответствия user+groupID и PID. Эти файлы пишутся лишь единожды для определения соответствий.

> cat /proc/$PID/uid_map
0 1000 1

cgroups

Ввели в 2008 в Linux 2.6.24 для квотирования и далее переделали капитально в 2016 в Linux 4.6 - ввели cgroups namespace.

Cgroup version check:

stat -fc %T /sys/fs/cgroup/

For cgroup v2, the output is cgroup2fs. For cgroup v1, the output is tmpfs.

cgroups memory limit

Cgroups memory.limit_in_bytes was deprecated because it is prone to race condition: https://www.kernel.org/doc/html/latest/admin-guide/cgroup-v2.html#deprecated-v1-core-features

Использовать memory.max (in bytes)! https://www.kernel.org/doc/html/latest/admin-guide/cgroup-v2.html#namespace

Система выдаёт список ограничений. Поменяем ограничения памяти для этой cgroup. Также отключим swap, чтобы реализация сработала:

unshare -c # unshare cgroupns in some cgroup

cat /proc/self/cgroup
sudo mkdir /sys/fs/cgroup/demo
cd /sys/fs/cgroup/demo/
sudo su
echo 100000000 > memory.max
echo 0 > memory.swap.max

cat /proc/self/cgroup
echo 0 > cgroup.procs
cat /proc/self/cgroup

После того как установлено ограничение в 100Mb памяти ОЗУ, напишем приложение, которое забирает память больше чем положенные 100Mb (в случае отсутствия ограничений приложение закрывается при занятии 200Mb):

fn main() {
    let mut vec = vec![];
    let max_switch: usize = 20; // запасное ограничение =200Mb
    let mut memcount: usize;
    loop {
        vec.extend_from_slice(&[1u8; 10_000_000]);
        memcount = vec.len() / 10_000_000;
        println!("{}0 MB", memcount);
        if memcount > max_switch {
            break;
        }
    }
    println!("Program terminated by MAX MEM = {}0 Mb", memcount);
}

Если его запустить, то увидим, что PID будет убит из-за ограничений памяти:

# rustc memory.rs
# ./memory
10 MB
20 MB
30 MB
40 MB
50 MB
60 MB
70 MB
80 MB
90 MB
Killed

Составление пространств имен

Можно составлять пространства имён вместе, чтобы они делили 1 сетевой интерфейс. Так работают k8s Pods. Создадим новое пространство имён с изолированным PID:

> sudo unshare -fp --mount-proc
# ps aux
USER       PID %CPU %MEM    VSZ   RSS TTY      STAT START   TIME COMMAND
root         1  0.1  0.6  18688  6904 pts/0    S    23:36   0:00 -bash
root        39  0.0  0.1  35480  1836 pts/0    R+   23:36   0:00 ps aux

Вызов ядра setns с приложением-обёрткой nsenter теперь можно использовать для присоединения к пространству имён. Для этого нужно понять, в какое пространство мы хотим присоединиться:

> export PID=$(pgrep -u root bash)
> sudo ls -l /proc/$PID/ns

Теперь присоединяемся с помощью nsenter:

> sudo nsenter --pid=/proc/$PID/ns/pid unshare --mount-proc
# ps aux
root         1  0.1  0.0  10804  8840 pts/1    S+   14:25   0:00 -bash
root        48  3.9  0.0  10804  8796 pts/3    S    14:26   0:00 -bash
root        88  0.0  0.0   7700  3760 pts/3    R+   14:26   0:00 ps aux

Своё приложение, создающее контейнер

https://brianshih1.github.io/mini-container/preface.html

runc

Система сборки и запуска контейнеров:

> sudo runc run -b bundle container

Можно исследовать, что runc создал mnt, uts, ipc, pid и net:

> sudo lsns | grep bash
4026532499 mnt         1  6409 root   /bin/bash
4026532500 uts         1  6409 root   /bin/bash
4026532504 ipc         1  6409 root   /bin/bash
4026532505 pid         1  6409 root   /bin/bash
4026532511 net         1  6409 root   /bin/bash

Runtime

External Link:

В 2007 году Google сделали проект Let Me Contain That For You (LMCTFY), в 2008 году появился Linux Containers (LXC). Для управления LXC в 2013 году появился инструмент Docker. Далее в 2015, команда Docker разработали проект libcontainer на языке Go. Также, в 2015 вышел Kubernetes 1.0. В 2015 собрали Open Container Initiative (OCI), которые стали разрабатывать стандарты на метаданные (манифесты-спецификации), образы контейнеров, методы управления ими. В том числе, в рамках OCI создали инструмент запуска и работы с контейнерами runc.

runc

sudo apt install runc
runc spec
cat config.json

В спецификации от runc можно увидеть всё необходимое для создания и запуска контейнера: environment variables, user + group IDs, mount points, Linux namespaces. Не хватает только файловой системы (rootfs), базового образа контейнера:

sudo apt install skopeo, umoci # Ubuntu 2404+
skopeo copy docker://opensuse/tumbleweed:latest oci:tumbleweed:latest
sudo umoci unpack --image tumbleweed:latest bundle

В распакованном образе можно найти готовую Runtime Specification:

sudo chown -R $(id -u) bundle
cat bundle/config.json

В ней можно увидеть обычные поля из runc, а доп заполненные annotations:

  "annotations": {
    "org.opencontainers.image.title": "openSUSE Tumbleweed Base Container",
    "org.opencontainers.image.url": "https://www.opensuse.org/",
    "org.opencontainers.image.vendor": "openSUSE Project",
    "org.opencontainers.image.version": "20190517.6.190",

Чтобы создать контейнер с runc, нужно его зацепить на терминал ввода команд TTY:

sudo runc create -b bundle container

ERRO[0000] runc create failed: cannot allocate tty if runc will detach without setting console socket

На существующий TTY зацепить контейнер нельзя (потому что окно удалённого xTerm не поддерживает такое), нужно создать новый виртуальный TTY и указать его сокет. Для этого надо установить Golang, скачать приложение rectty, создать с его помощью виртуальный терминал, после чего В ДРУГОМ ОКНЕ терминала создать контейнер и зацепить его на создвнный TTY:

sudo apt install wget
wget https://go.dev/dl/go1.23.3.linux-amd64.tar.gz
sudo tar -C /usr/local -xzf go1.23.3.linux-amd64.tar.gz

/usr/local/go/bin/go install github.com/opencontainers/runc/contrib/cmd/recvtty@latest

rectty tty.sock

В ДРУГОМ ОКНЕ терминала создать контейнер и зацепить его на создвнный TTY:

sudo runc create -b bundle --console-socket $(pwd)/tty.sock container
sudo runc list # контейнер в статуса created, не запущен
sudo runc ps container # посмотрим что внутри него
UID        PID  PPID  C STIME TTY          TIME CMD
root     29772     1  0 10:35 ?        00:00:00 runc init

runc init создаёт новую среду со всеми namespaces. /bin/bash ещё не запущен в контейнере, но уже можно запускать в нём свои процессы, полезно чтоб настроить сеть:

sudo runc exec -t container echo "Hello, world!"
Hello, world!

Для запуска контейнера выполним:

sudo runc start container
sudo runc list
sudo runc ps container
UID        PID  PPID  C STIME TTY          TIME CMD
root      6521  6511  0 14:25 pts/0    00:00:00 /bin/bash

Исходный runc init пропал, теперь только /bin/bash существует в контейнере. На ПЕРВОМ ОКНЕ терминала появилась консоль контейнера:

$ ps aux
ps aux
USER       PID %CPU %MEM    VSZ   RSS TTY      STAT START   TIME COMMAND
root         1  0.0  0.0   5156  4504 pts/0    Ss   10:28   0:00 /bin/bash
root        29  0.0  0.0   6528  3372 pts/0    R+   10:32   0:00 ps aux

Можно проверить управление: заморозим контейнер. Во ВТОРОМ ОКНЕ терминала выполним:

sudo runc pause container
# в первом окне ввод команд прервётся
sudo runc resume container

# Рассмотрим события контейнера:
sudo runc events container
#{...}

Для остановки контейнера достаточно выйти из rectty-сессии, после чего удалить контейнер. Остановленный контейнер нельзя перезапустить, можно лишь пересоздать в новом состоянии:

> sudo runc list
ID          PID         STATUS      BUNDLE      CREATED                         OWNER
container   0           stopped     /bundle     2019-05-21T10:28:32.765888075Z  root
> sudo runc delete container
> sudo runc list
ID          PID         STATUS      BUNDLE      CREATED     OWNER

Можно модифицировать спецификацию в контейнере (bundle/config.json):

> sudo apt install moreutils, jq # инструмент jq для работы с JSON
> cd bundle
> jq '.process.args = ["echo", "Hello, world!"]' config.json | sponge config.json
> sudo runc run container
> Hello, world!

Можно удалить разделение PID namespace процессов в контейнере с хостом:

> jq '.process.args = ["ps", "a"] | del(.linux.namespaces[0])' config.json | sponge config.json
> sudo runc run container
16583 ?        S+     0:00 sudo runc run container
16584 ?        Sl+    0:00 runc run container
16594 pts/0    Rs+    0:00 ps a
[output truncated]
  • runc очень низкоуровневый и позволяет серьёзно нарушить работу и безопасность контейнеров.
  • Поэтому сделаны надстройки обеспечения ИБ уровня ОС: seccomp, SELinux и AppArmor
  • Однако, их намного удобнее использовать на уровне управления выше
  • Для защиты также можно запускать контейнеры в режиме rootless из runc
  • С помощью runc нужно руками настраивать сетевые интерфейсы, очень трудоемко

CRI-O

Инструмент CRI-O разработан в 2016 при участии OCI в рамках проекта Kubernetes. Философия UNIX, максимально лёгкий аналог Docker/containerd. Он НЕ предназначен как инструмент для приёма команд от разработчиков. Задача - принимать команды от K8s. Внутри себя CRI-O использует runc как backend, и принимает команды по gRPC API как frontend.

Попробуем CRI-O с помощью спец-контейнера с crictl:

sudo apt install podman
sudo vim /etc/containers/registries.conf
# нужно задать репозиторий для скачивания:
# unqualified-search-registries=["docker.io"] 
sudo podman run --privileged -h crio-playground -it saschagrunert/crio-playground

Внутри лежит файл sandbox.yml:

---
metadata:
  name: sandbox
  namespace: default
dns_config:
  servers:
    - 8.8.8.8

Из него можно создать Pod:

$ crictl runp sandbox.yml
5f2b94f74b28c092021ad8eeae4903ada4b1ef306adf5eaa0e985672363d6336

SSG Hugo

Install (on NIX)

Need to install:

Choose a site directory and create site + repo:

hugo new site ./
git init
git add *
git commit -m "Initial commit"
cd themes/
git submodule add https://github.com/halogenica/beautifulhugo.git themes/beautifulhugo
git status
git add *
git commit -m "Theme added"

Some themes (Relearn) have to be downloaded as zip. So we have a git repo inside a git repo now. Copy contents exampleSite of theme:

cp -r themes/hugo-theme-relearn/exampleSite/* ./

Launch local web-server:

hugo server

Visit local site and check it.

Gitlab sync

Create a Gitlab account, make SSH Key exchange. After that, create project by CLI from hugo site folder:

git branch -m master main # change master to main branch for gitlab
git push --set-upstream git@gitlab.com:aagern/hugotest.git main

Where hugotest.git is the project name.

  • Click Setup CI/CD button.

Use Hugo template (should be in Gitlab):

---
# All available Hugo versions are listed here:
# https://gitlab.com/pages/hugo/container_registry
# image: "${CI_TEMPLATE_REGISTRY_HOST}/pages/hugo:latest"
image:
  name: "${CI_TEMPLATE_REGISTRY_HOST}/pages/hugo:latest"
  entrypoint: ["/bin/sh", "-c"]
variables:
  GIT_SUBMODULE_STRATEGY: recursive
test:
  script:
    - hugo
  except:
    variables:
      - $CI_COMMIT_BRANCH == $CI_DEFAULT_BRANCH
pages:
  script:
    - hugo
  artifacts:
    paths:
      - public
  only:
    variables:
      - $CI_COMMIT_BRANCH == $CI_DEFAULT_BRANCH
  environment: production

Change visibility: Settings -> General -> Pages visibility = Everyone.