SHIFT+D - Grade Bypass (Disable). Disable all nodes to see the original image;
CTRL+D - Grade Bypass (Disable) on current node;
SHIFT+H - see node mask, or qualifier mask etc. in monitor windows;
CTRL+F - See preview window in Full screen.
Create nodes
ALT+S - New Corrector (Serial) AFTER selected node;
SHIFT+S - New Corrector (Serial) BEFORE selected node;
ALT+L - Add Layer lower than current node;
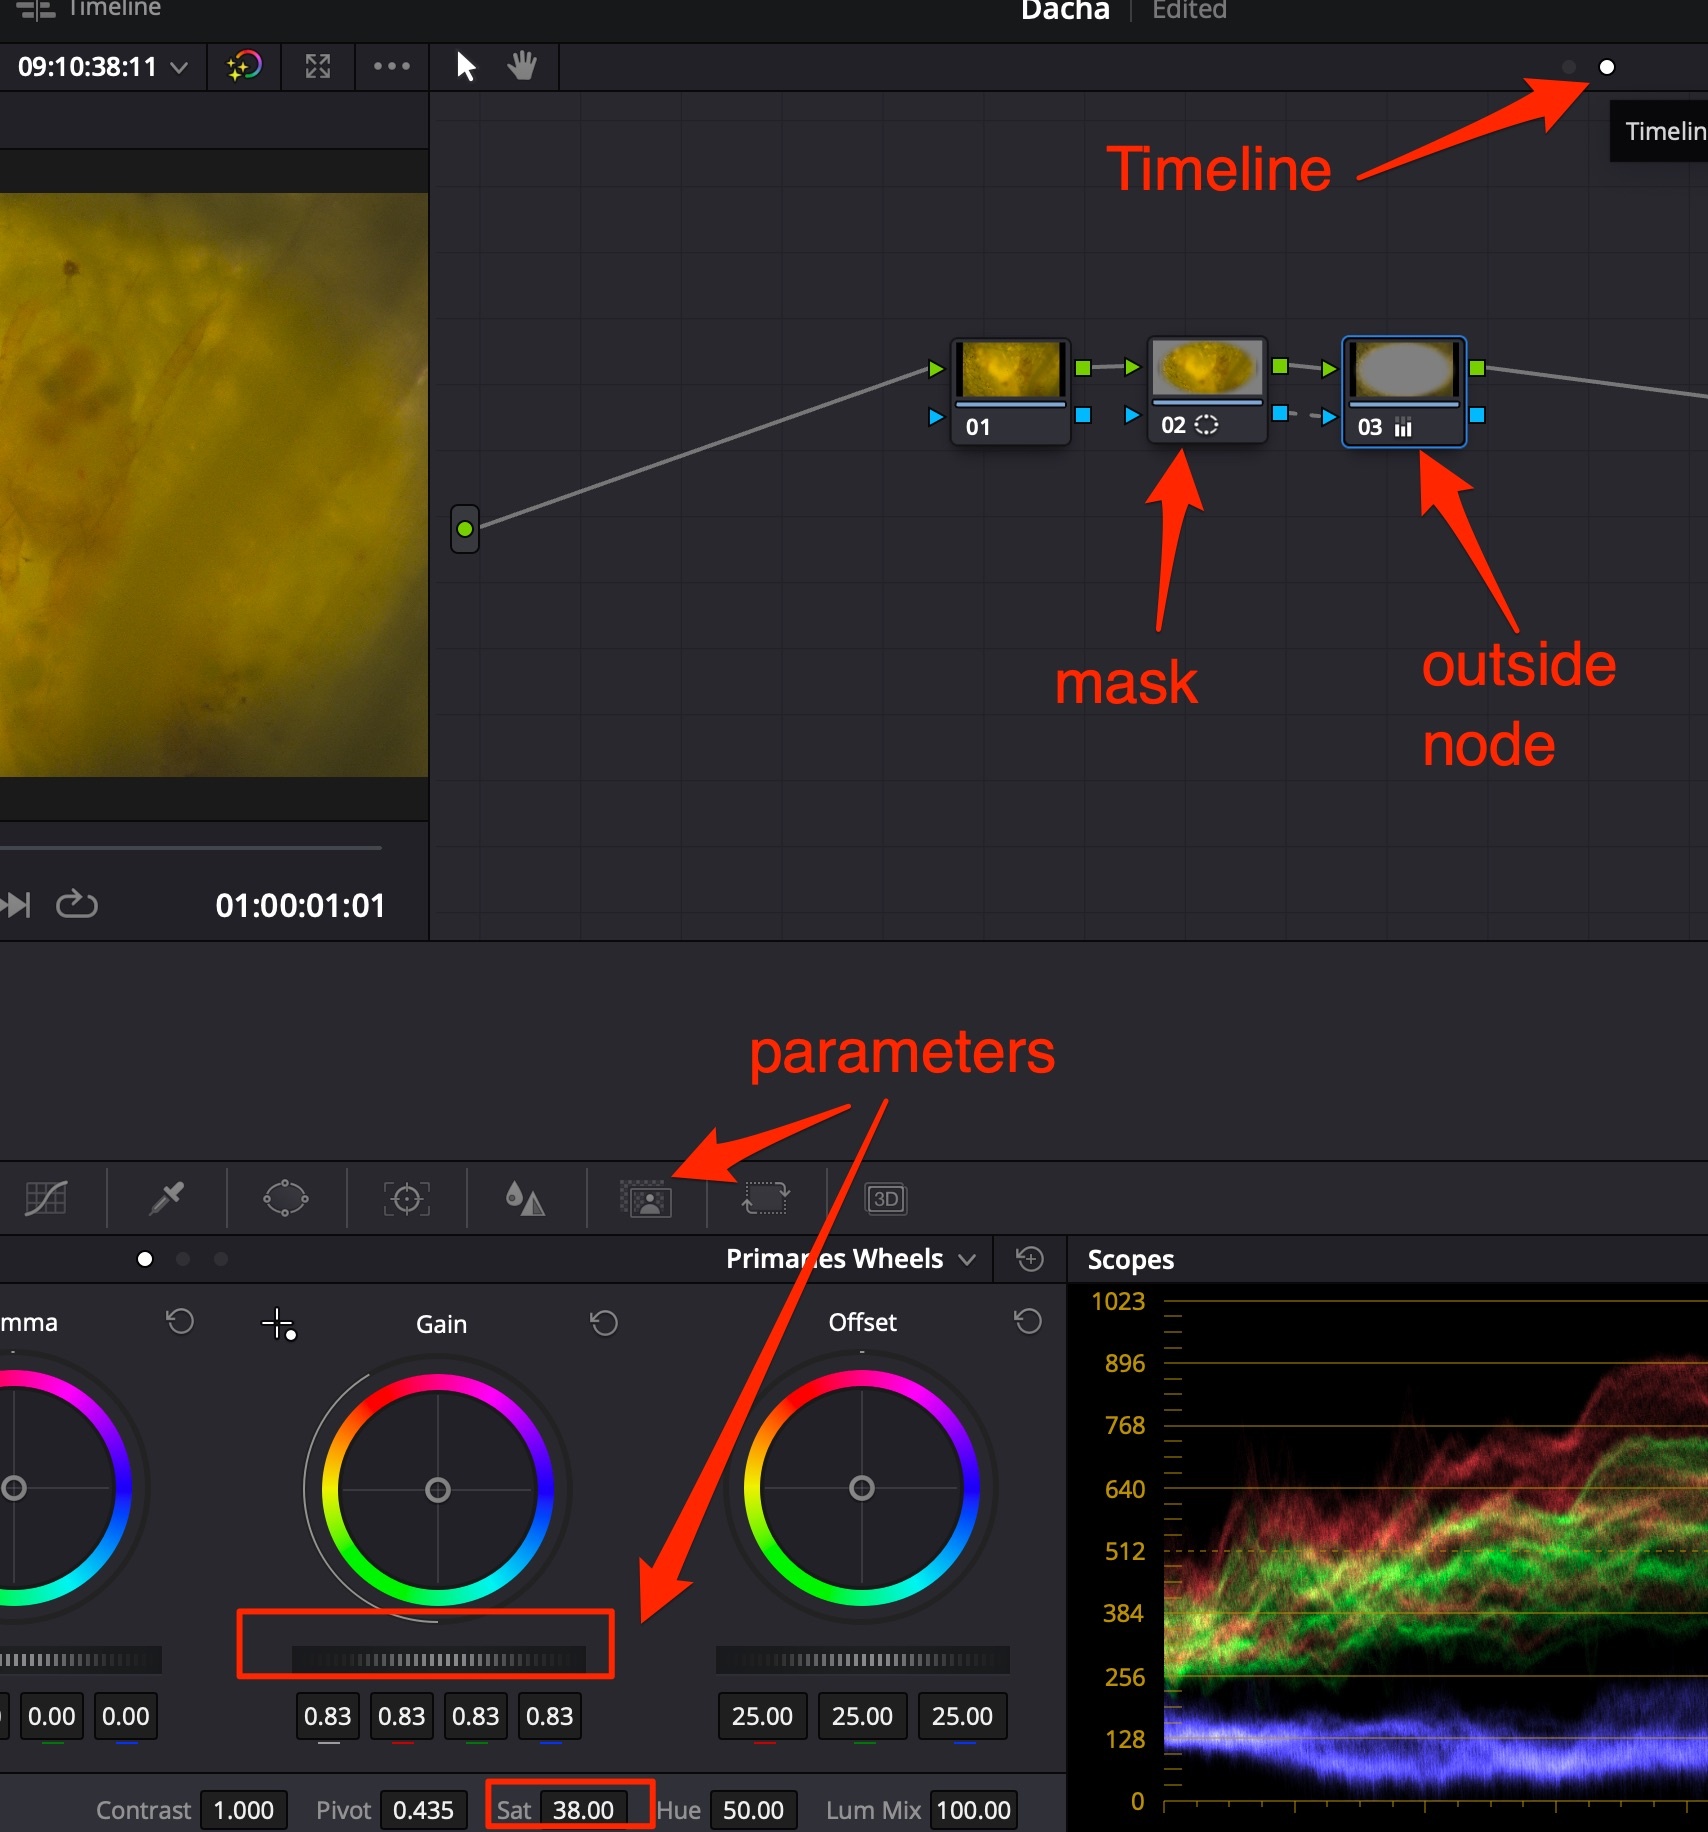
ALT+O - New Outside node (Includes everything NOT selected in previous node)
ALT+P - New Parallel node.
Tracker
CTRL+T - Track mask forward;
ALT+T - Track mask backward.
Versions
CTRL+Y - add new color grade version;
CTRL+N - switch to next version;
CTRL+B - switch to previous version.
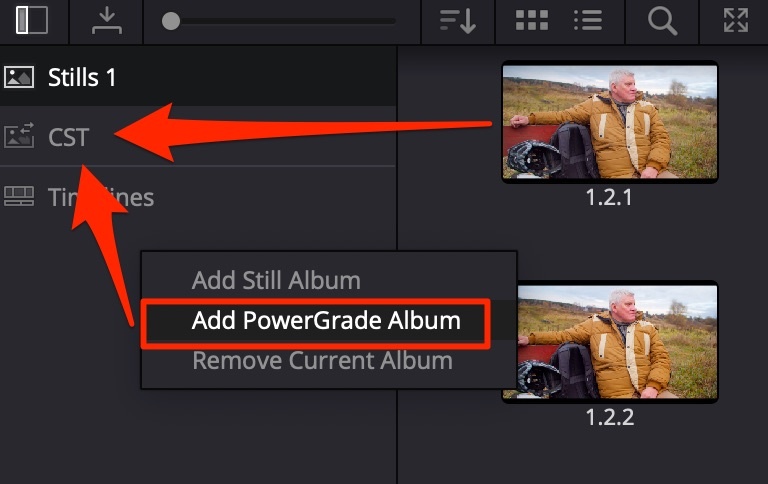
PowerGrades
Create a PowerGrade folder to store color grading across all projects.
Captured stills can be put into this folder → go into the DaVinci Database and are shared across all projects. A convenient way to store ready-made Color Space Transforms for different camera colorspace/gamma types. Use Append Node Graph to apply the grade, do NOT use Apply Grade since this changes the original ISO of the footage, which may differ in the specific scene.
Tracker
Cloud tracker - tracks using a whole mask with all its’ points.
Point tracker - needs control points on contrast areas, which it uses to track.
Stills
Right-click on footage → Grab Still: this saves the footage with currently applied grade. After any changes to the image, you can find the still in Gallery, and:
double-clickon still to make a A|B compare picture. CTRL+W to see changes on full screen (disable still);
right-click → Apply Grade to apply to what was saved. Stills can be applied to any footage to copy correction or try interesting results.
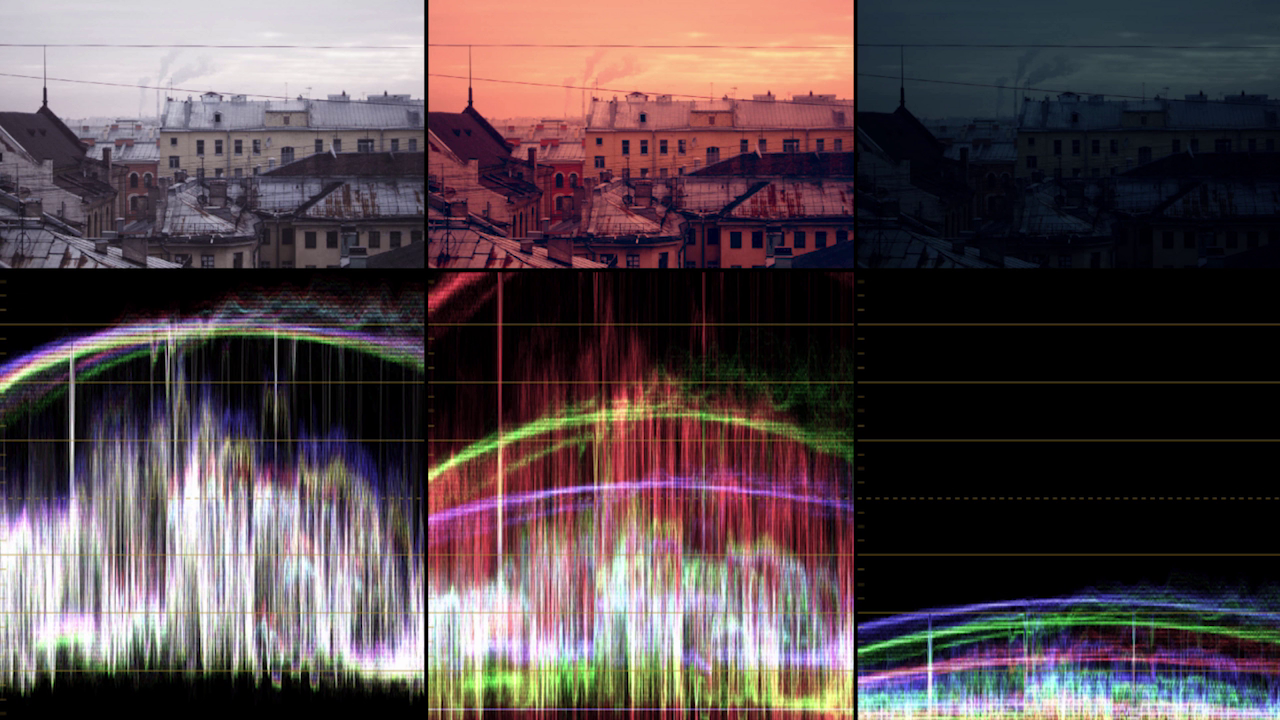
Закат - много красного, оранжевого в средних и в светлых тонах, синий цвет в тенях противопоставляется;
Рассвет - более холодный чем закат, больше зелёного чем красного/оранжевого;
Ночь - в кино обычно синяя ночь, чем чёрная. Небо сохраняет светлость;
Унылый серый город - снизить насыщенность (Saturation), чтобы это подчеркнуть.
Цвет в портрете
Хакрактер рисуется контрастом. Обычно грейдинг начинается с опусканием вниз теней. Дальше отделение от фона.
Работа с ЧБ портретом
Человек не воспринимает ЧБ как именно ЧБ, он ищет и выдумывает немного цвета. Поэтому ЧБ не делают полностью лишённым цвета, его чуть-чуть подкрашивают для придания настроения: для тёплого настроения подкрашивают в коричневый, для “глянцево-журнального” настроения - в синий. Количество подкраса совсем маленькое, совсем чуть-чуть, как петрушка в супе.
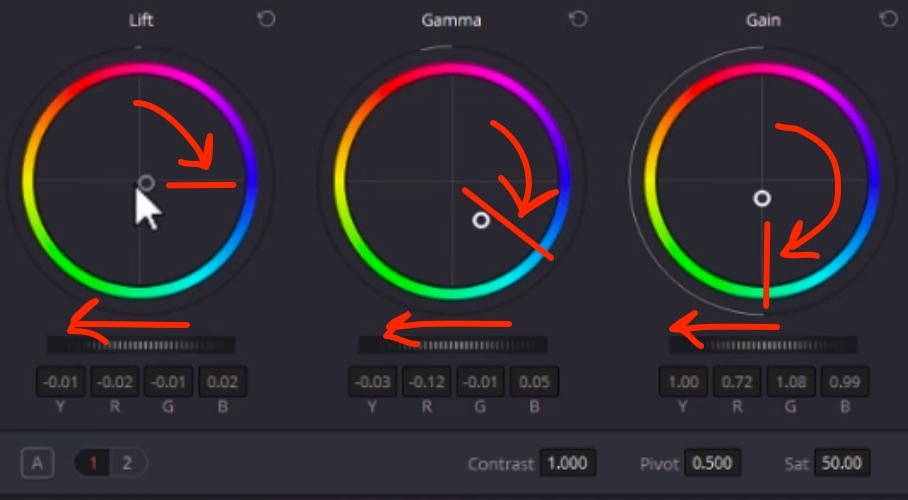
Teal & Orange
Start by grading the image into nice blue using all color wheels (Lift, Gamma, Gain), and distribute the wheels in a clockwise fashion between each other!
All colors in the image turn blue, but shadows have to stay neutral: user the Log wheels to fine tune: Shadow, Midtone, Highlight wheels between Low Range (default lower than 33% = shadows) and High Range (default higher than 66% = highlights). Turn the Shadow wheel to blue counterpart to make shadows neutral. Lower the Low Range (around 10%) so that midtones are not affected;
THEN mask out skin and other “warm elements” in the picture (in parallel node) and grade them into the opposite color - yellow-orange;
Use the Log wheels to balance the colors: make a soft bridge between warm skin and cold background by turning Shadow wheel to green a bit, Highlight to magenta;
Balance the footage colors, so the color work together, and not appear as isolated elements: one cheater method to do this is to radically darken the background. Since with teal&orange we get the maximum color contrast, it is better to make the light contrast stronger as well. Another method is to make subtle changes - bring the overcolored ares back by lowering saturation, for example.
Color Wheels → Color Boost (number in the below section) - increases/decreases the saturation of the MOST SATURATED colors in the image. Helps if you have some over-saturated colors which you want to level down, without touching the rest if the image.
Add Saturation to high values, then subtract Color Boost to remove color spills. Example: vegetables in a white glass bowl will pass their color to the bowl. To keep it white, subtract Color Boost.
Цветокоррекция и покрас плёночного кино
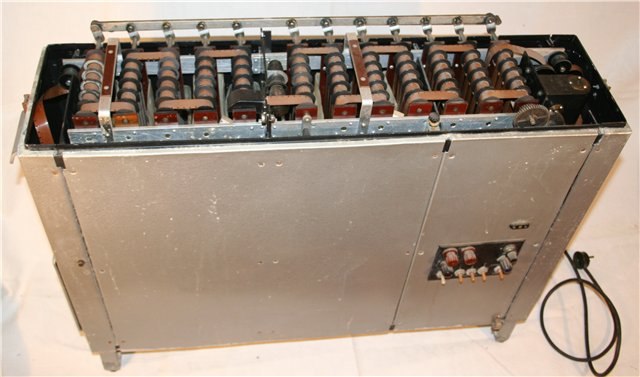
В плёночном кино грейдинг являлся этапом PRE-Production. Это связано с необходимостью подбора правильной плёнки, дающей нужную гамму цветов. Для проявки плёнки проявочные машины (пример - российская машина МПМ—16—3М), которые работали по заданному СТАНДАРТУ.
Videocard sends a signal to the monitor, divided in 2 components: COLORSPACE (color) and GAMMA (light)
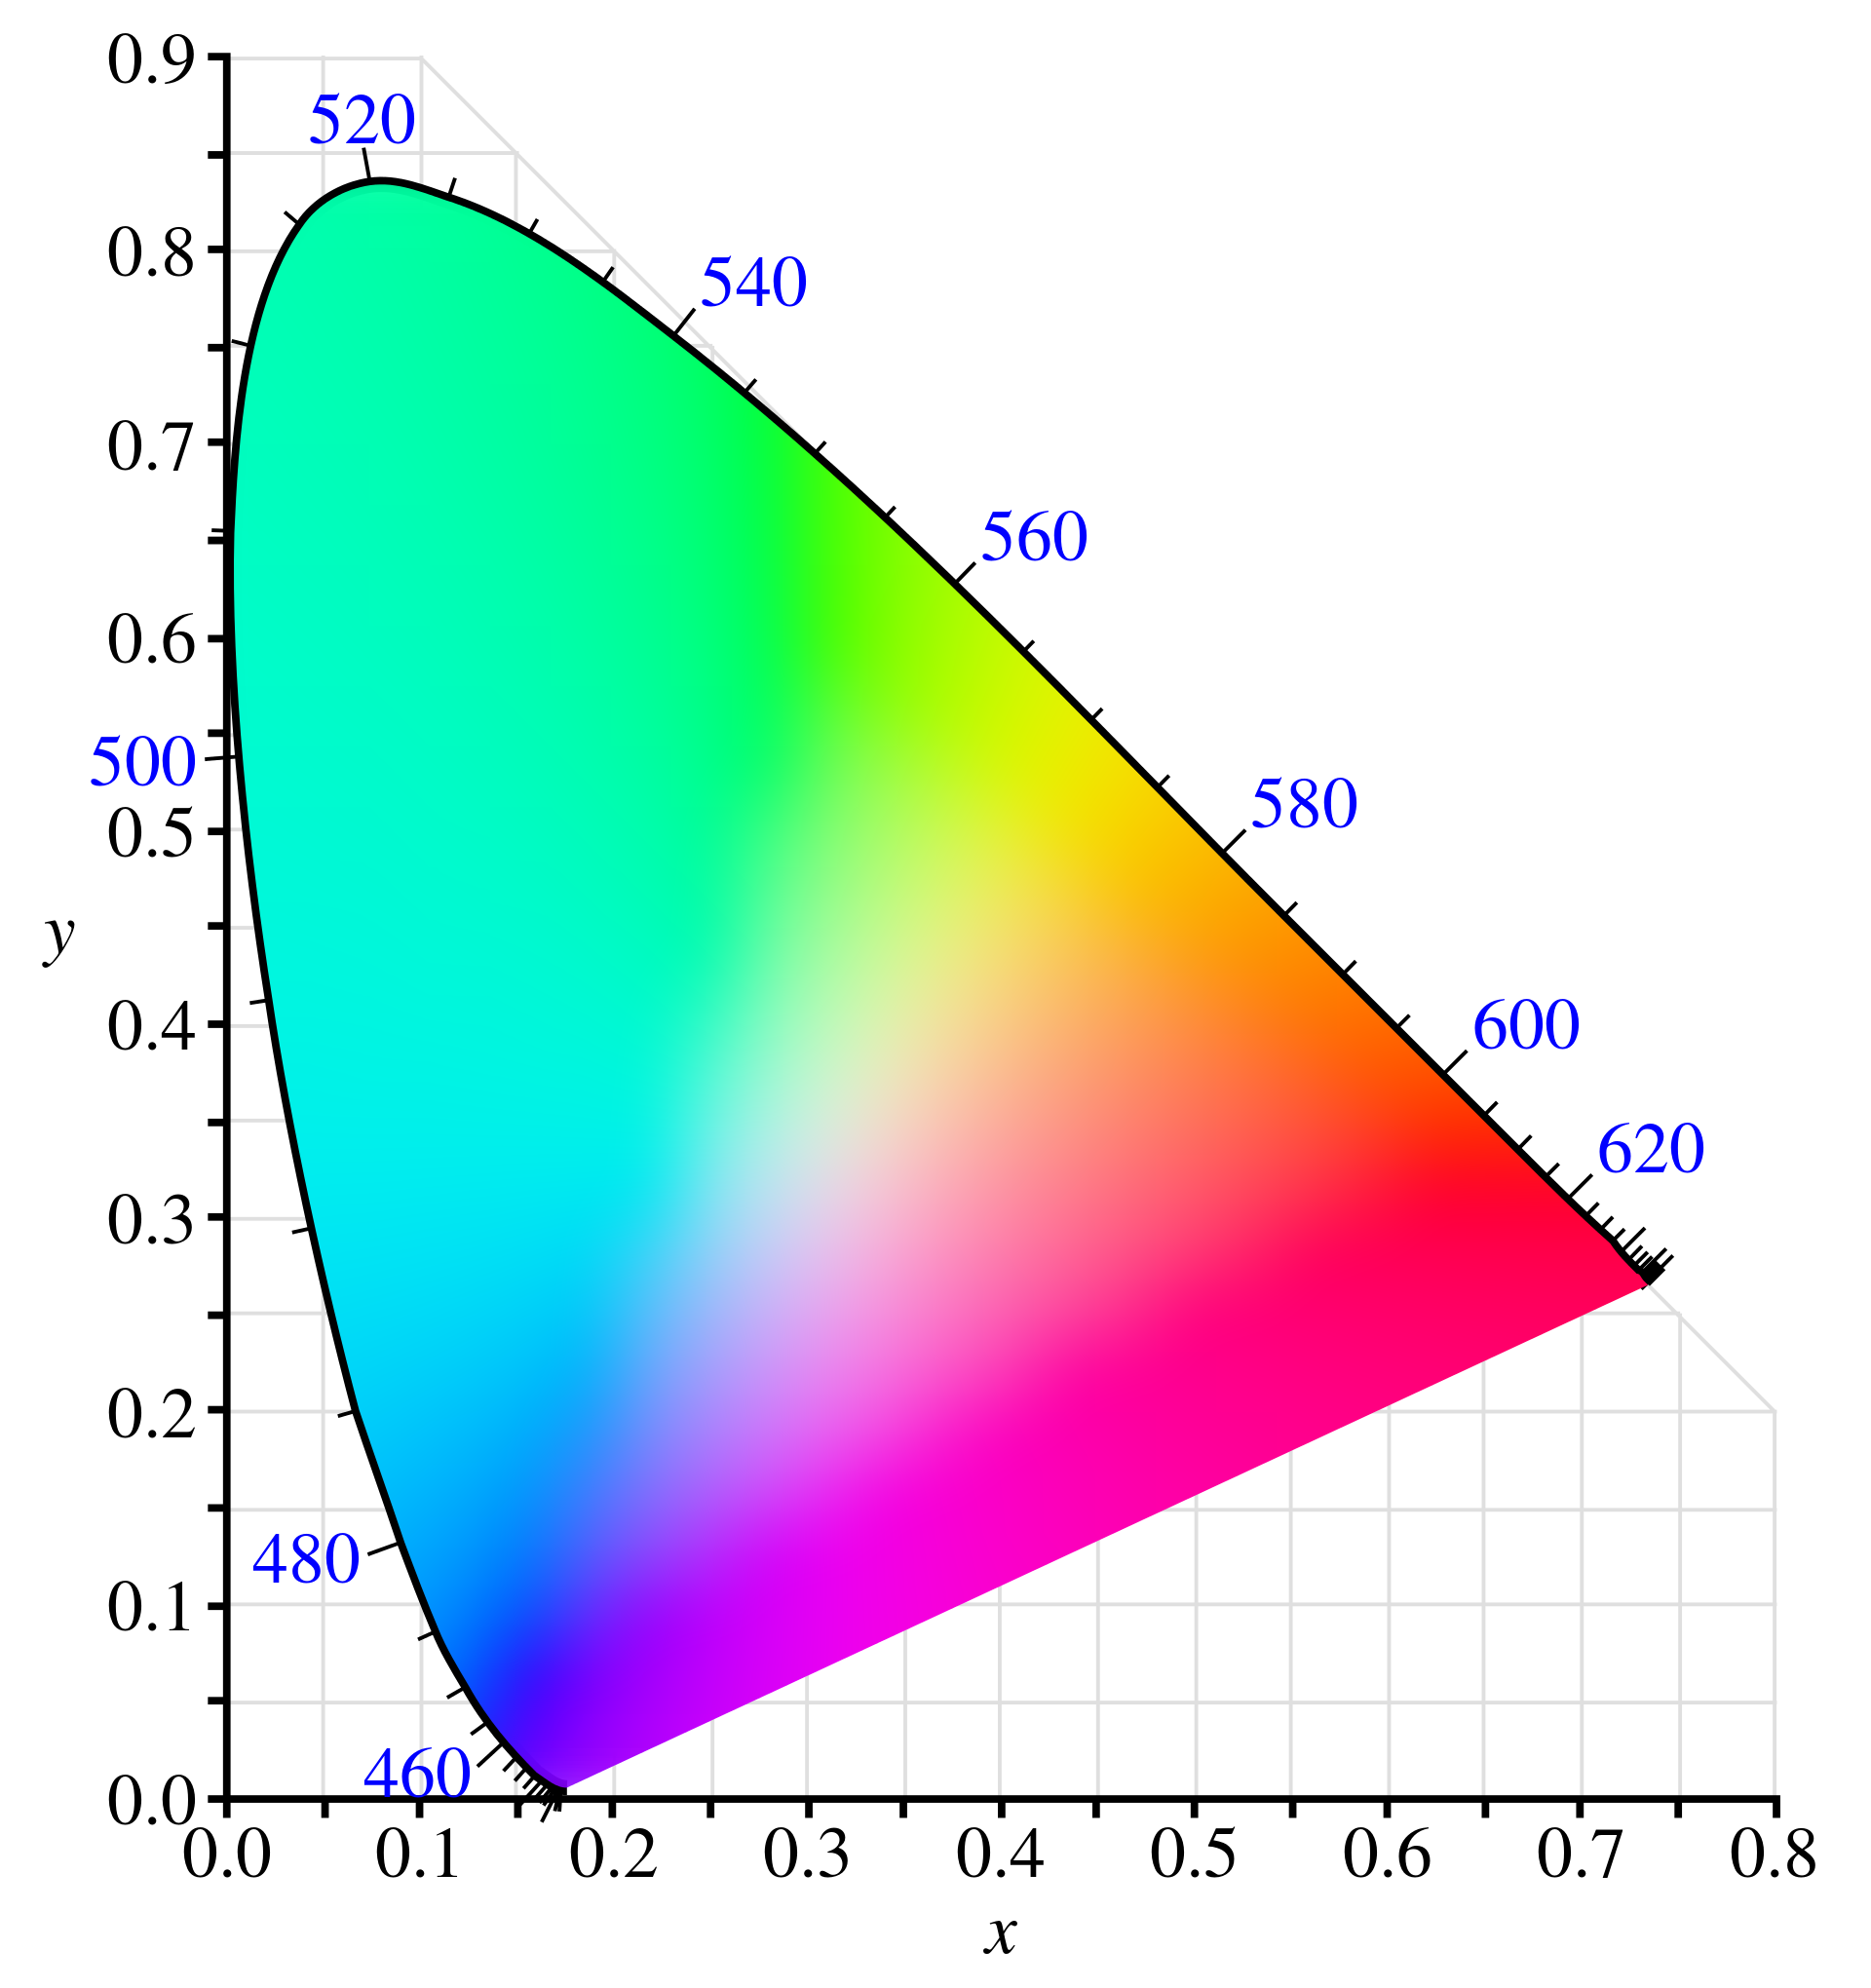
COLORSPACE
Initial colorspace is a triangle-like model of all colors which are discriminated by the human eye (mathematical model):
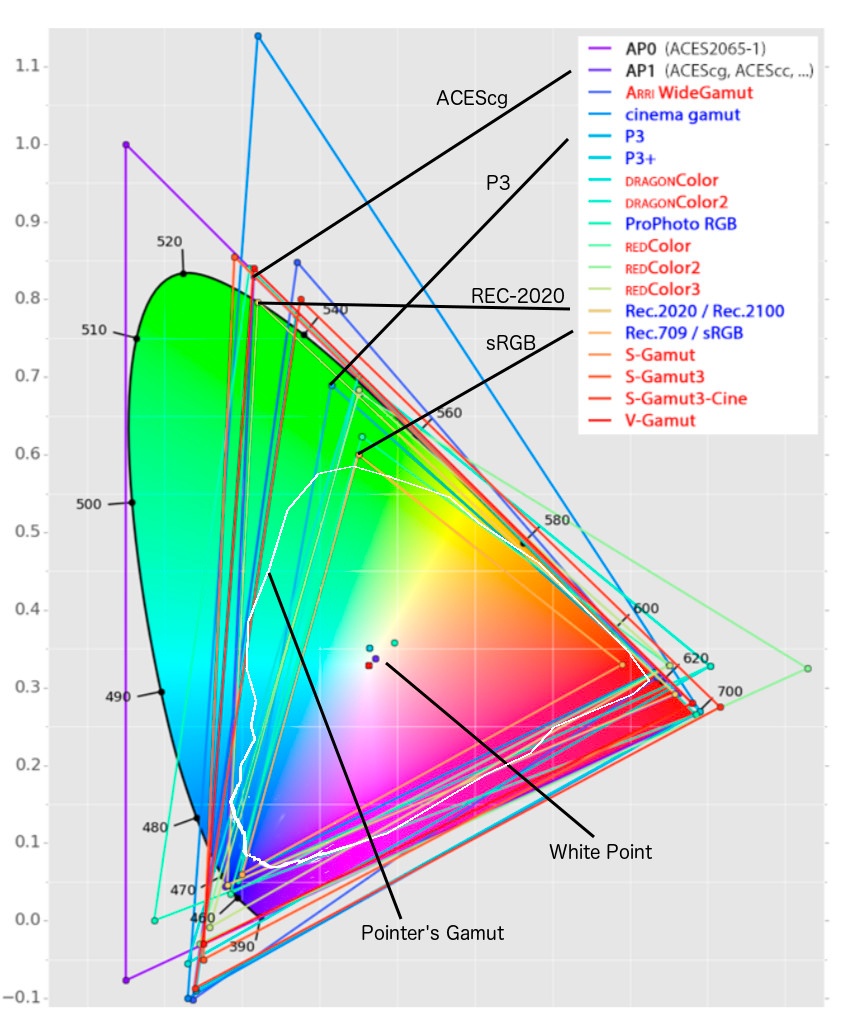
Different color spaces encompass different sets of colors as compared to this model:
rec709 - came with digital TV, P3 - used for digital cinema theater, rec2020 - UHDTV / new 4K video standard.
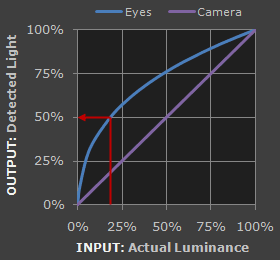
GAMMA (Dynamic Range)
Digital cameras see the world in a linear fashion. If we have a room with 1 lamp and we bring in a second lamp, camera will register 2x increase of light. Human eye will register around +20% increase of light.
Transfer function - math function to compress the light data of an image and then use this file to restore the whole dynamic range seen by the human eye.
Human eye dynamic range: 10-13 stops active range, 24 stops total range
Film dynamic range: 13 stops
RED Weapon Camera: 16.5+ (incl HDRX-mode) stops
HLG: 12 stops
REC709: 6 stops
REC709 GAMMA 2.4 is the native format for DaVinci Resolve, Adobe Premiere etc. If you throw a different colorspace file in DaVinci, you must tell it what it is and convert: Color room → Library → ResolveFX Color → Color Space Transform.
Fir SONY SLog3 shoot with +2 or +3 F-stops higher to quell noise, then choose:
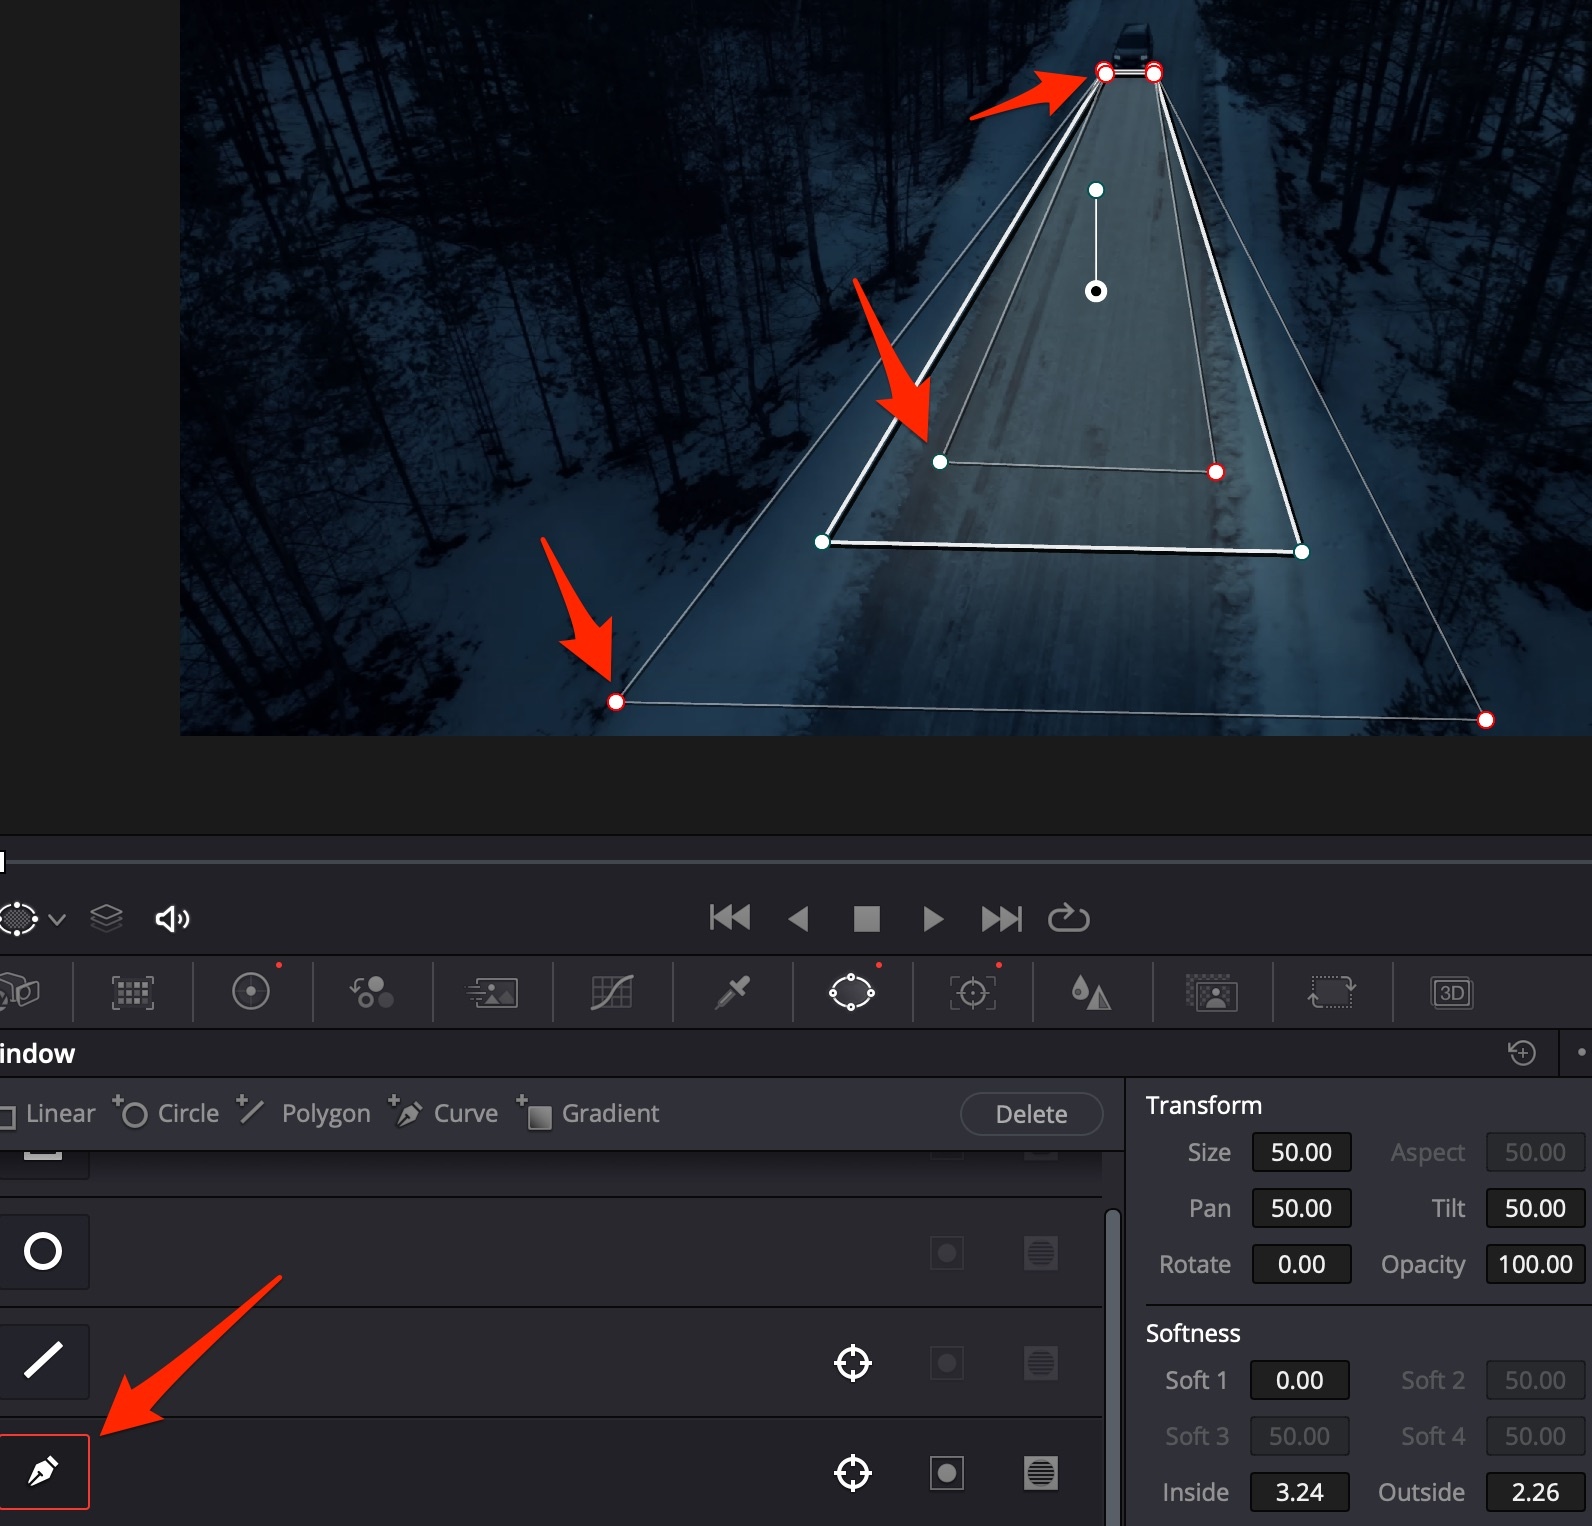
Always use the curved mask: it is the only one that has soft transitions, which can be changed individually for different sides:
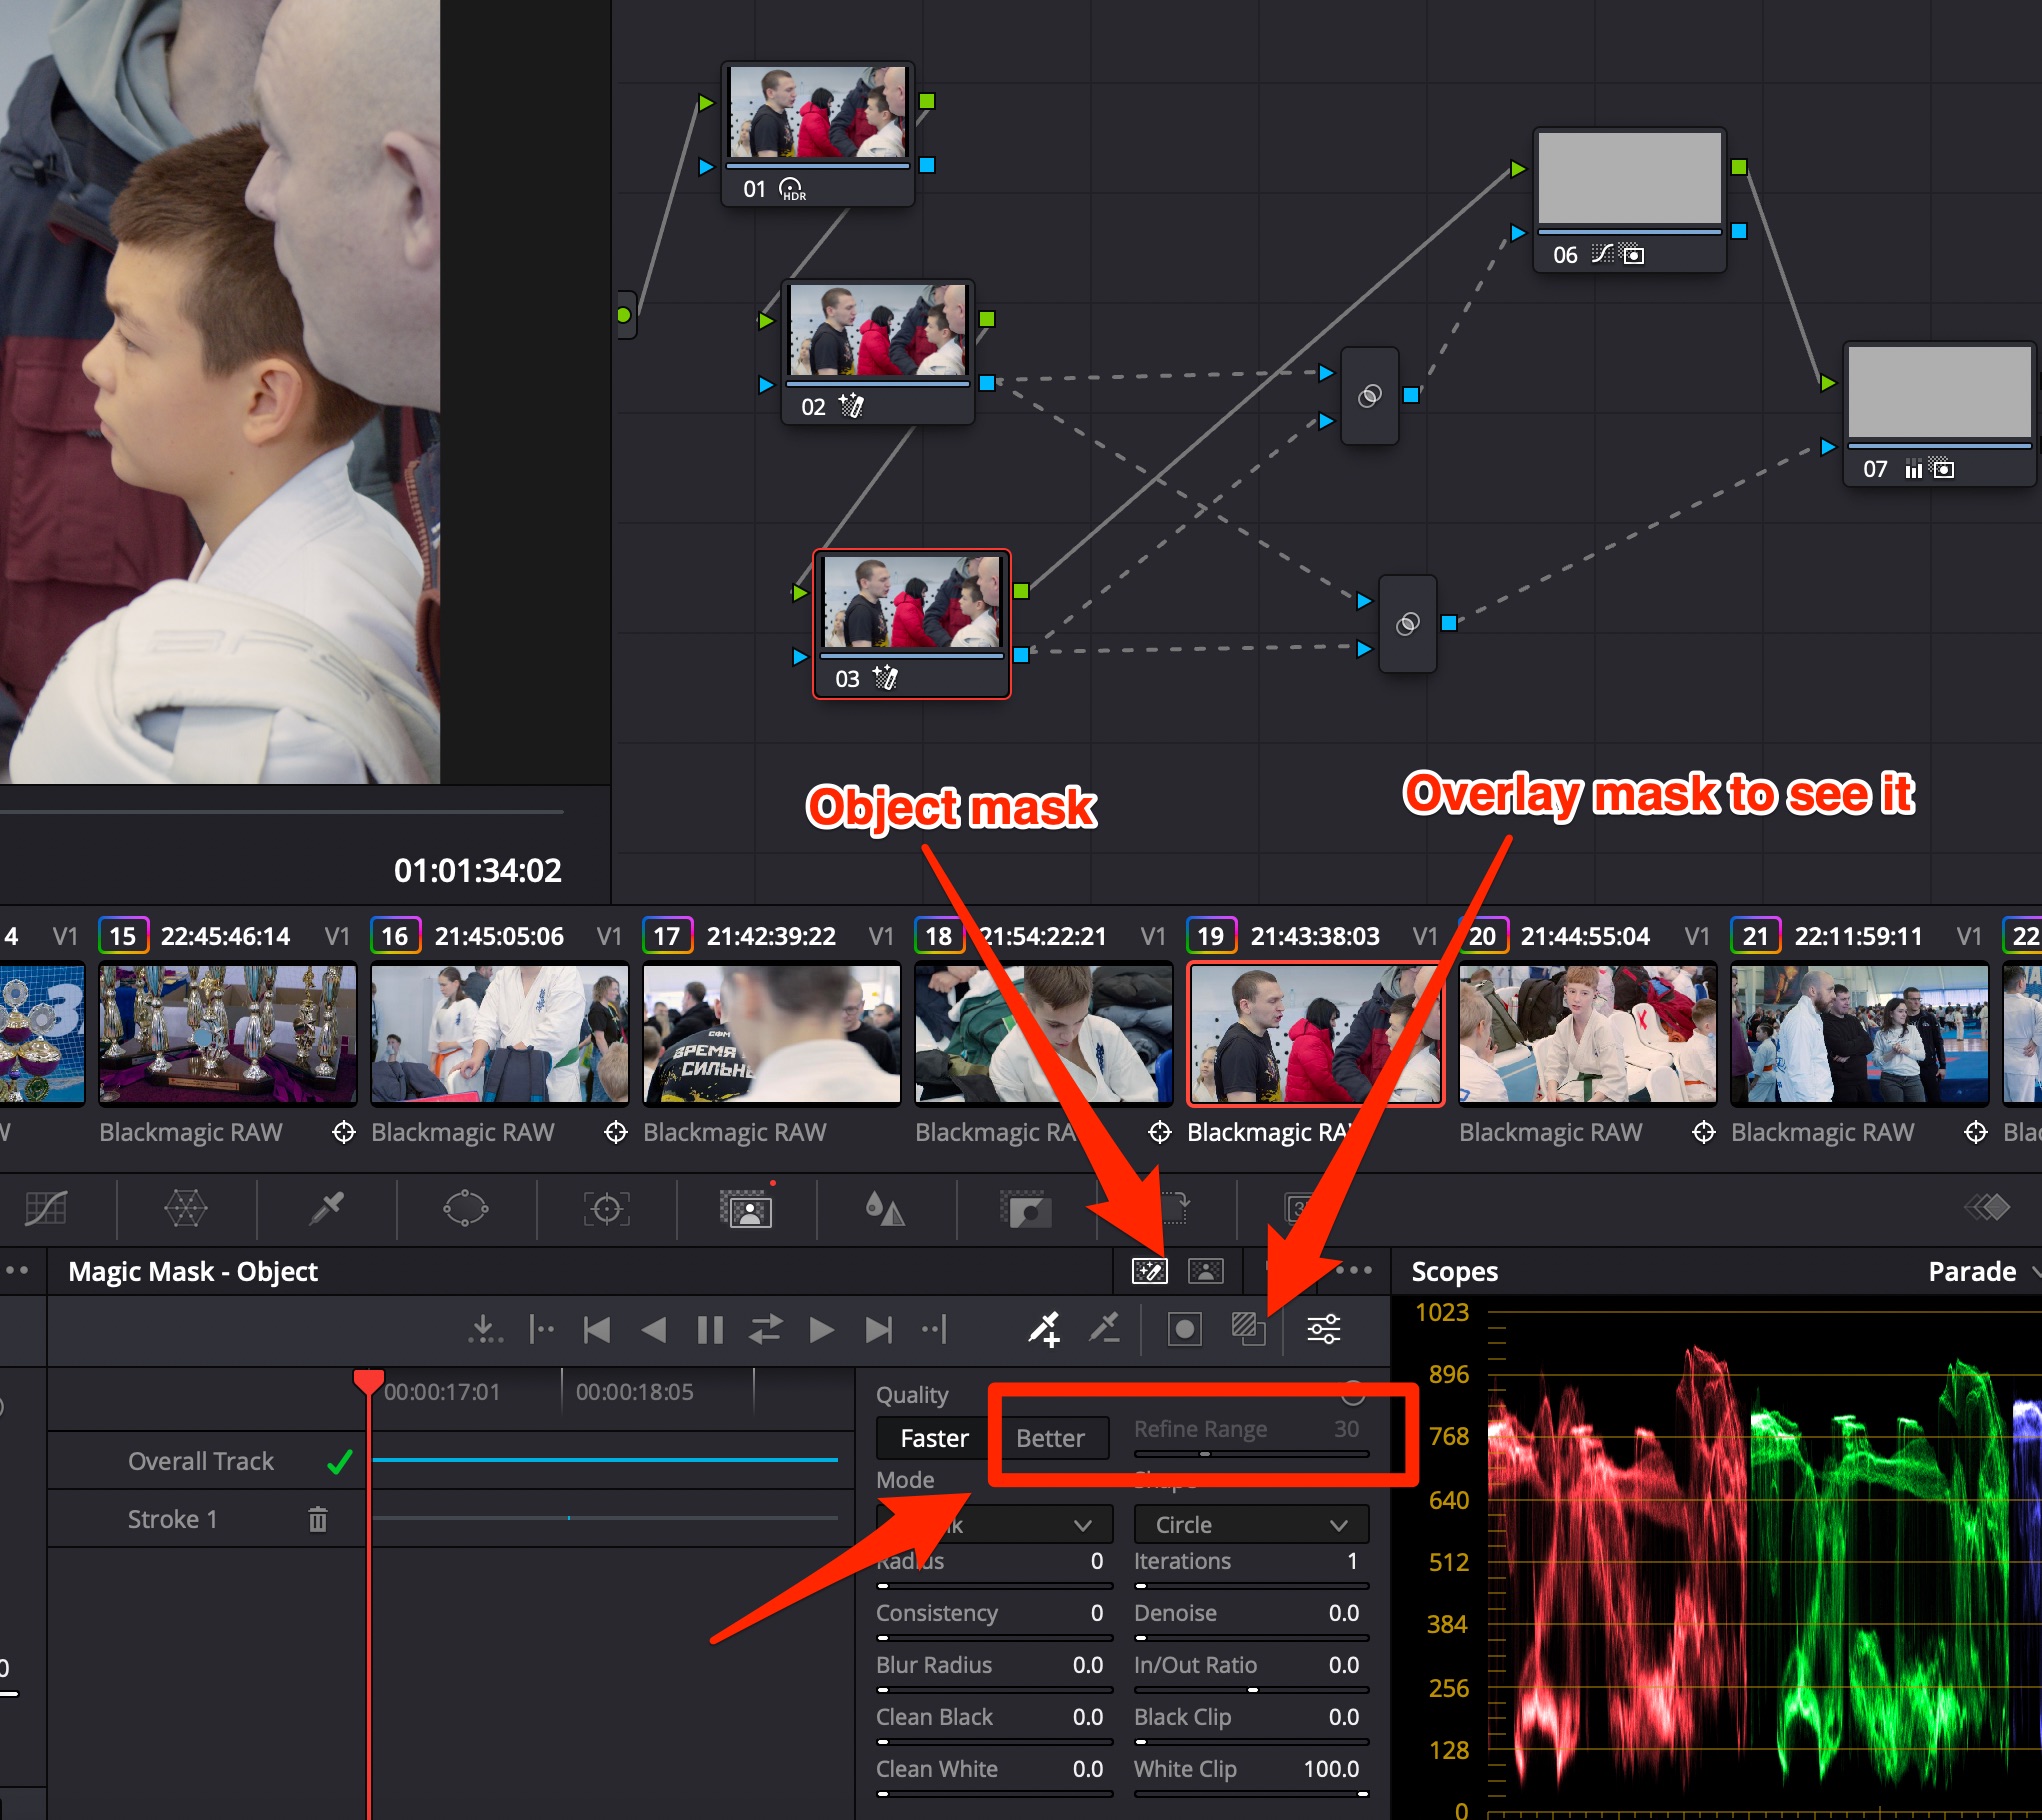
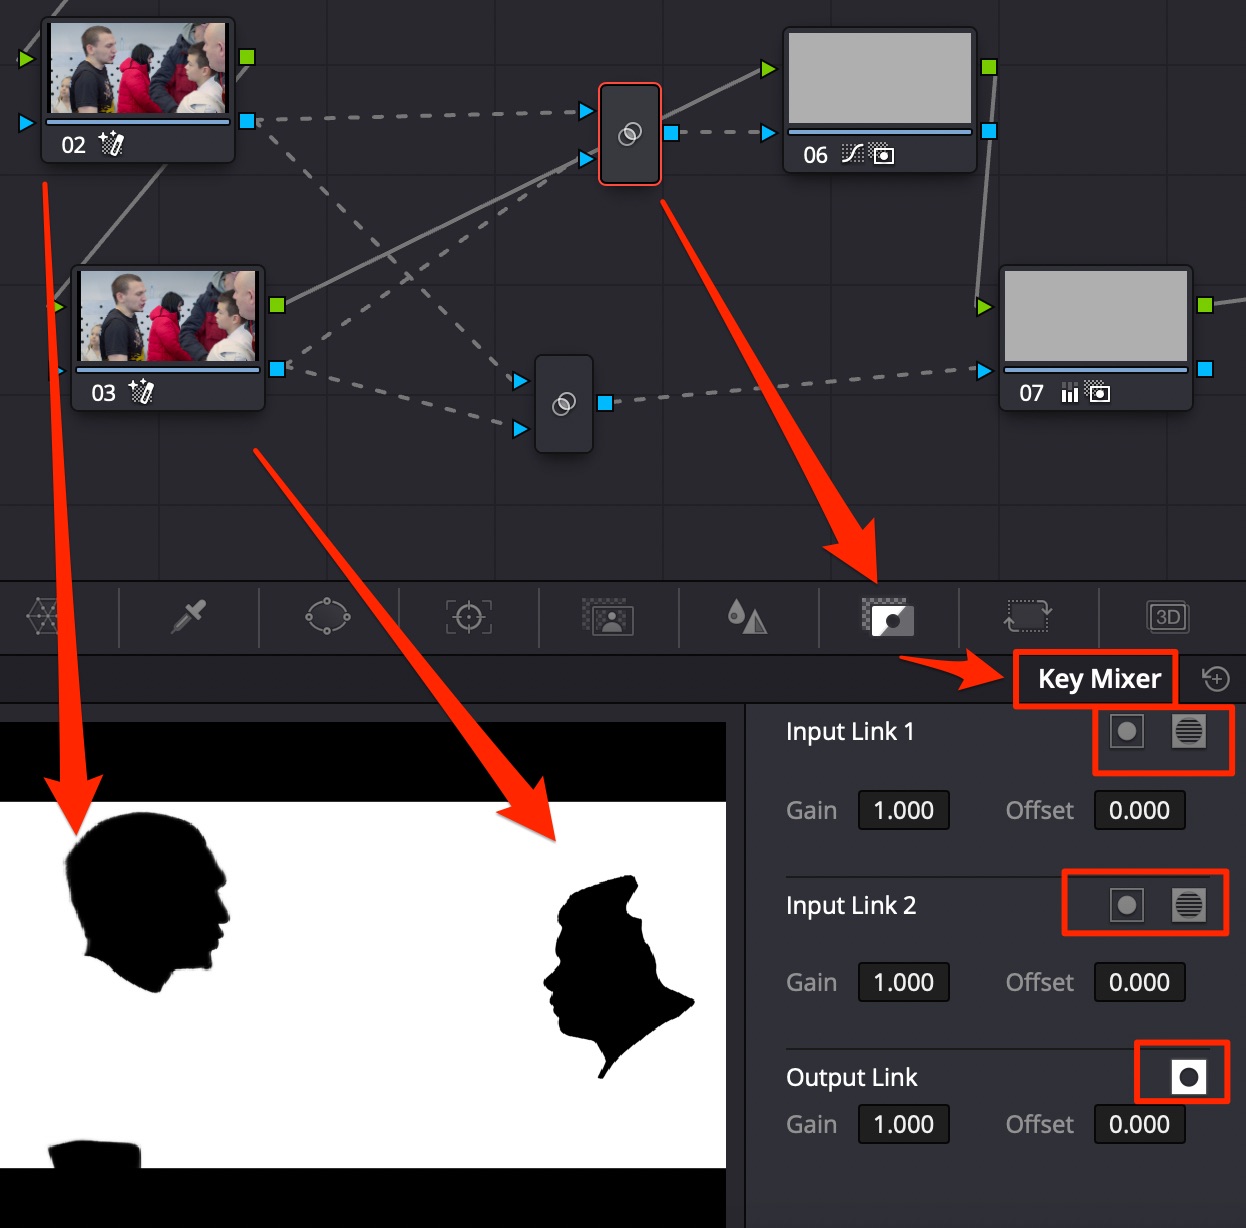
Neural Masks
Davinci Resolve Studio 18+ brings Object Mask to select parts of a person.
Draw lines with dropper+ over face & other parts of a person to highlight them. Use dropper- to leave other objects out of the mask. Use Better quality with Refine Edge BEFORE calculating the mask.
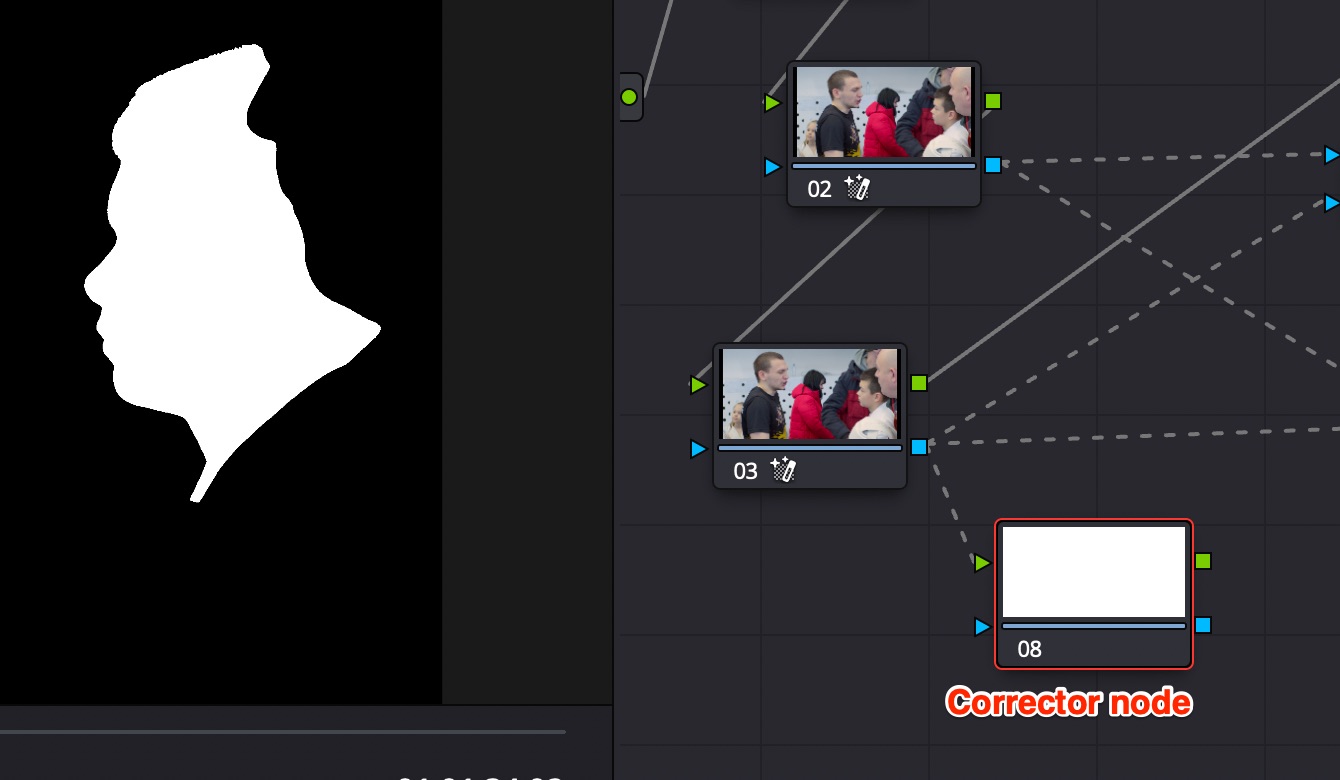
You can see the mask using Corrector node.
Use Key Mixer node to combine several masks (you can input more than 2, links are added in Key Mixer node automatically upon connection), invert them using button in Key Mixer config.
Use the wheels: lower Gain, then create node and restore contrast;
Use the Curves: lower the curve in the highlight area, make “S” form to restore contrast;
In the Curves instrument, use Soft Clip section: Low / High restores shadows / highlighs, while Low Soft / High Soft makes a smooth transition - ideal for blown sky areas.
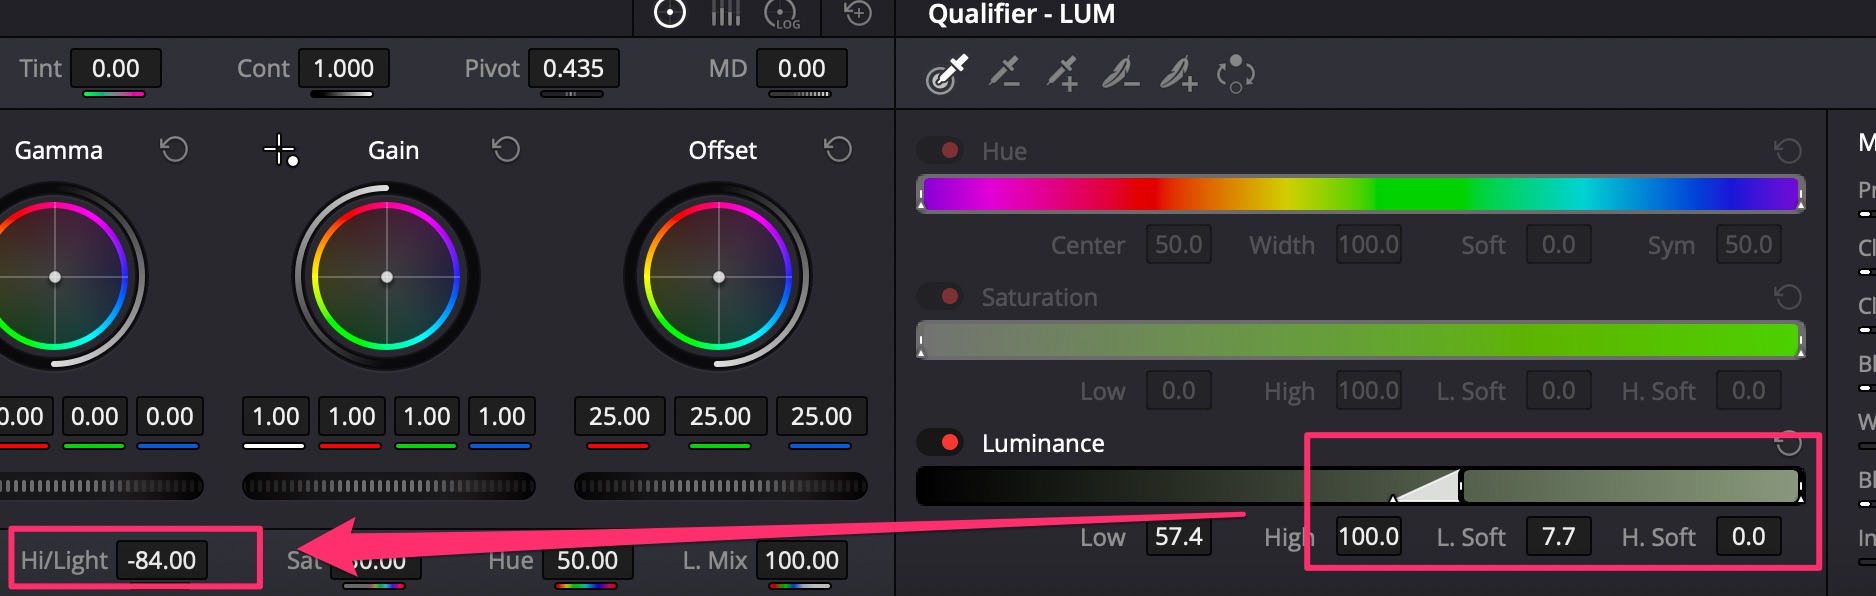
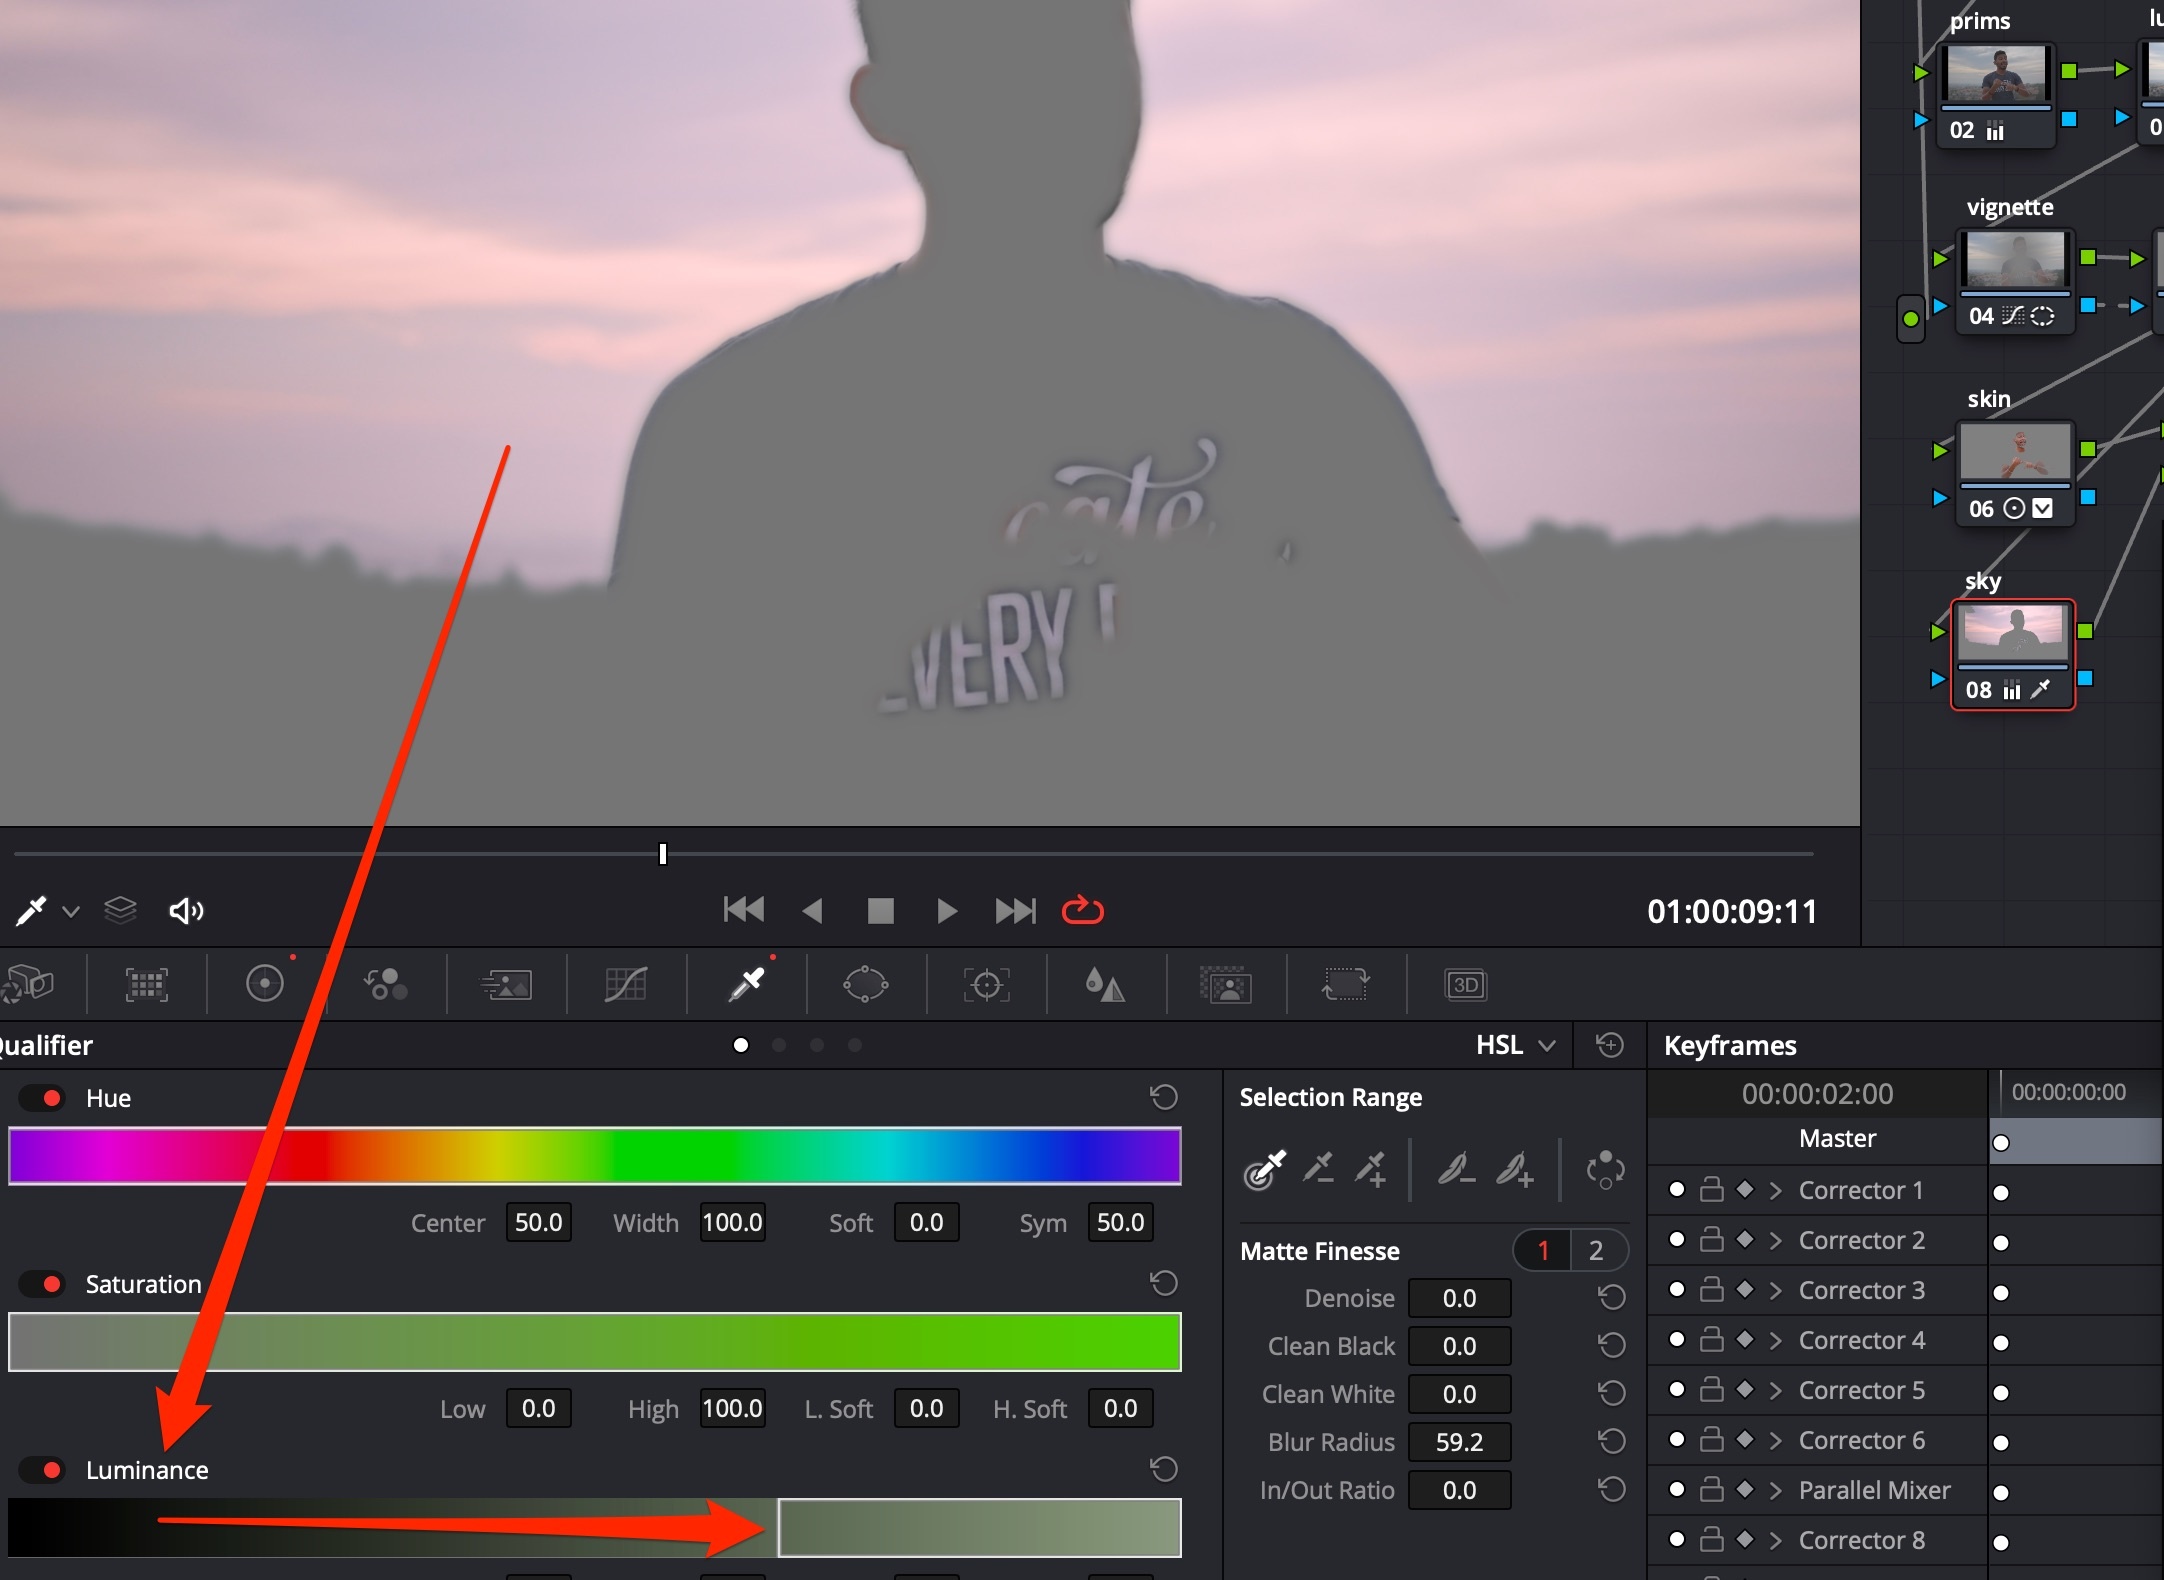
Controlled Restoring of Blown Highlights
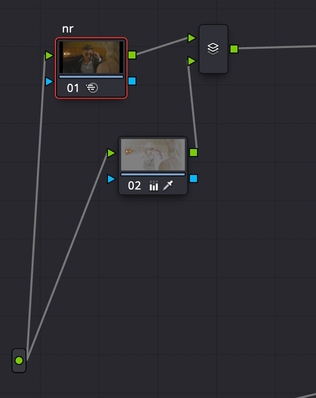
Create a Parallel Node after the input together with the denoise node
Use Luminance Qualifier to select smoothly the bright part of the image;
Turn down Highlights to get the details back.
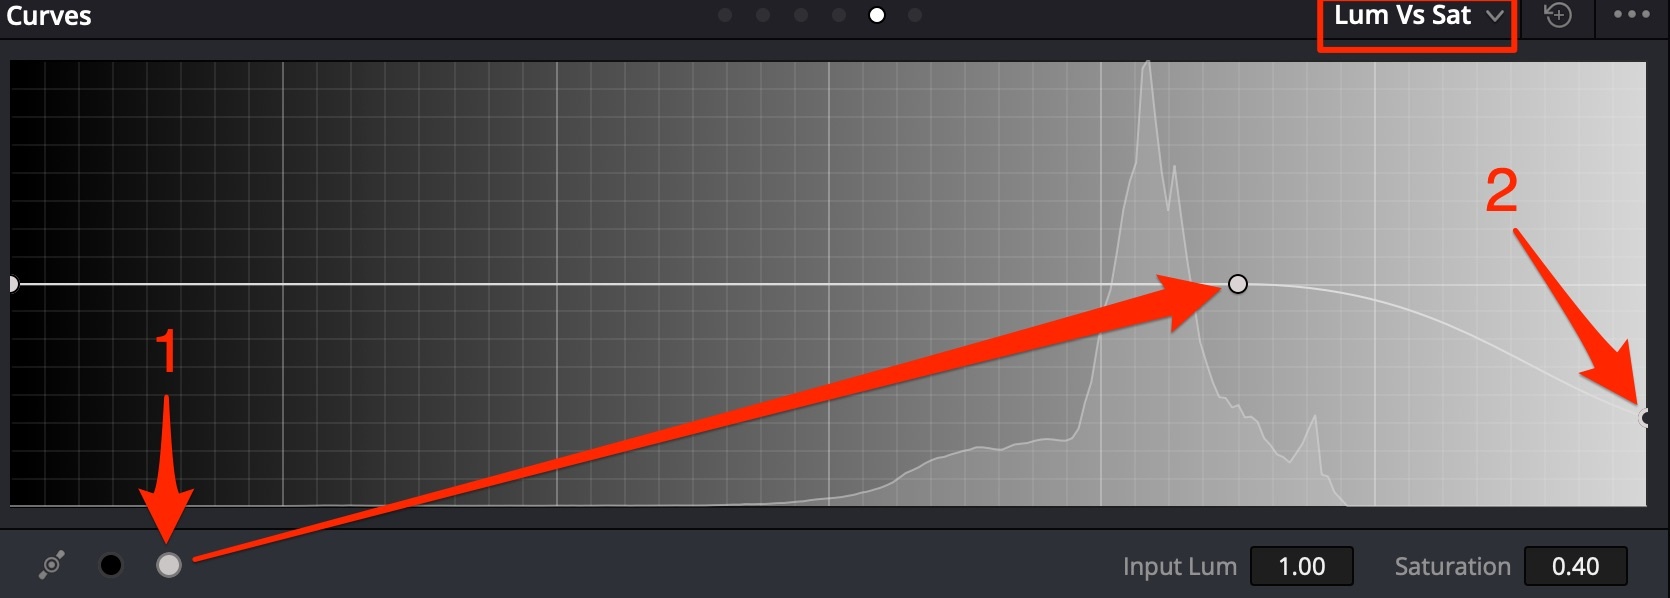
Parasite color in highlights
Typically such things appear when shooting on 8bit cameras. Use Lum Vs Sat Curve to fix.
Isolate highlights by luminosity;
Bring saturation level in highlights down to remove color.
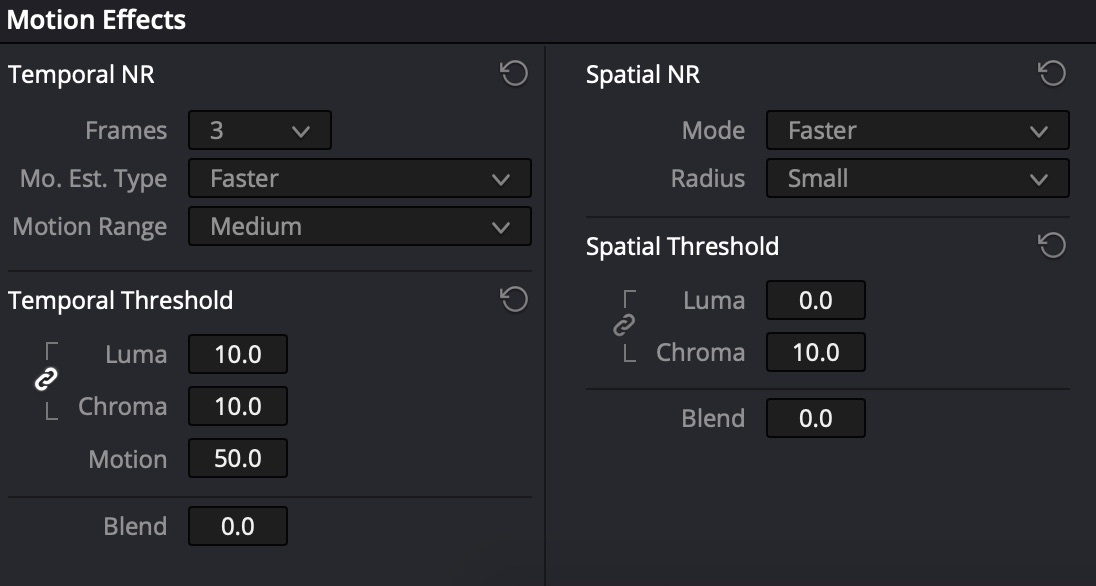
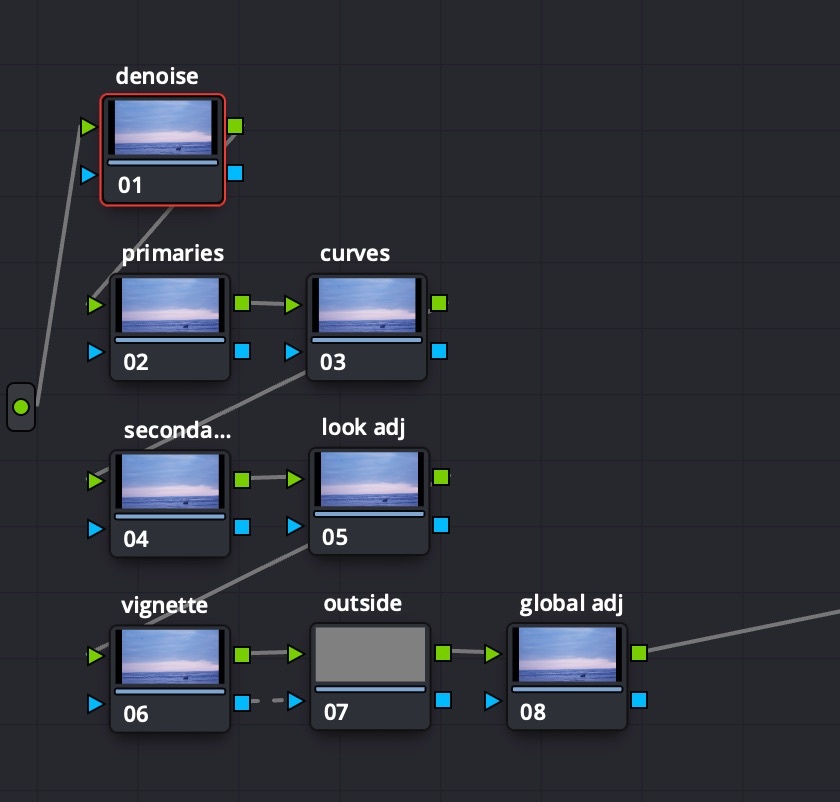
global denoise to reach pristine look for selection
node for primaries
node for curves
basic secondaries + additional secondaries nodes
vignette node, then Add Node → Outside Node, then finally the global look
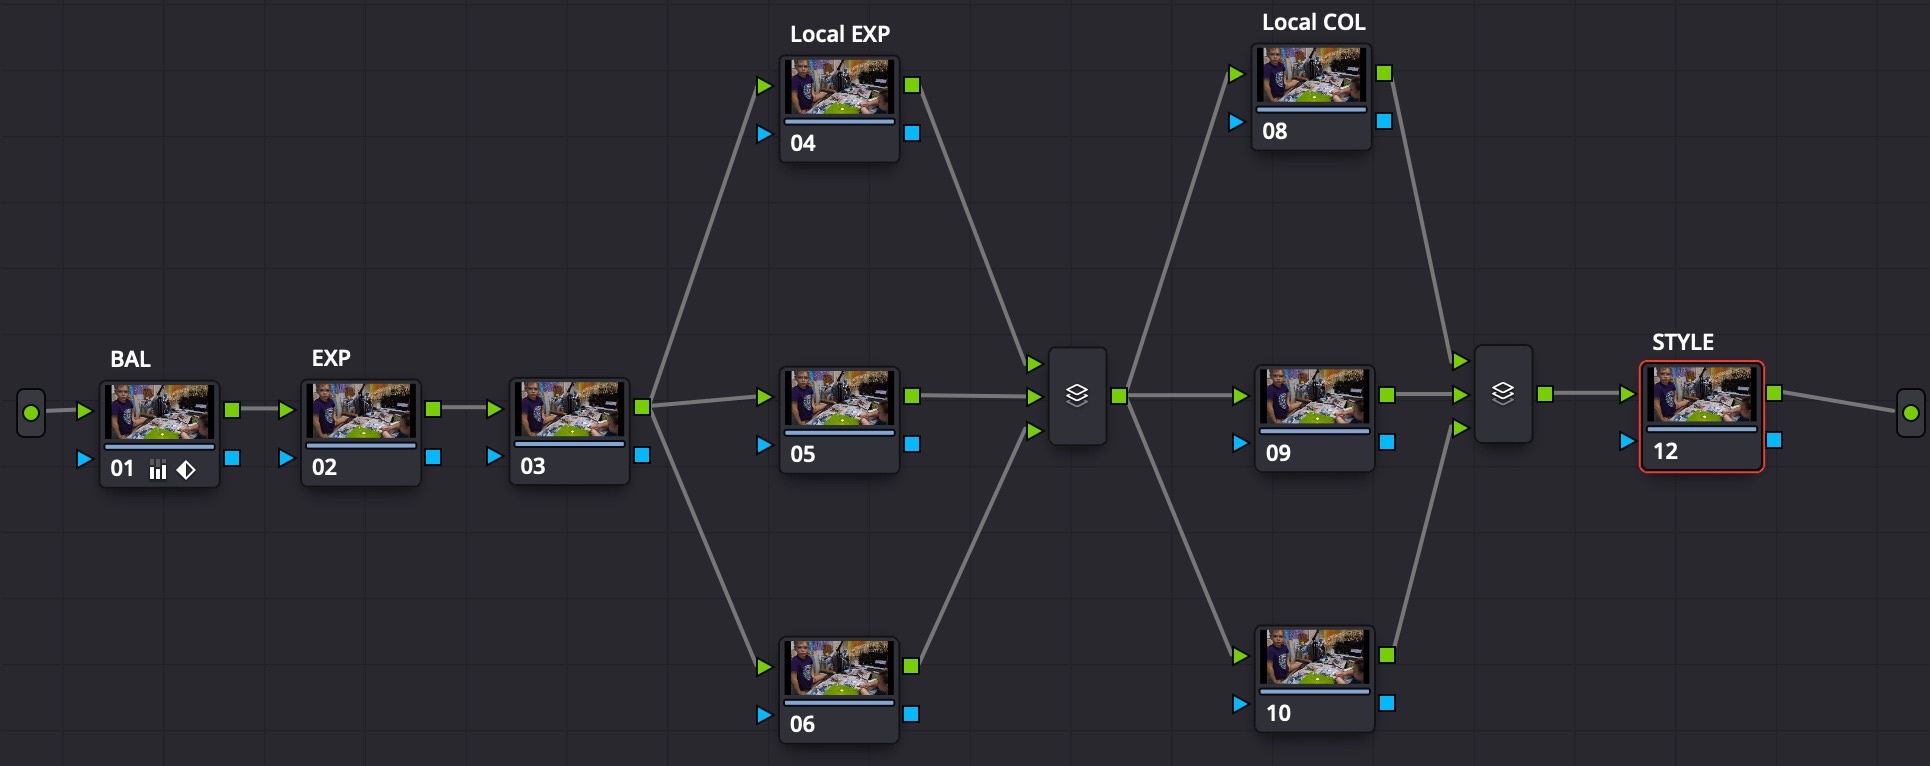
Color Grading Structure
Color Grading structure contents:
3 global corrector nodes: color balance, global exposition, misc global node (noise reduction?)
3+ local exposition corrector nodes: use masks for areas and add light, like lighting up the face
Parallel mixer with 3 inputs
3+ local color corrector nodes: use masks for areas and change saturation, like de-saturating items with bright colors, which may drag unwanted attention
Parallel mixer with 3 inputs
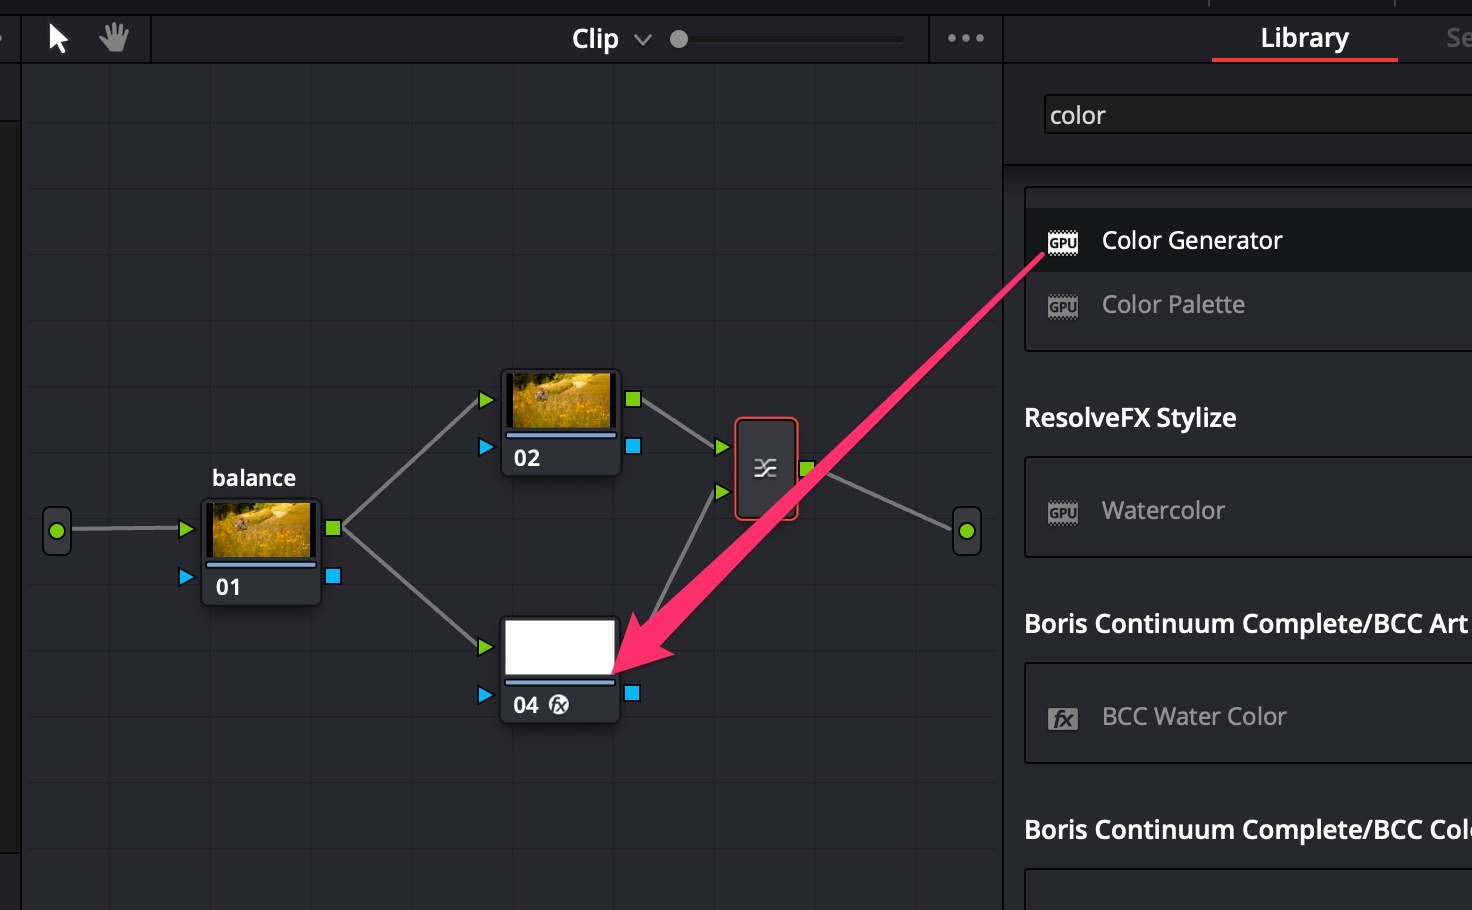
1 corrector node with a combination of LUTs to produce a special look (color grading for drama / atmosphere / mood goes here)
Parallel Nodes
Changes in parallel nodes are made to the image with the same intersection, as if the nodes were in sequence (Serial type). The difference is that all parallel nodes read data from one initial node, while in serial sequence the next node reads data from previous node with all corrections applied on the previous step.
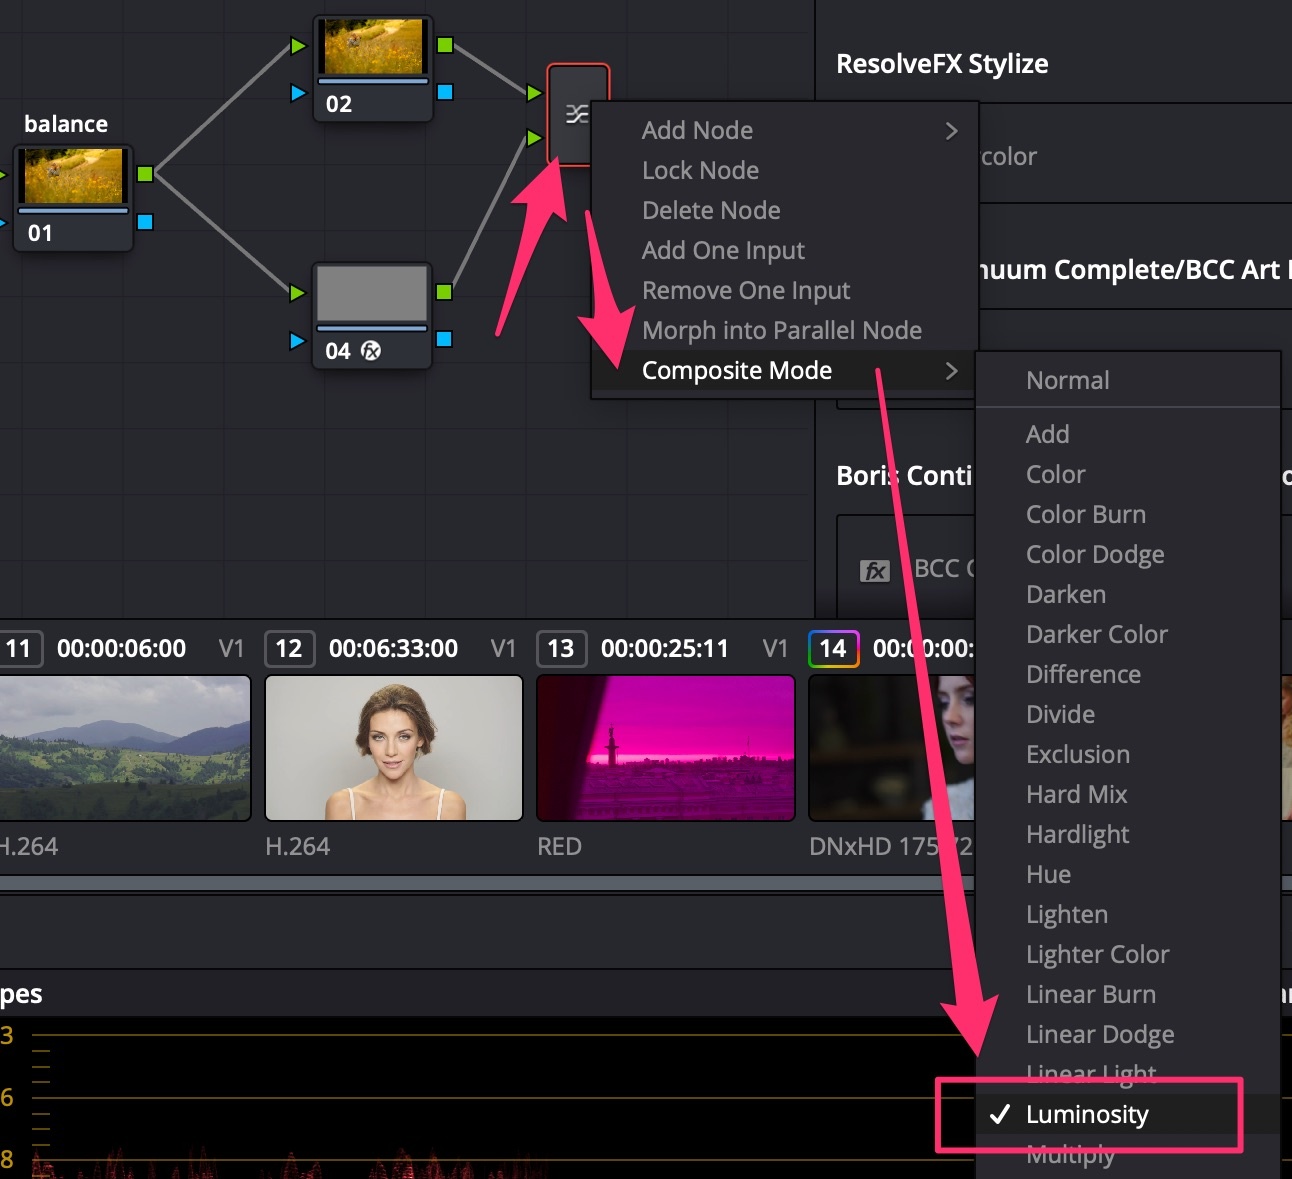
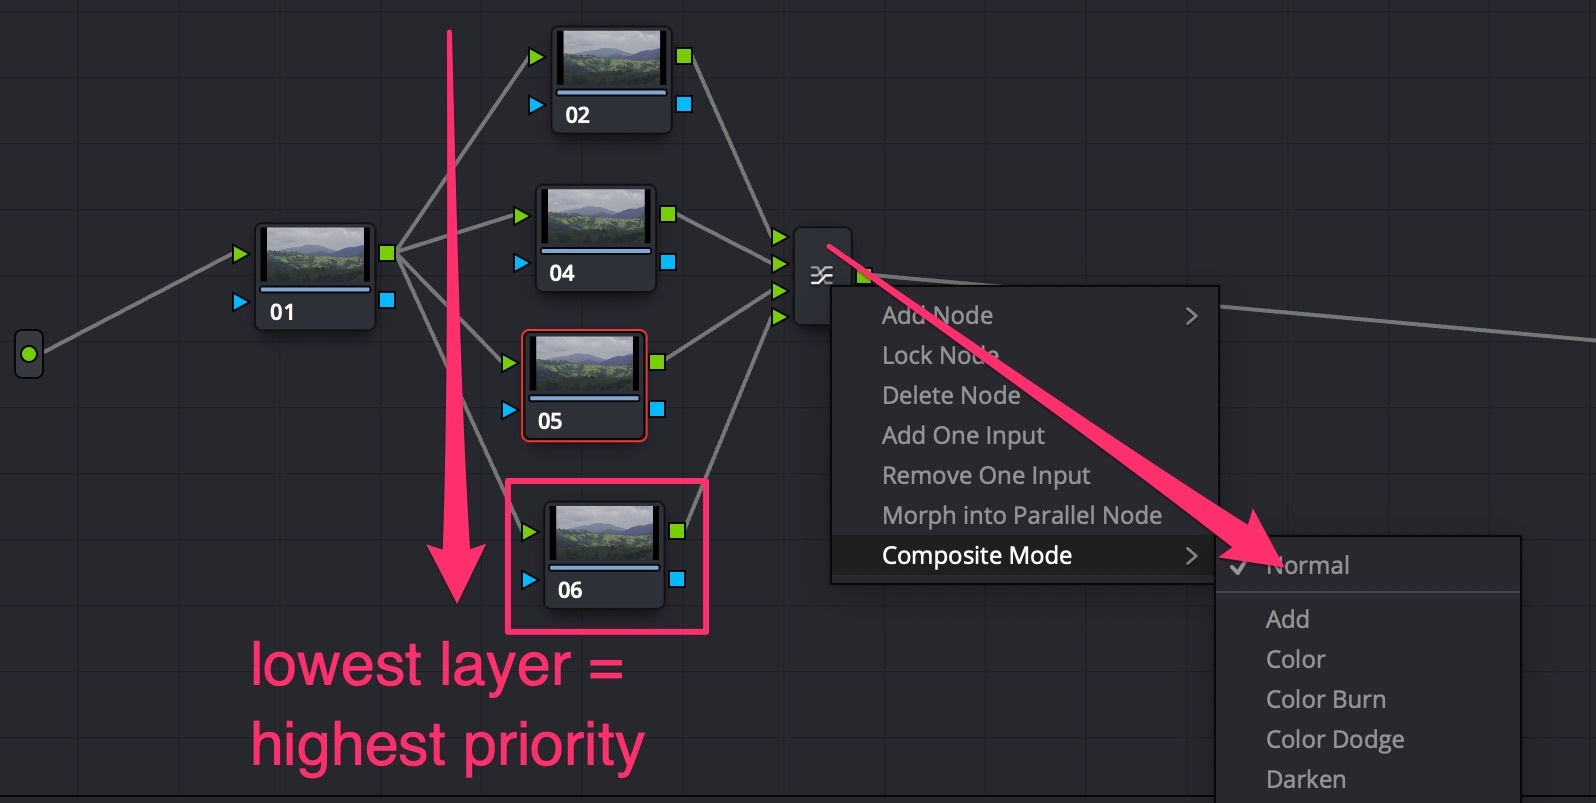
Node Layers
Layers are parallel nodes, but work in opposite direction: lowest layer has the highest precedence. Layers can be composited using connecting node settings.
Node Sequence
Nodes sequence matters
Create 2 nodes: in the first darken image using a LIFT wheel. In the second node make it red with the LIFT wheel and raise Saturation to 100%;
Make a second version with nodes in reverse sequence;
See the difference: if darken is first, then more areas become red using the second node than vice-versa.
Tip
Instruments sequence also matters: in the Color Wheels section, Lift/Gamma/Gain wheels are applied BEFORE the general Offset wheel.
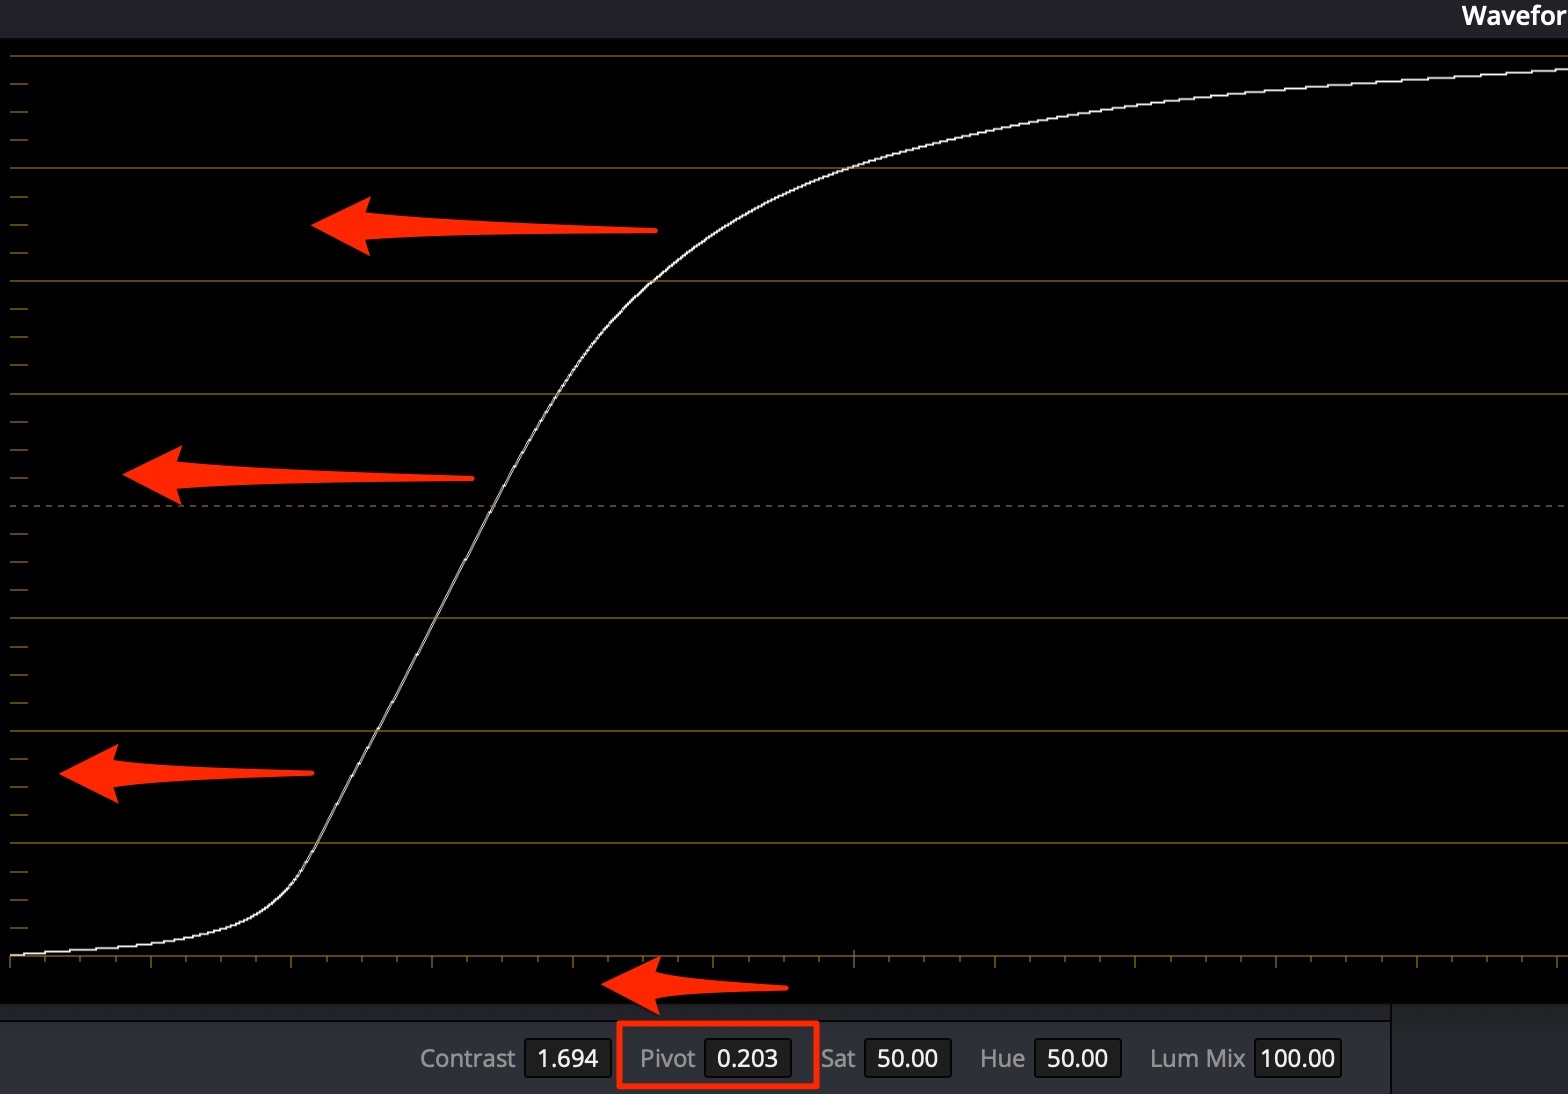
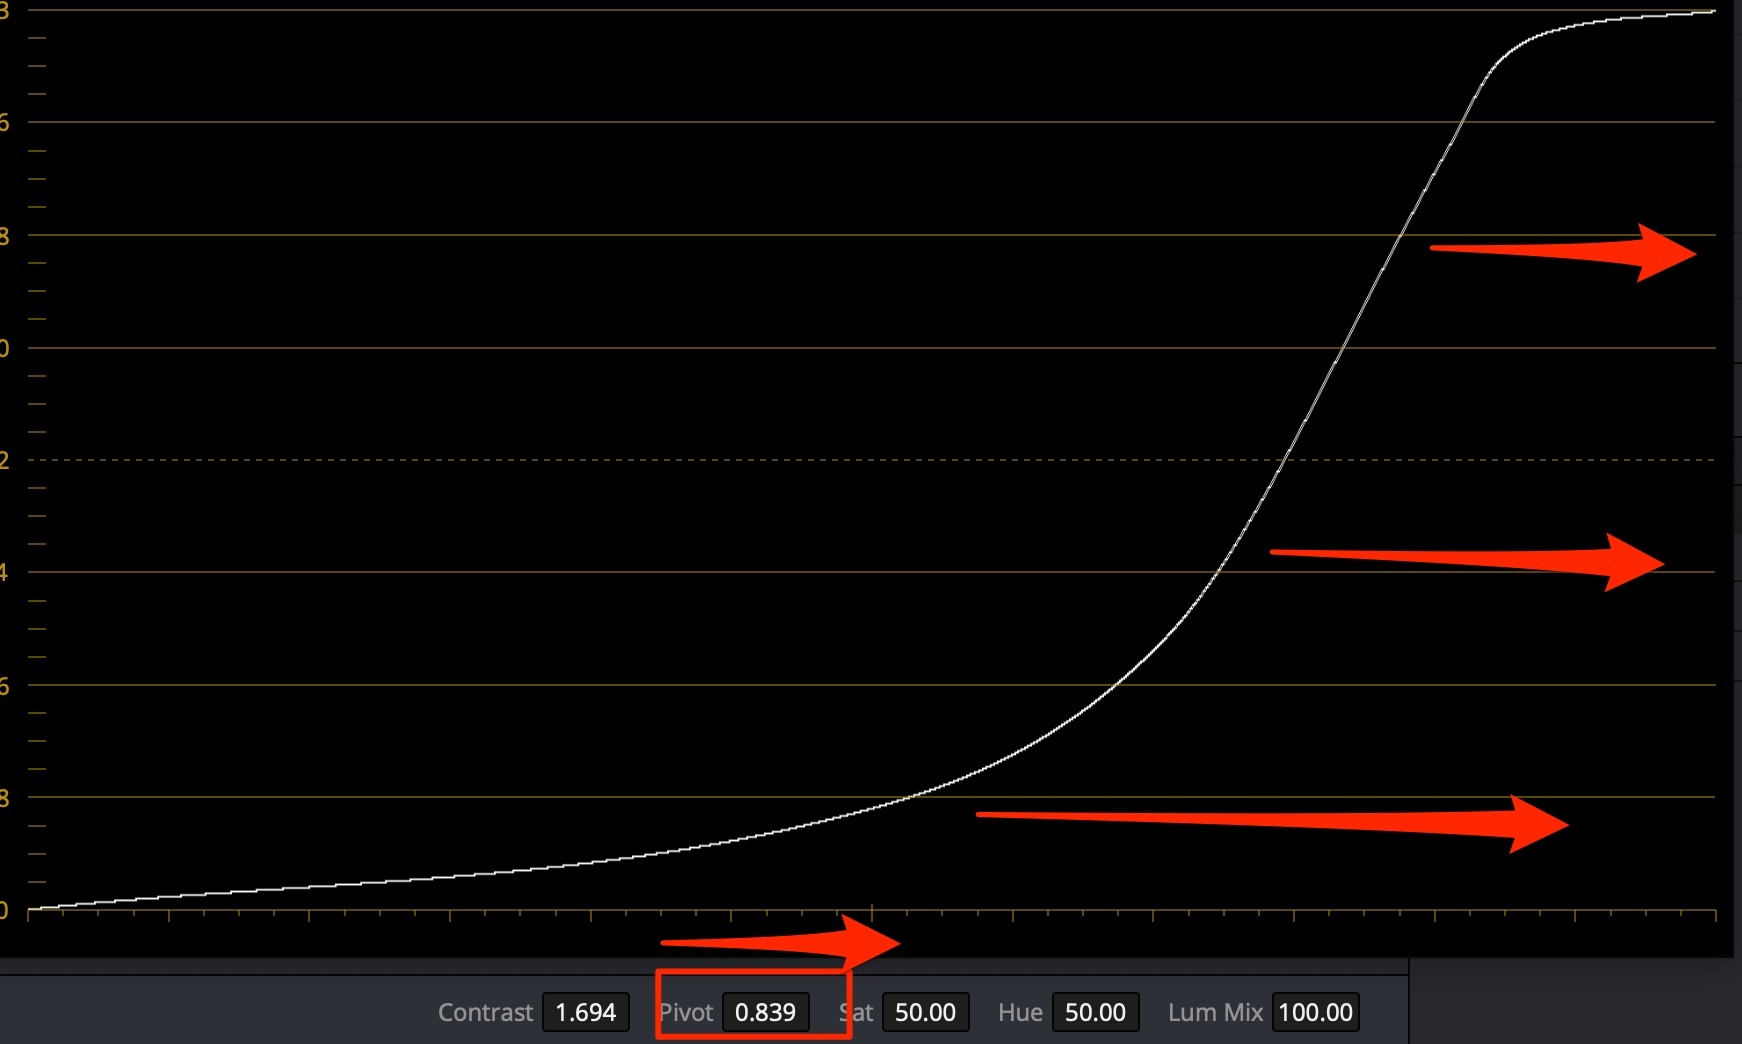
Contrast sequence matters
When you use a node to make stronger contrast on a footage, you basically stretch the image info between Dark & Light boundaries. If you create a second node after the “contrast creation” one, you will be changing the resulting stretched image data, and the changes will be more subtle and soft.
Хорошо работают при неоднородном фоне. На однородном они слишком очевидны
Делают видео более объёмным, отделяют передний и средний планы от заднего
Способ создания 1
OpenFX → ResolveFX Stylize → Vignette
Способ создания 2
Обычно виньетки применяются на уровне Timeline
Добавить новую ноду (ALT+S), добавить к ней круговую маску
Добавить outside node (ALT+O), с помощью колец Color Wheels опустить Gain и Saturation, в разделе Key снизить Key Output → Gain до 0.8-0.9, чтобы смешать с оригинальной картинкой
Способ 2 лучше чем 1, т.к при способе 1 по углам создаются чёрные области с растушёвкой, в то время как при способе 2 происходит “multiply” видеопотока на себя с коррекцией = такой способ даёт менее “грязный” результат.
Способ создания 3
Создать ноду Vignette;
Создать круговую маску на субъекте, с высокой мягкостью (Soft = 25);
Зайти в Curves, основную кривую опустить примерно по центру вниз;
Добавить outside node (ALT+O),
В этой ноде зайти в Curves, основную кривую немного поднять (либо создать обратную S-кривую, поднять лишь тени), чтобы высветлить субъекта.