DaVinci Resolve
Articles
Configure Settings of DVR
Create anntations to video
Check Exposure in DVR
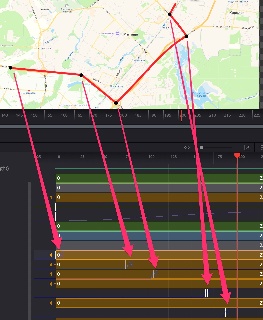
Hotkeys Based on maximum shortcuts for left hand.
Fusion Room
Deliver Room
Color Room
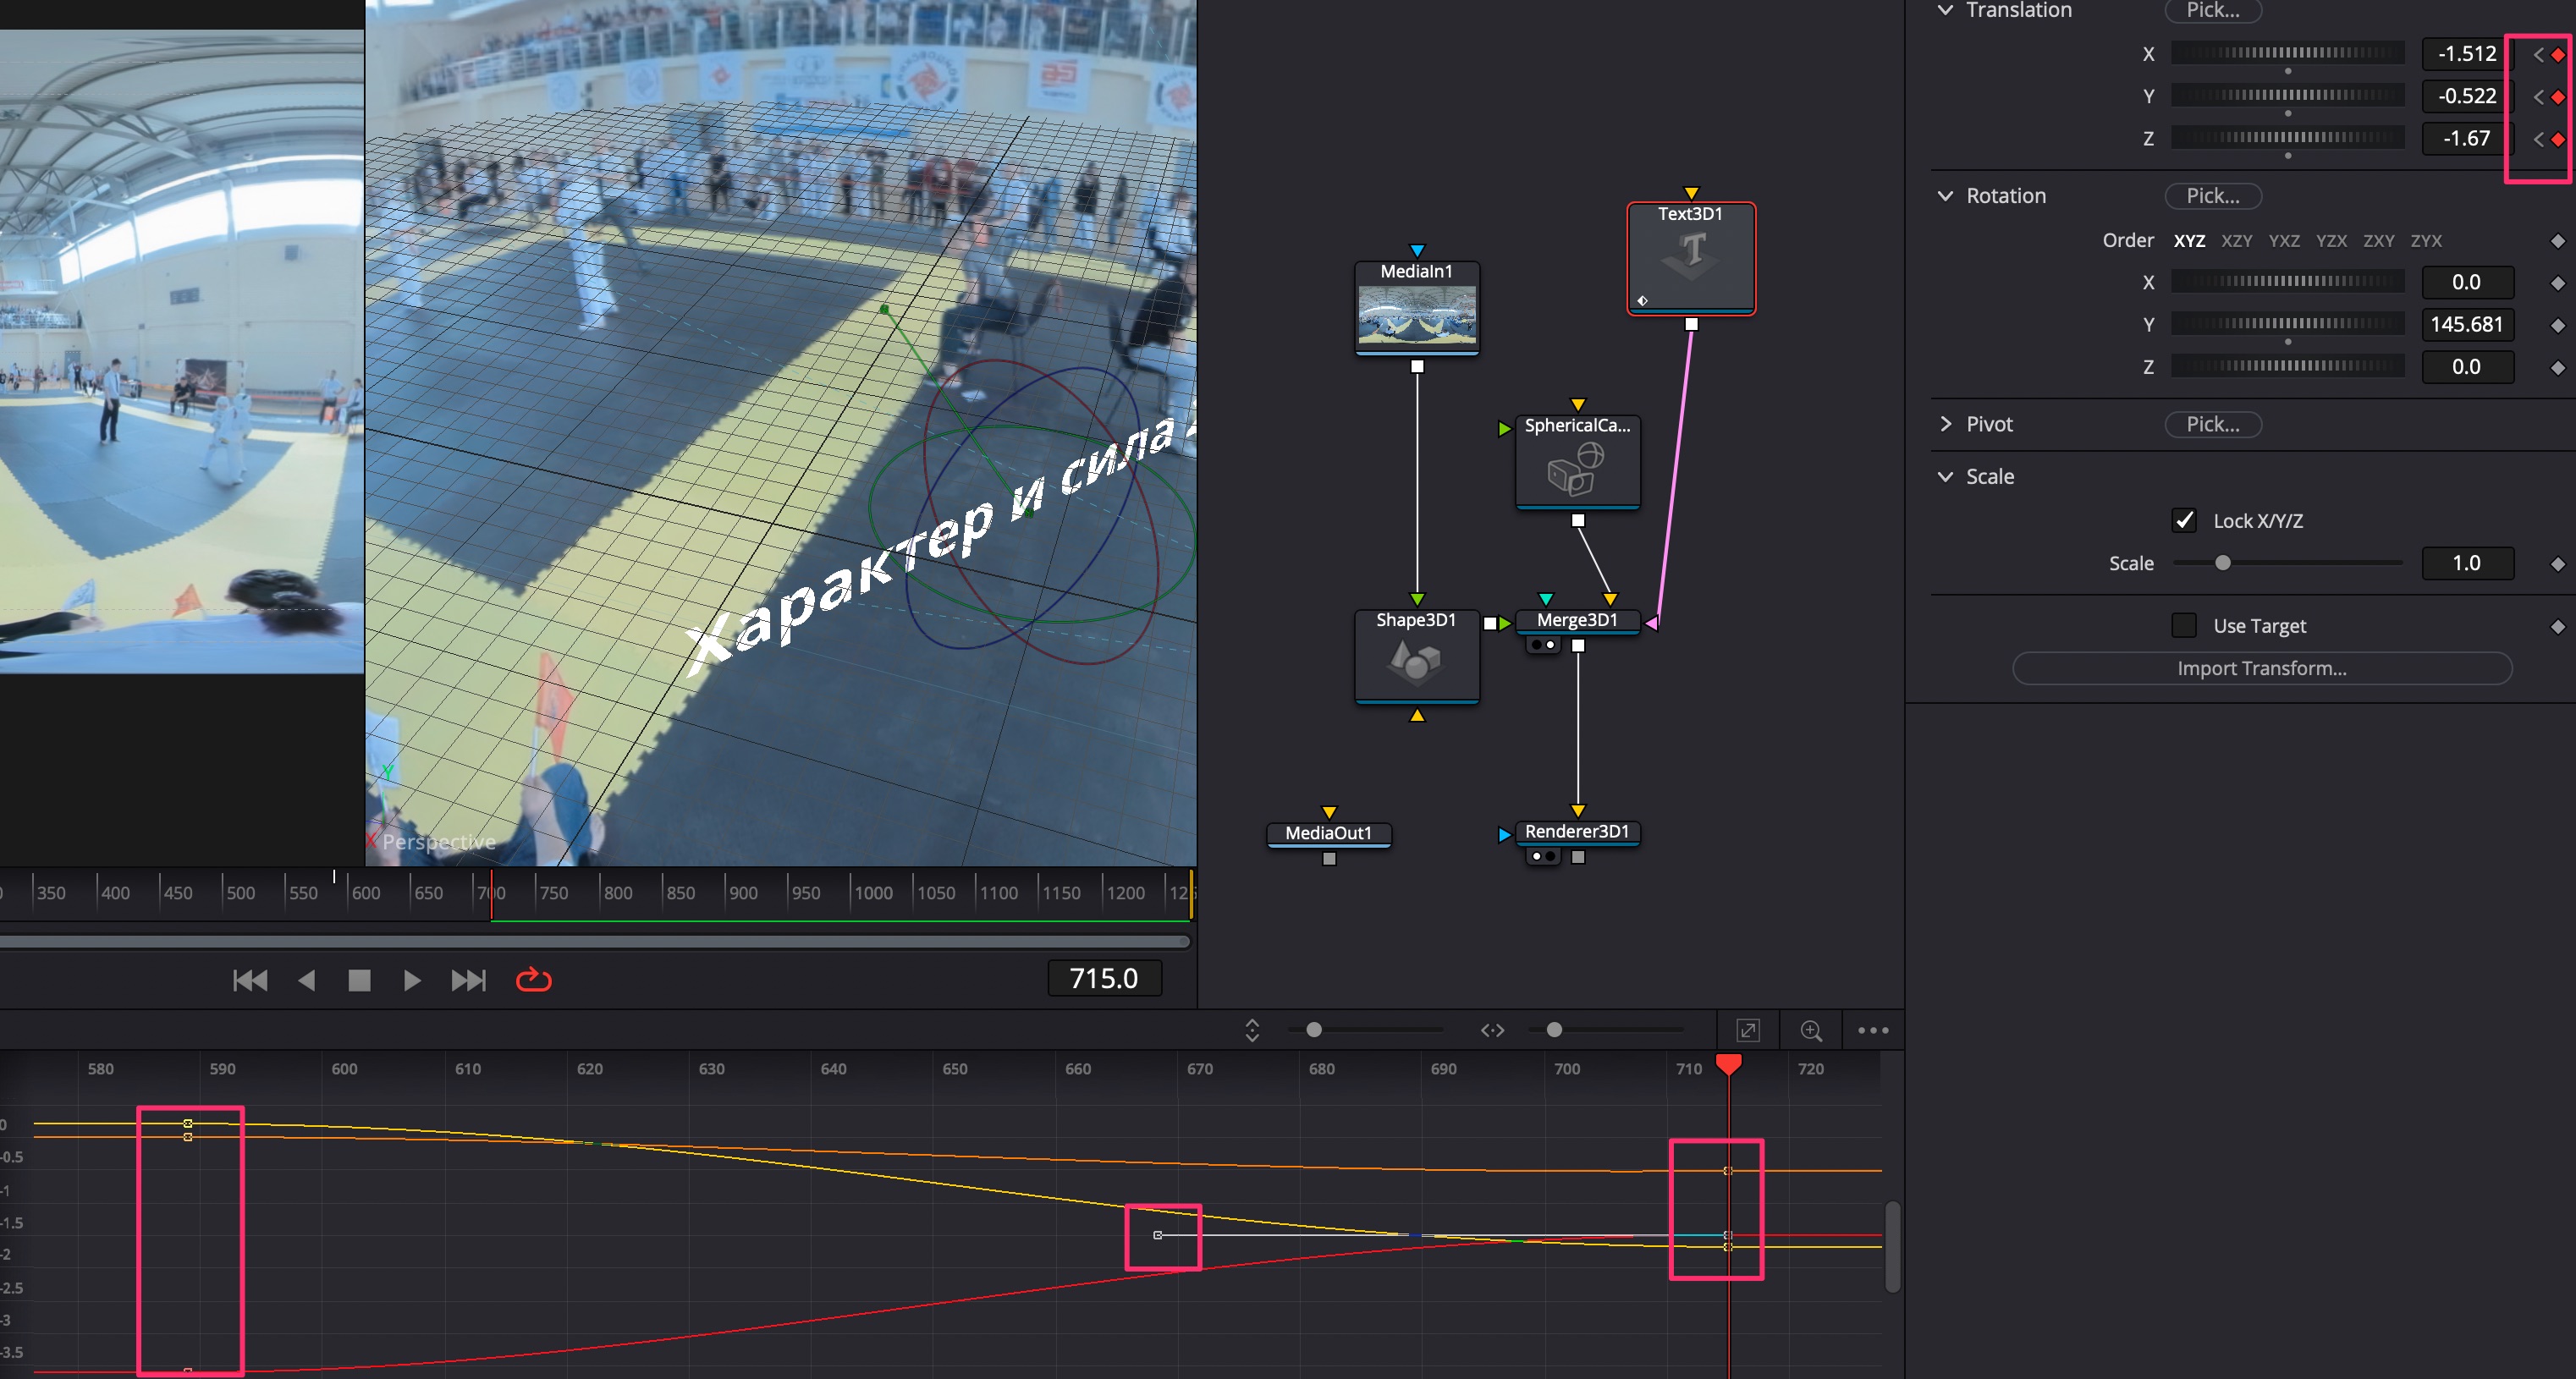
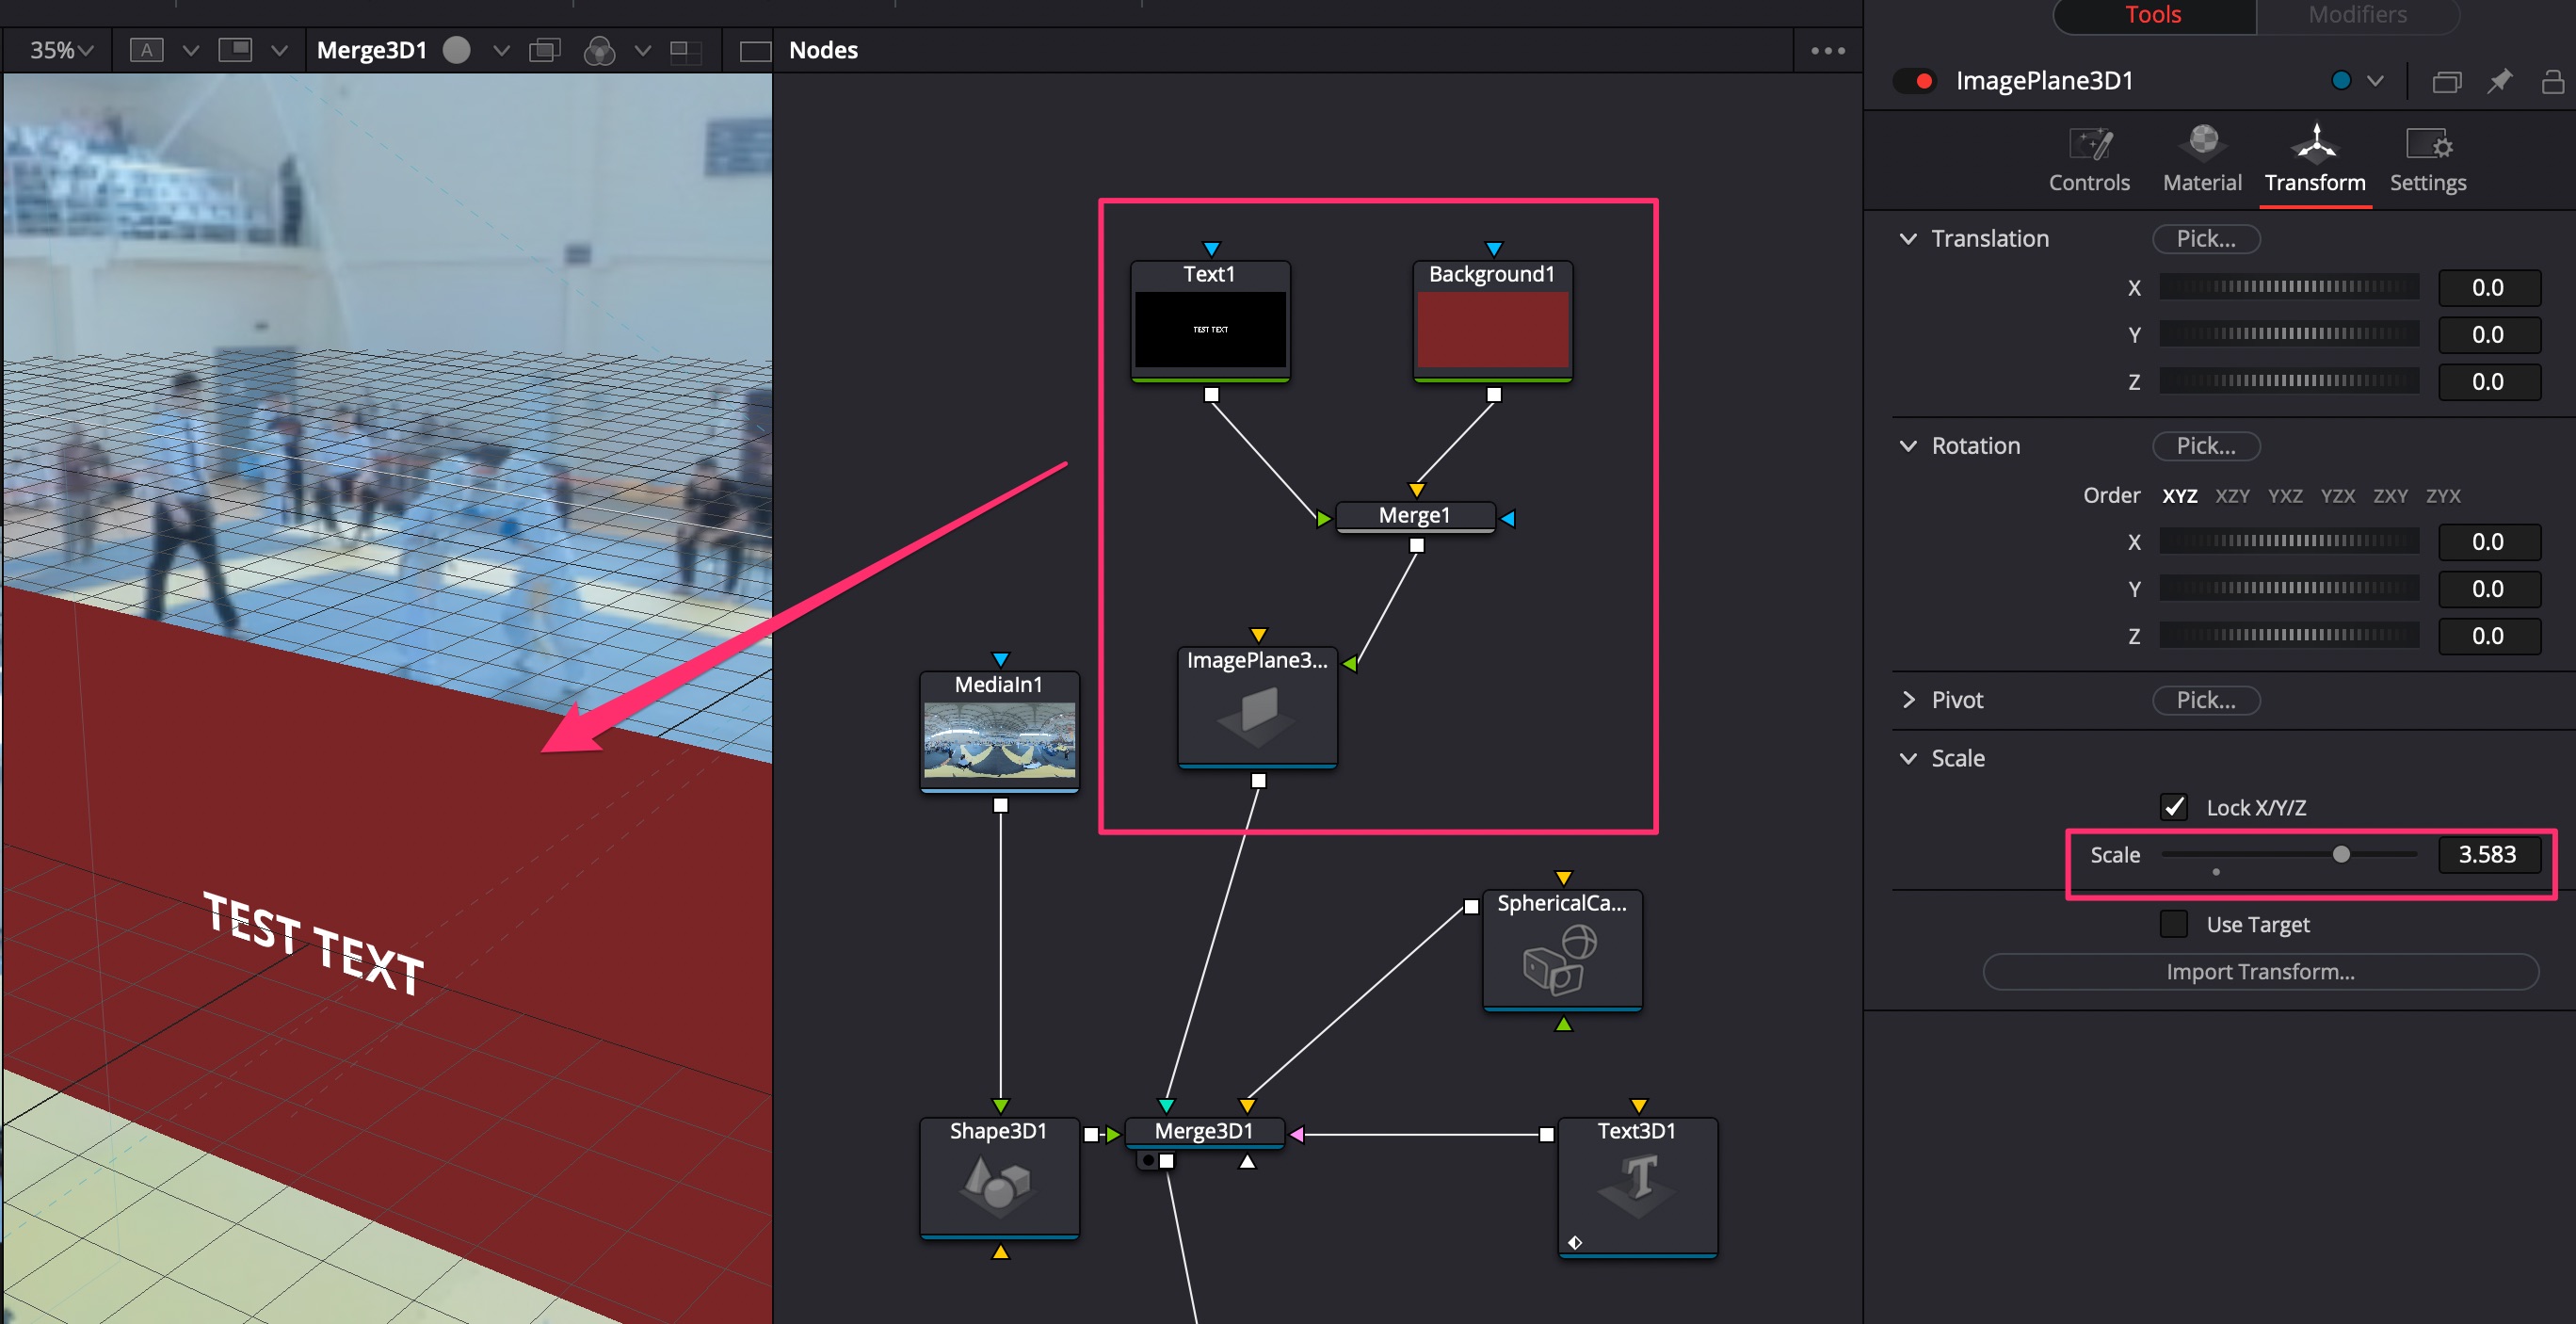
Editing 360VR Video
Configure Settings of DVR
Create anntations to video
Check Exposure in DVR
Hotkeys Based on maximum shortcuts for left hand.
Fusion Room
Deliver Room
Color Room
Editing 360VR Video
Requires DaVinci Studio license.
Turn ON Timeline -> Selection follows playhead
Create a new database from scratch. Choose PostgreSQL or disk files.
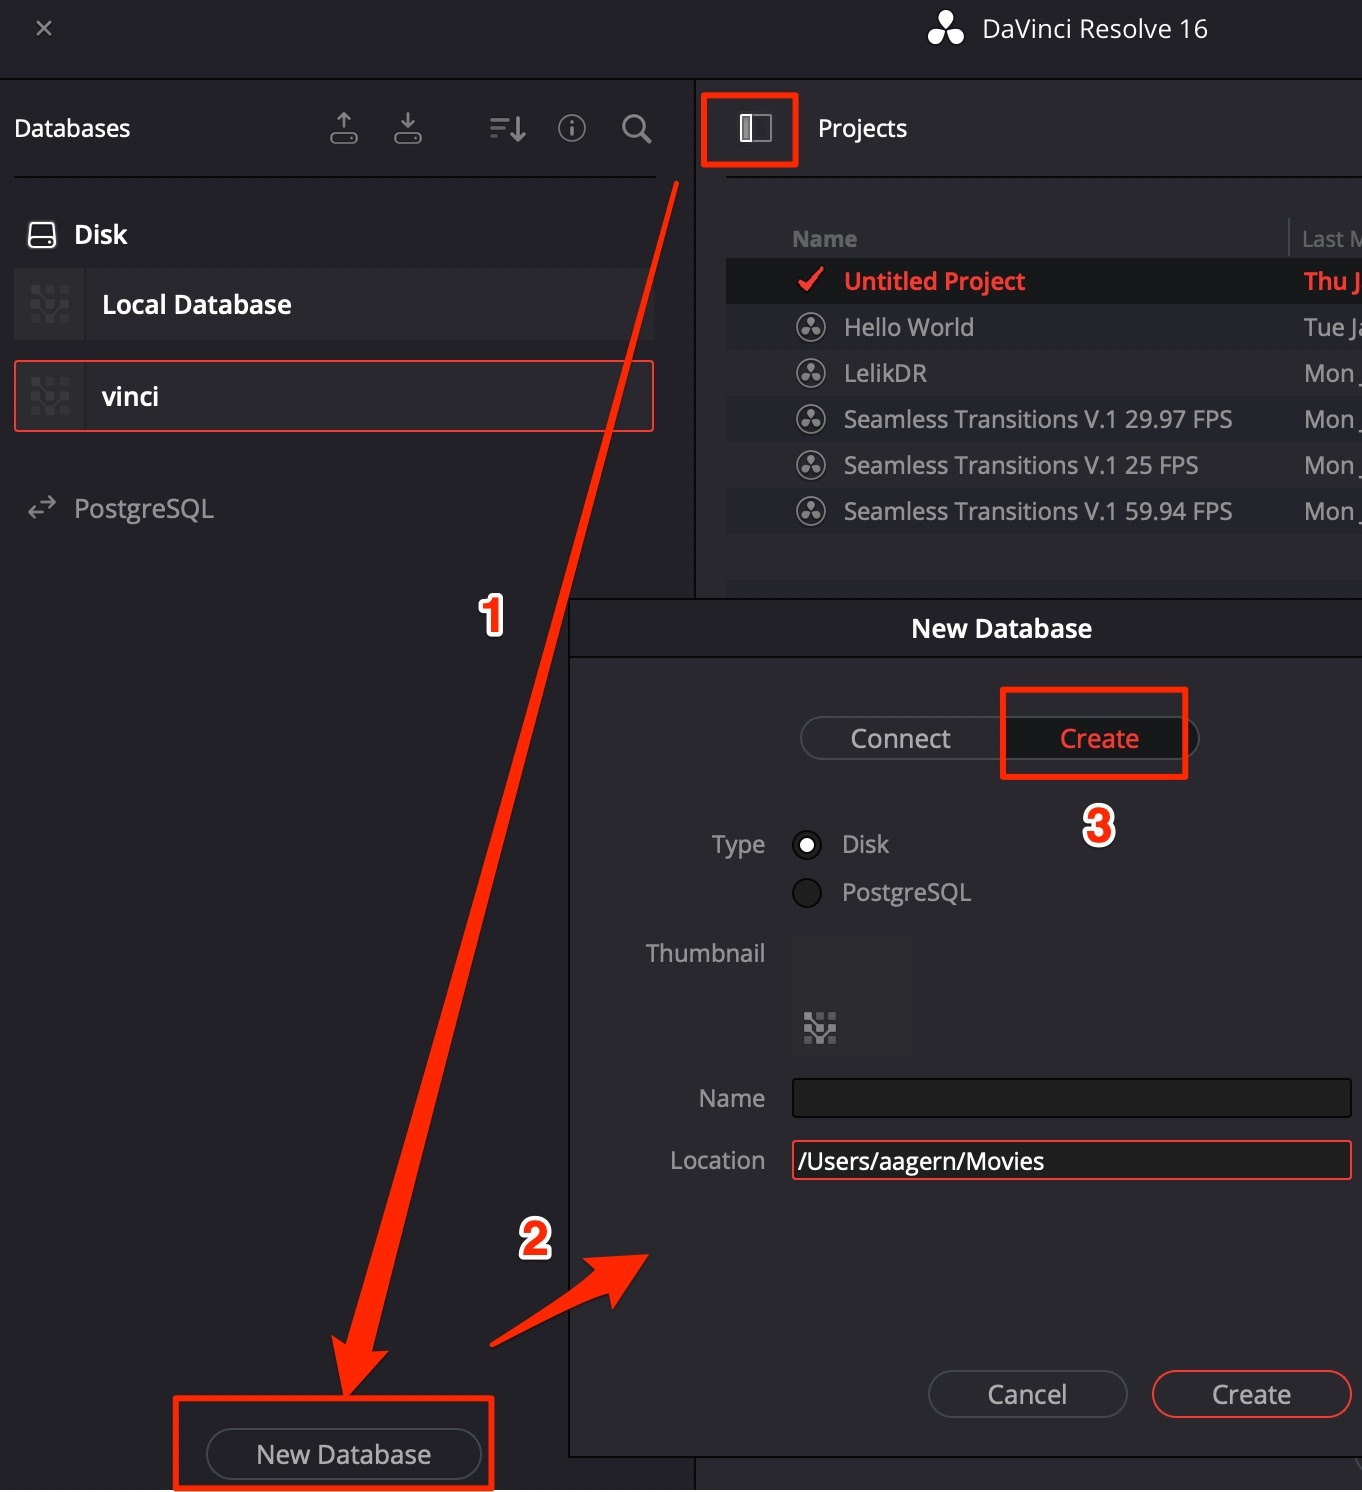
It is recommended to create a separate database + folders for video, pictures, cache etc. for each global project, like Youtube-channel.
Folder structure on disk:
-PROJECT
–Database
–Cache
–SourceMedia (source video)
–Gallery (color correction templates)
–Output (master videos)
–Backups
Save current settings as a preset: go to Presets tab in Project Settings, choose Save As.. After saving the preset, choose it with a right mouse click and choose Save As User Default Config.
Mismatched resolution files = Scale full frame with crop, this setting greatly helps in conform process, if material was re-scaled before color correction.
Broadcast Safe: turn ON to help monitor colors to be safe for TV broadcast.
Check current colors in Color room go in menu View → Display Safe Broadcast Exceptions
Get the colors back to safe with either using HUE vs SAT instrument, or Gamut Mapping OpenFX plugin (Gamut mapping method = Saturation Compression, lower Saturation Max level).
These preferences work for the whole system and all projects.
Needed for work with RAW. Enable all checkboxes - for the GPU to use hardware Debayer on RAW material.
The folder containing 3rd party VST plugins for Fairlight, in case DaVinci did not find them itself.
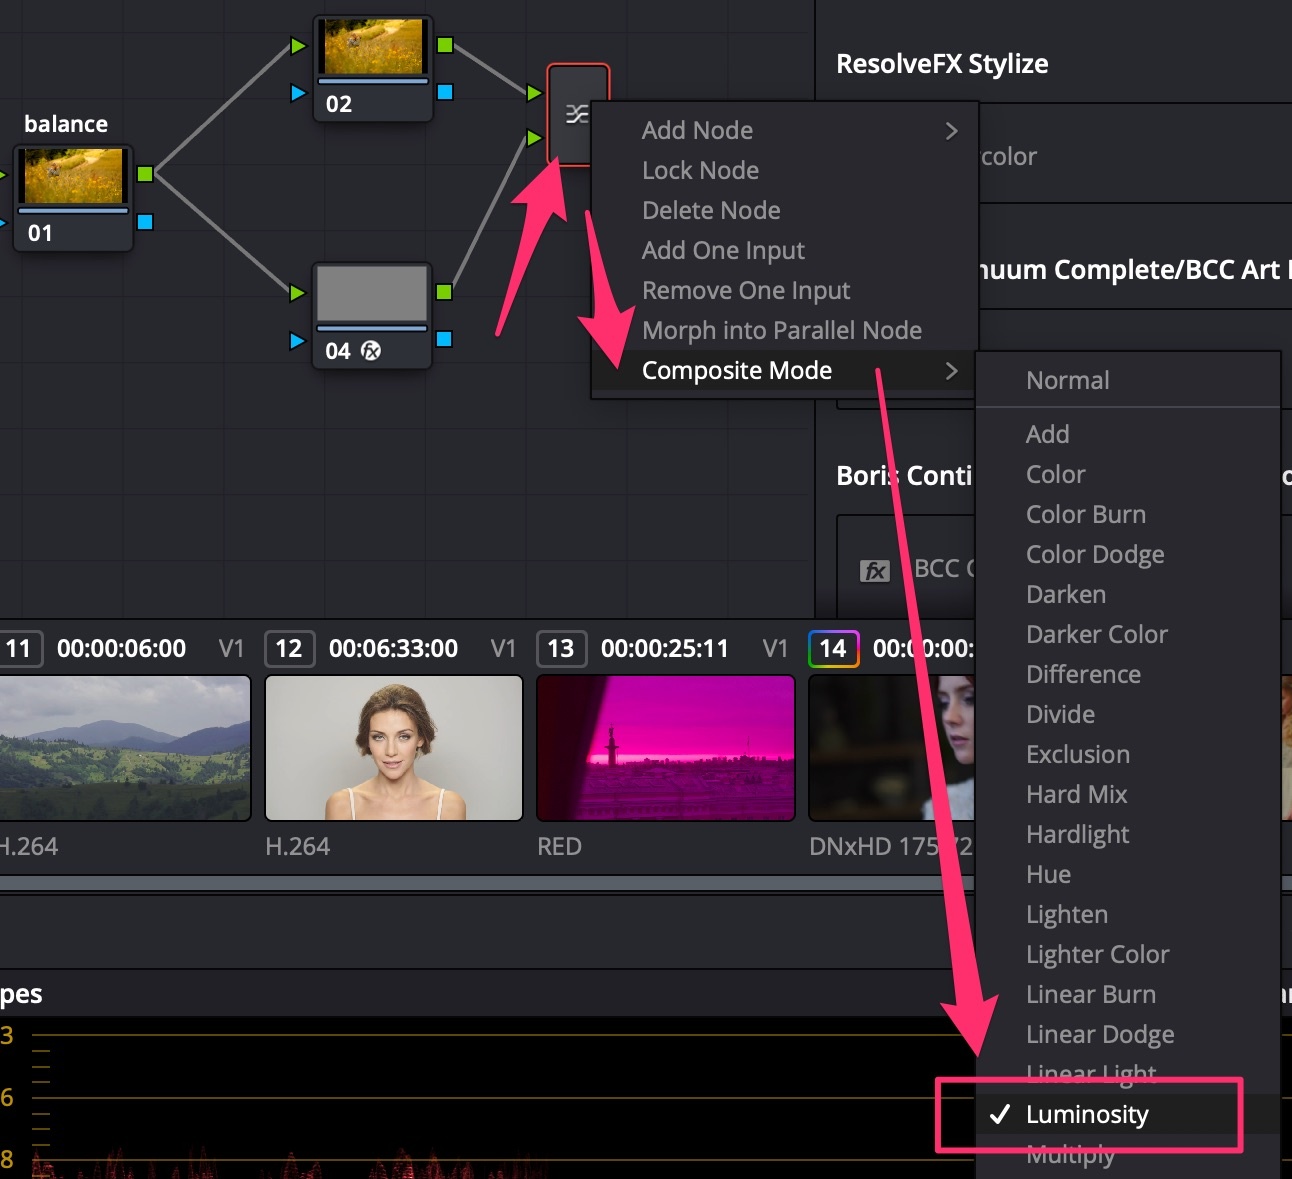
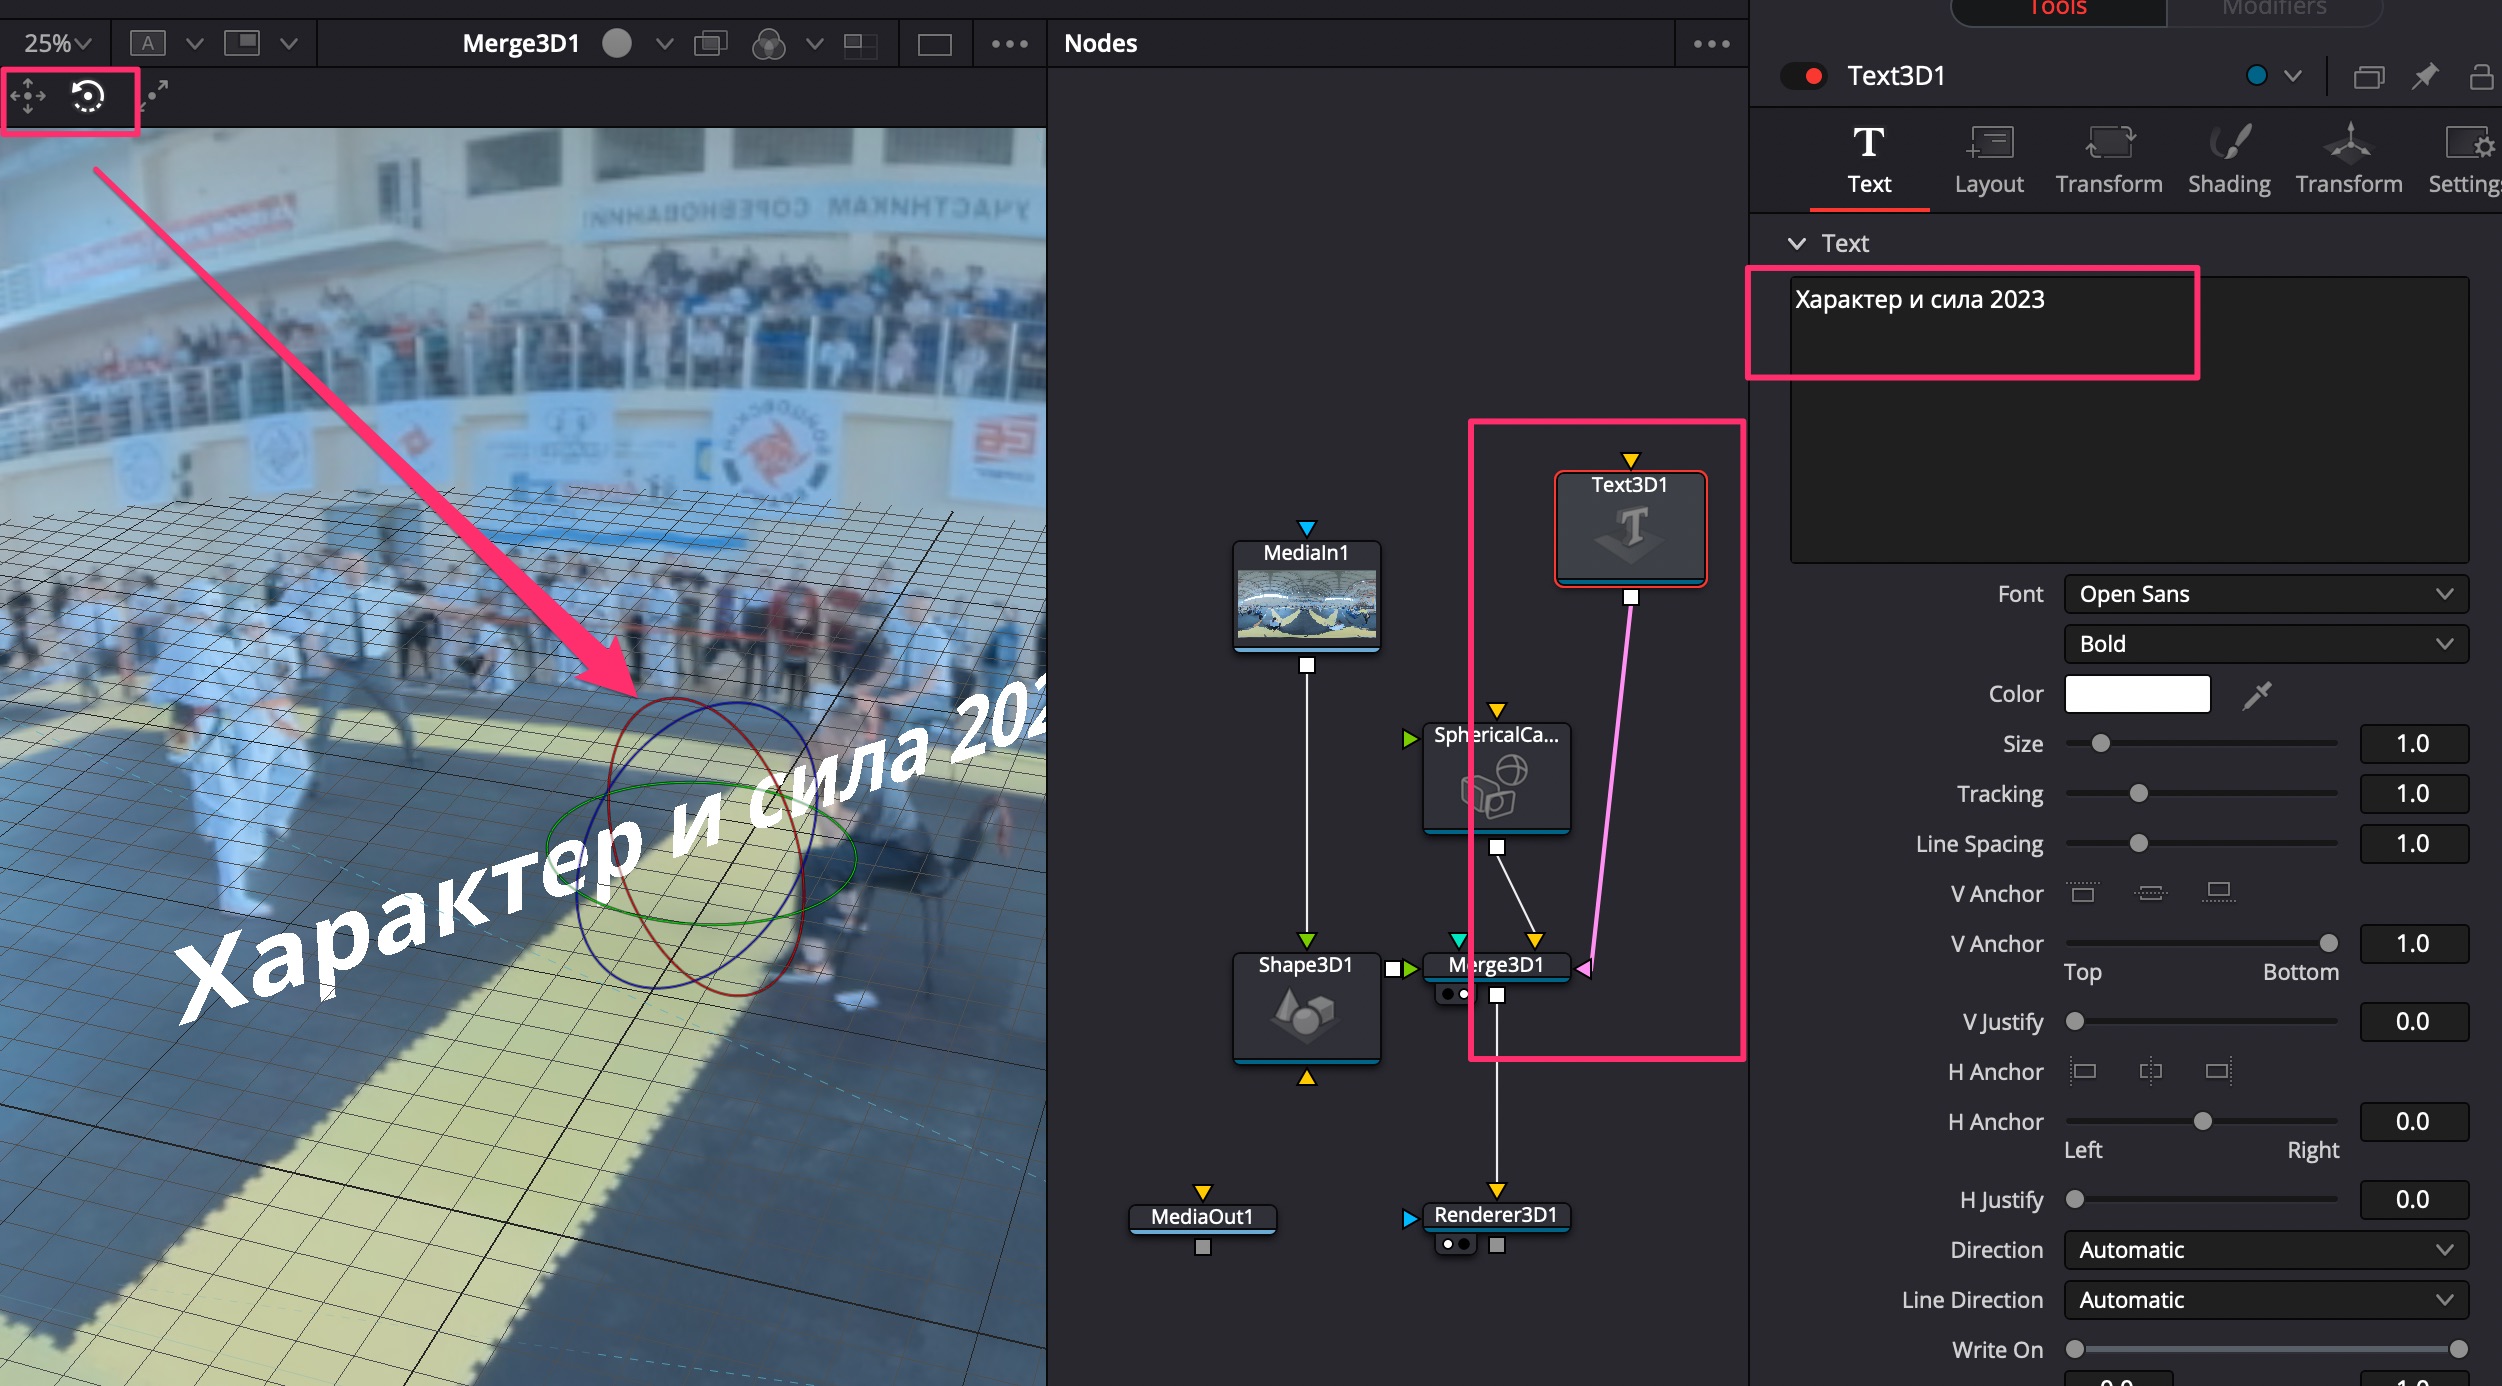
Create anntations to video to future self or other artists:
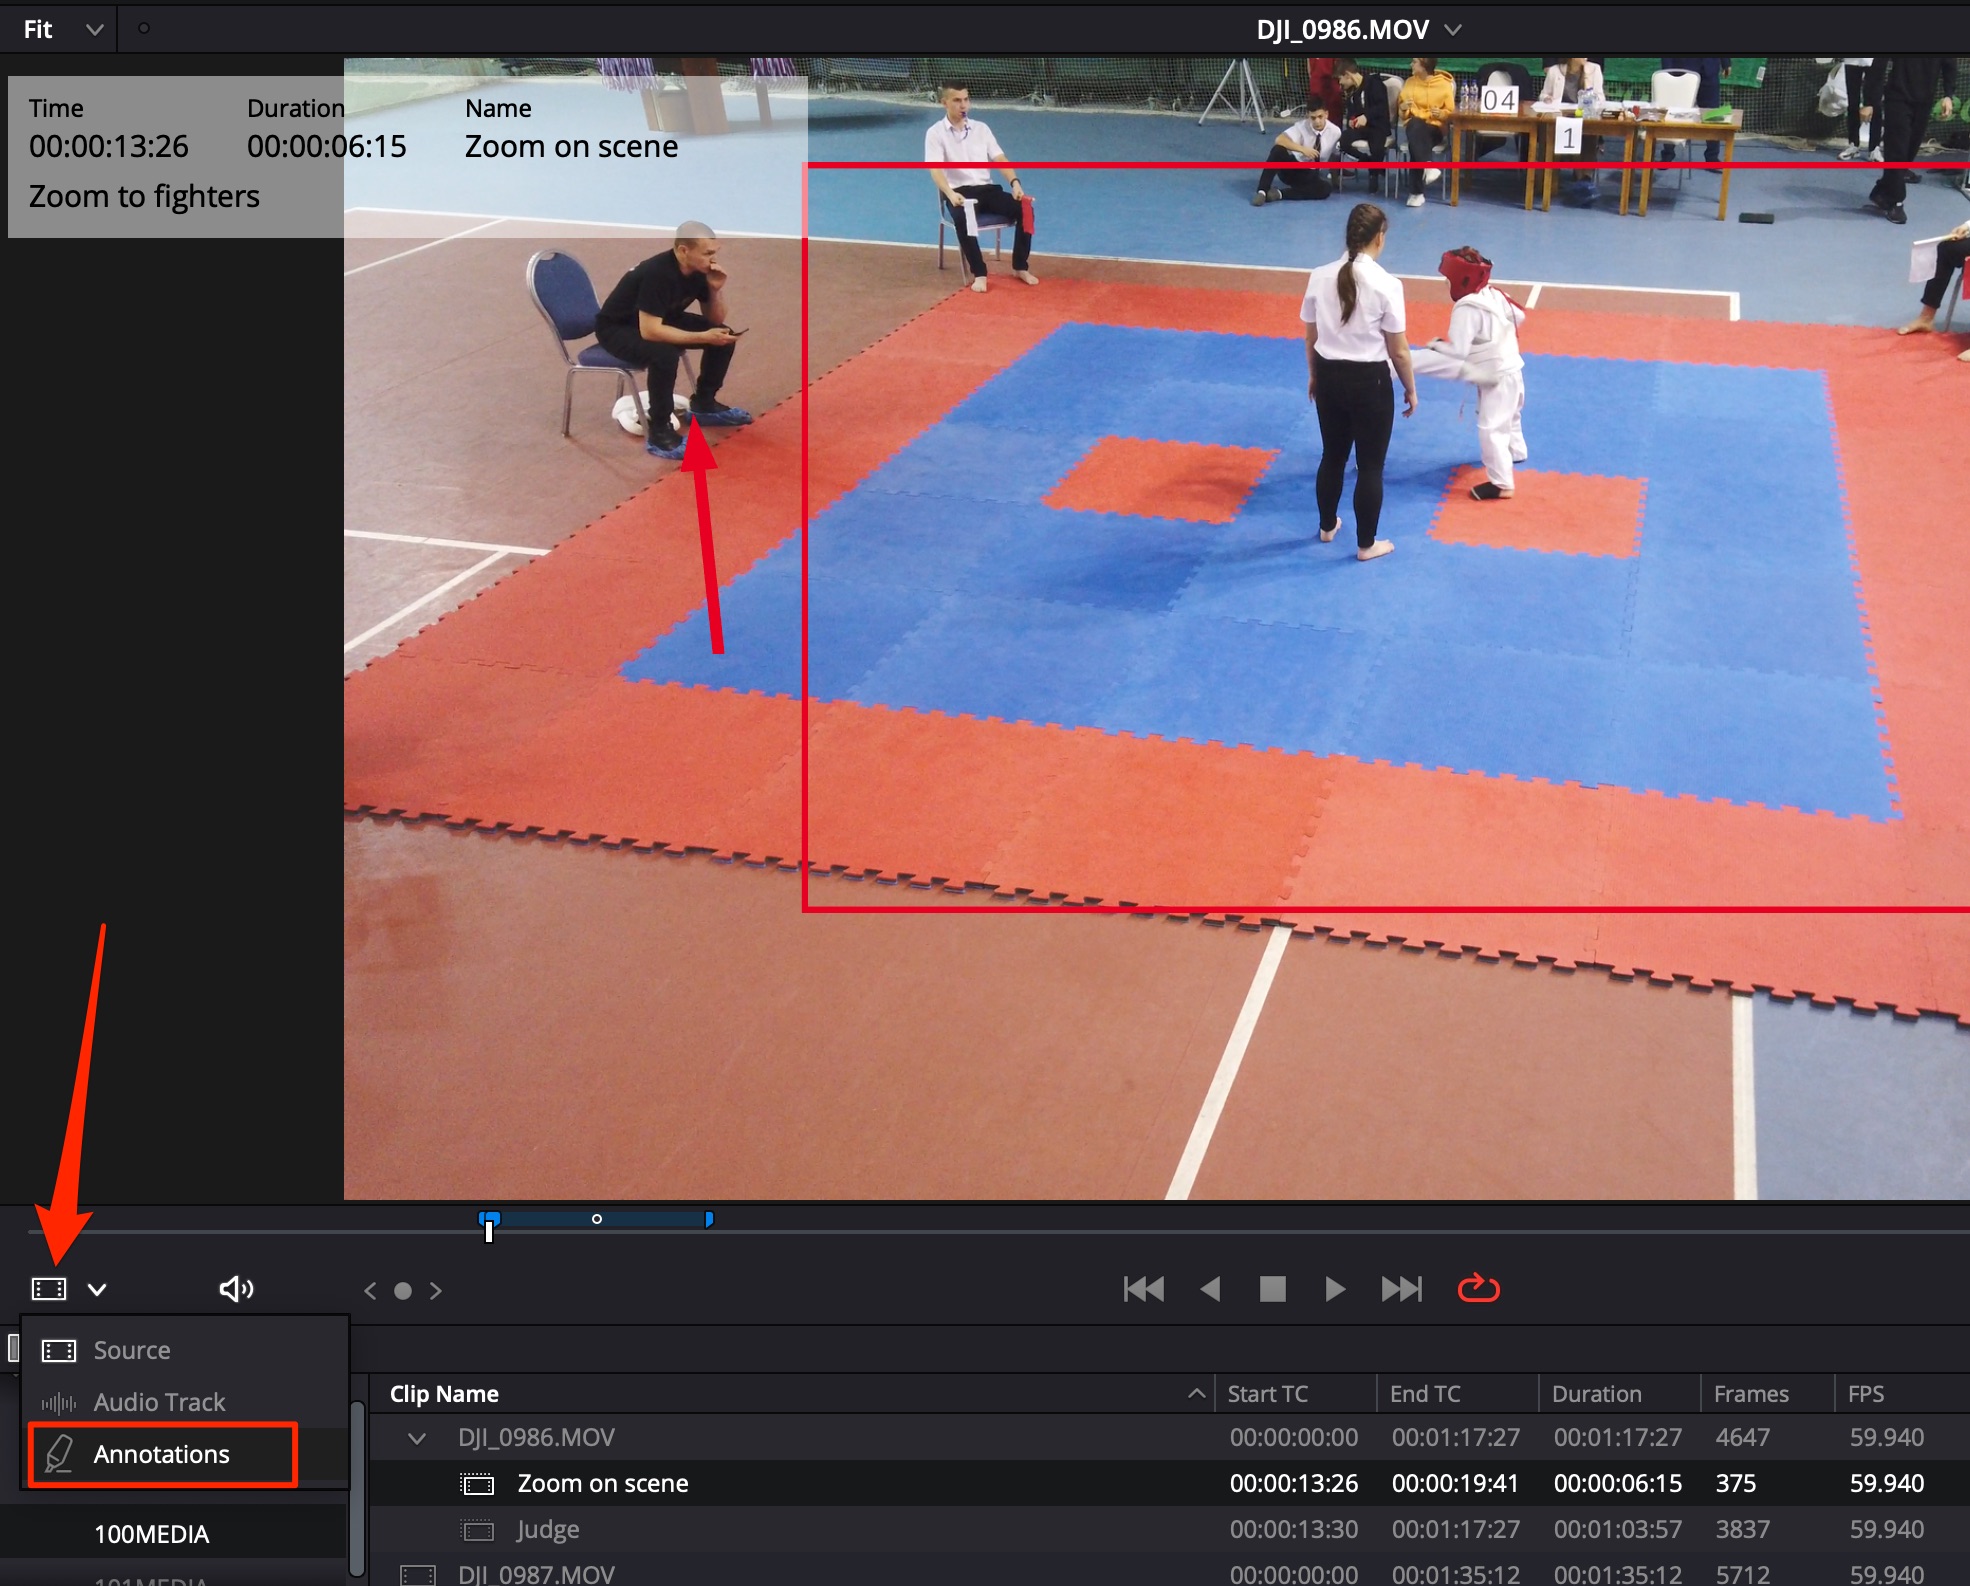
Annotations translate to every other room in DaVinci Resolve.
Use Proxy to optimize performance. Use column header Proxy to check if proxies were created for video.
In Color Room, turn off proxies to check color drift.
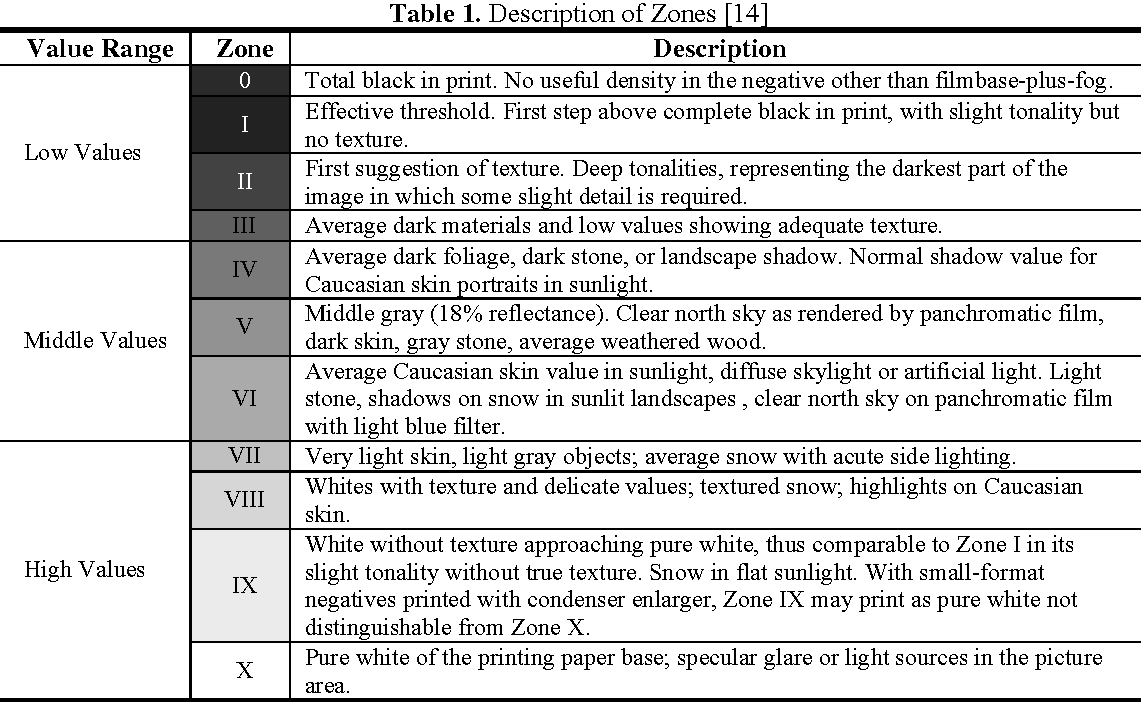
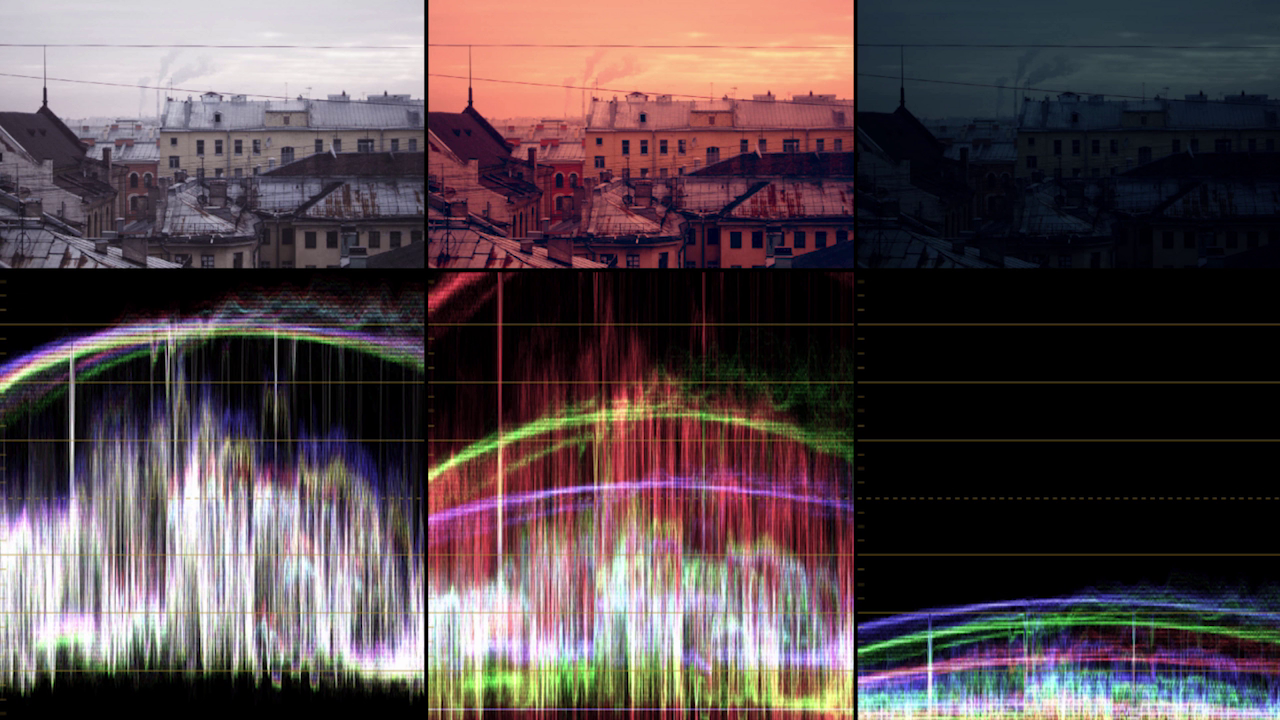
Use Ansel Adams Zone Model to divide exposure in 10 parts
Check the video by using Effects -> False Colors. Configure the effect: Plugin Mode = Creative, Creative Style = Exposure Guide

CTRL+Z - Undo
CTRL+SHIFT+Z - Redo
EDIT TAB - Show/Hide Media Pool
EDIT SHIFT+TAB - Show/Hide Inspector
~ - Enter DaVinci Full Screen
ctrl+~ - See video from Preview in Full Screen (to switch betwwen clips use this from Color tab and ARROWUP/ARROWDOWN)
EDIT X - create In/Out points around selected clip
EDIT ALT+X - delete In/Out points
EDIT SHIFT+A - create In/Out points around several selected clips
EDIT Q - Trim to playhead from left
EDIT M - Create marker (double-tap M,M - create maker & launch marker config window)
EDIT ALT+M - Delete selected marker
EDIT SHIFT+ARROWUP/ARROWDOWN - move playhead between markers
EDIT W - Split on playhead
EDIT E - Trim to playhead from right
EDIT S - Ripple delete selected clip
EDIT D - Enable/disable clip
EDIT T - Trim edit mode tool
EDIT CTRL+D - Delete all gaps between selected clips
EDIT - ARROWUP/ARROWDOWN - Select prev/next clip in timeline
EDIT - ARROWLEFT/ARROWRIGHT - Move by 1 frame left/right
EDIT - SHIFT+ARROWLEFT/ARROWRIGHT - Move by 1 second left/right
EDIT - . / , - Move selected clip left/right by 1 frame
EDIT - - / = - Zoom Out/In timeline (Also ALT+SCROLLBUTTON or ALT+SCROLLTRACKPAD gesture), also SHIFT+W for Zoom In
EDIT CTRL+SCROLLTRACKPAD - scroll timeline (or CTRL+SCROLLBUTTON)
EDIT SHIFT+SCROLLTRACKPAD - scale in/out track on timeline (or SHIFT+SCROLLBUTTON)
EDIT - SHIFT+Z - Zoom to fit timeline
EDIT - ALT+ARROWUP/ARROWDOWN - bring selected clip up/down a track on timeline
EDIT - SHIFT+~ - Reveal Transform border over selected clip in viewer window
EDIT - CTRL+SHIFT+V (done after CTRL+C) - Paste selected attributes on selected clip / paste clip with no overwrite - moves adjacent clips to the right
EDIT - CTRL+SHIFT+X - Remove attributes from selected clip
EDIT - P - Open clip attributes windows
EDIT - F - turn snapping ON/OFF (also use N)
EDIT - ALT+F - find selected clip from timeline in Media Pool
EDIT - CTRL+SHIFT+F - find & show selected clip from Media Pool in Finder
EDIT - CTRL+E - create a Compound clip from selected clips
EDIT - CTRL+SHIFT+E - enter inside Compound clip
EDIT - ALT+SHIFT+E - decompose a Compound clip
EDIT - G - turn linked selection ON/OFF
EDIT - C - unlink/link video+audio of selected clip
EDIT - R - Open clip speed window (+Ripple timeline in config will move adjacent clips without overwirting them)
EDIT - SHIFT+R - clip speed overlay on selected clip
EDIT - CTRL+R** - clip speed menu for clip
EDIT - CTRL+SHIFT+R - show retime curve: ALT+click on curve to add speed points fast
EDIT - CTRL+ALT+R - reset retime controls to 100%
EDIT - SHIFT+C - Curve Editor on selected clip
EDIT - CTRL+SHIFT+C - Keyframe Editor on selected clip
EDIT - L - Loop mode ON/OFF
EDIT - SHIFT+SPACEBAR - play the loop (use In/Out points to define the loop interval)
Y - select clip & press to select all other clips to the right in the track from the current selected one CTRL+Y - clip & press to select all other clips to the left in the track from the current selected one
EDIT H - show current Timeline you are working in at Media Pool
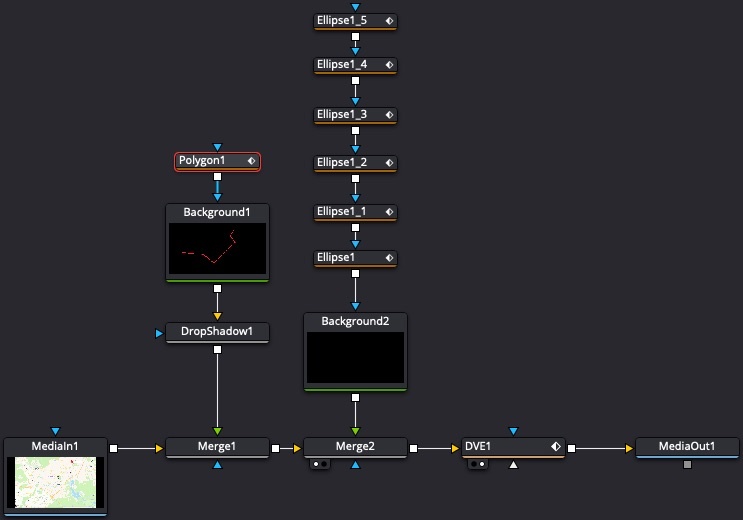
Diagonal masks
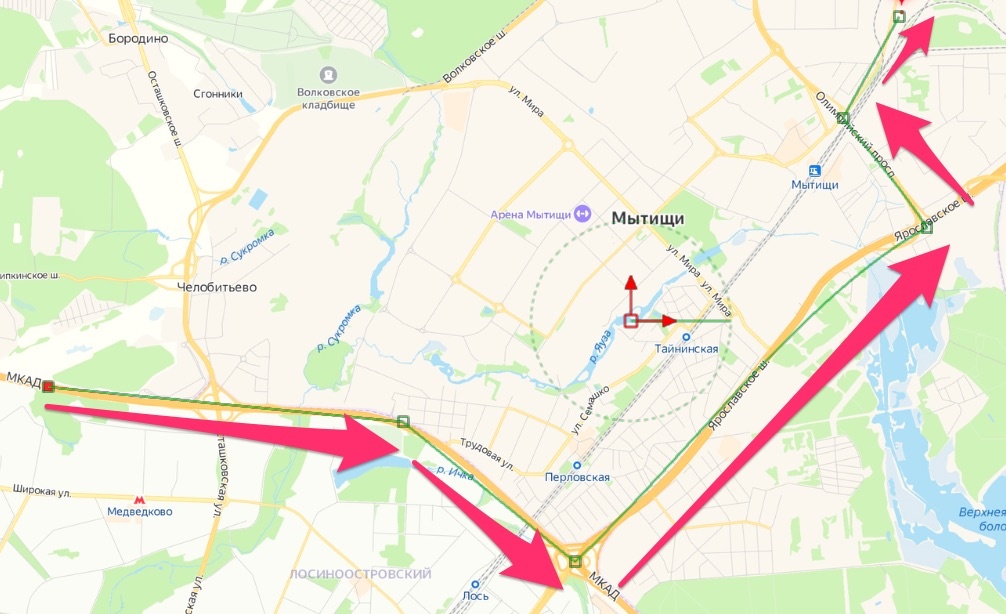
Make animated travel maps
Menu Fusion → Turn OFF Show Toolbar;
Menu Fusion → Fusion Settings…
Reboot of DaVinci Resolve needed after settings saved.
SHIFT+SPACE - search&create node by name menu
CTRL+T - switch inputs (in merge node switch background & foreground)
Connecting output of one node to the output of another node will automatically create a Merge node;
Link: https://www.steakunderwater.com/wesuckless/viewtopic.php?f=32&t=3067
To remove plugins from Reactor, use Remove button. Do not un-tick them.
Use Polygon mask in Fusion to create a diagonal crop, with underlying video creatively seen.
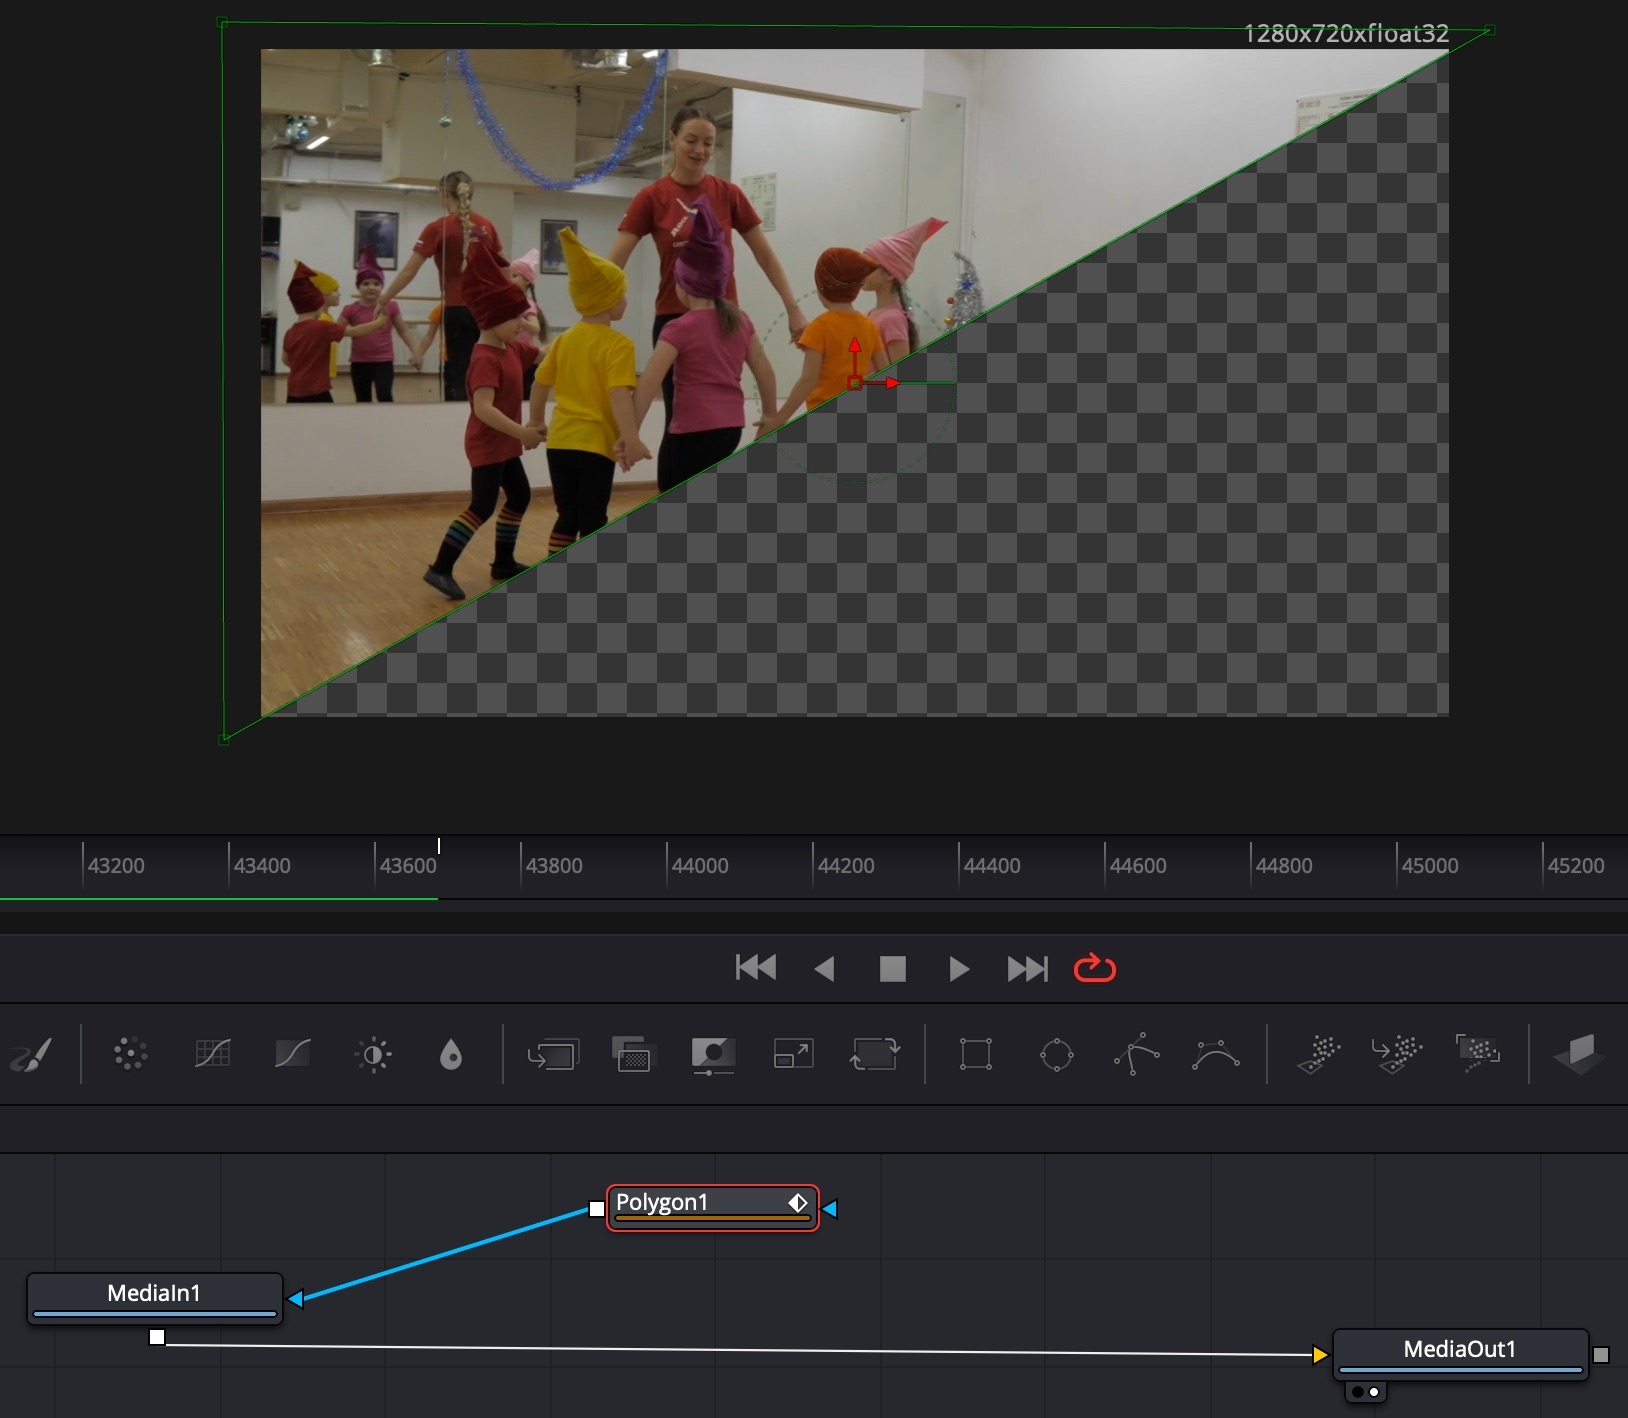
External Link: https://www.youtube.com/watch?v=Vb42fYP6FBU
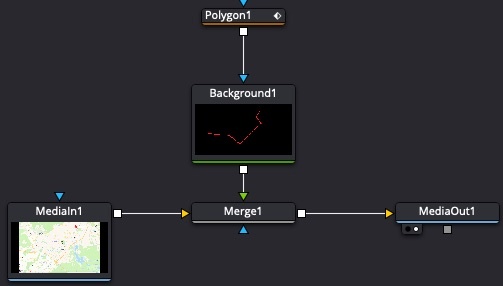
Choose the Polygon node, then in the Viewer draw line segments from point A to B;
In Polygon node → Controls → Border Width = 0.006 add border width to see the line. Choose Polygon → Controls → Border Style to make line ends round or square;
Change Background node Background → Color to make the line colored appropriately;
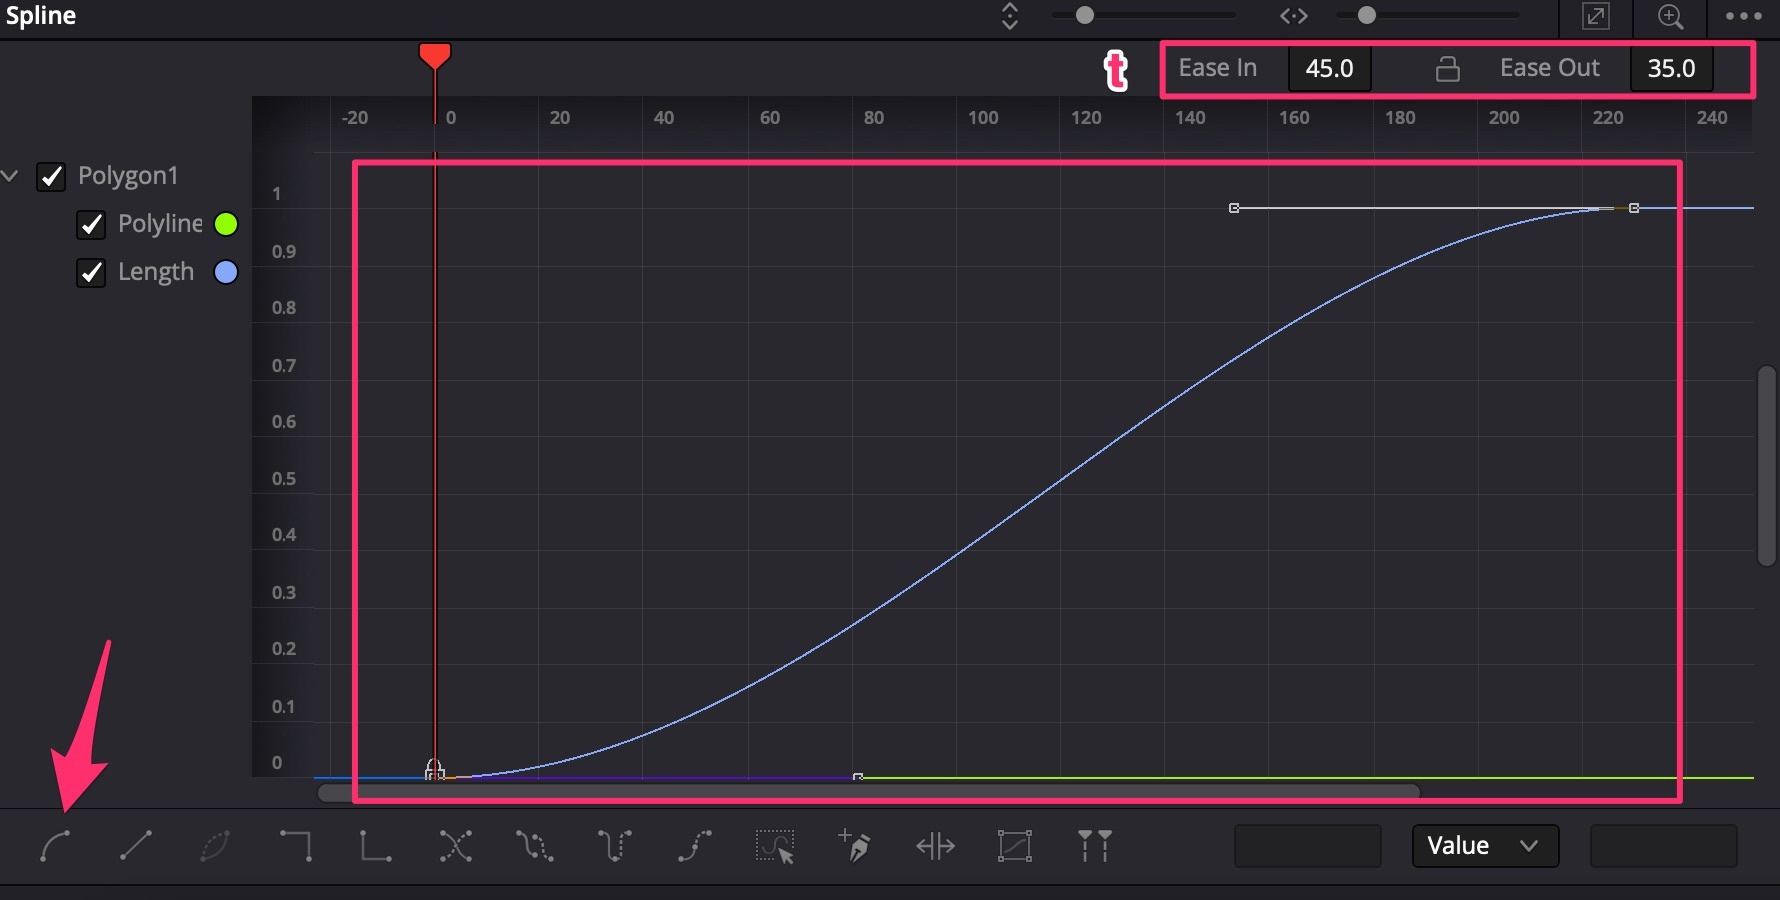
Animate the Polygon node → Controls → Length from 0 and frame 0 to 1.0 at last frame;
In Spline Editor choose both keyframes, make them smooth (hotkey S). Then use hotkey T to select Ease In = 45 and Ease Out = 35;
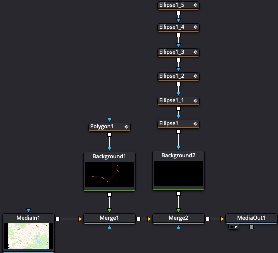
Create map points: add a new Background node, Merge it with the previous Merge node;
Add an Ellipse node, drag the border of the ellipse to make it a small point;
Animate Ellipse → Controls → Border Width from small negative number to 0 to make the point pop out when travel line starts from it;
Go to Spline Editor, choose the Ellipse keyframes and press S to make them smooth;
Ctrl+C copy the Ellipse, then Ctrl+V paste it to make other points for the travel line. Move them to appropriate positions;
Use the Keyframes editor to move the keyframes of ellipse copies in the appropriate frames of time.
Preset = H.264
Quality restrict to:
For RAW footage:
Finding the color balance
Color grading scenarios and config
Color management basics
Color mask types
DaVinci Resolve Studion De-Noiser
Hightlight correction
Typical node structures in color correction and grading
Skin and Sky exposure grading
Object highlighting using vignette
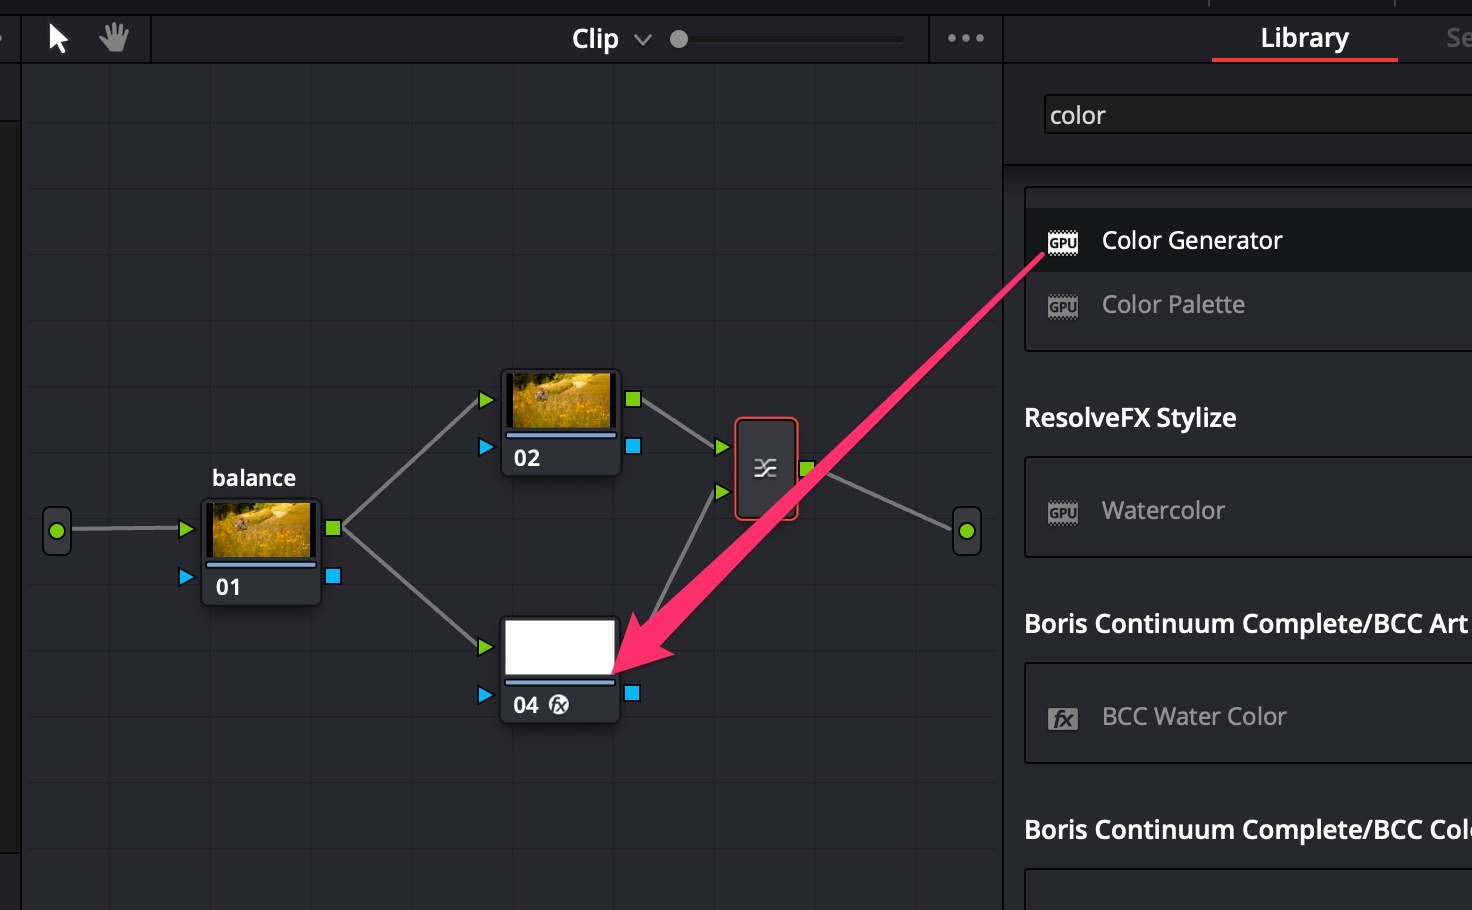
Create a PowerGrade folder to store color grading across all projects.
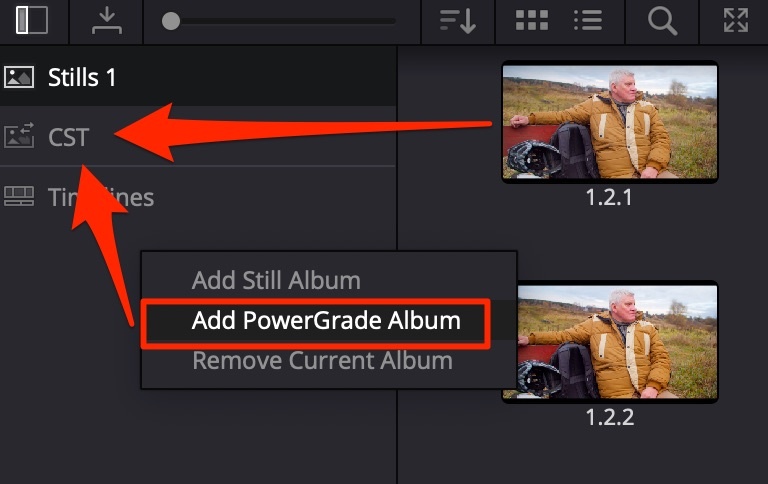
Captured stills can be put into this folder → go into the DaVinci Database and are shared across all projects. A convenient way to store ready-made Color Space Transforms for different camera colorspace/gamma types. Use Append Node Graph to apply the grade, do NOT use Apply Grade since this changes the original ISO of the footage, which may differ in the specific scene.
Cloud tracker - tracks using a whole mask with all its’ points.
Point tracker - needs control points on contrast areas, which it uses to track.
Right-click on footage → Grab Still: this saves the footage with currently applied grade. After any changes to the image, you can find the still in Gallery, and:
Tip to help reach ideal neutral color balance.
Хакрактер рисуется контрастом. Обычно грейдинг начинается с опусканием вниз теней. Дальше отделение от фона.
Человек не воспринимает ЧБ как именно ЧБ, он ищет и выдумывает немного цвета. Поэтому ЧБ не делают полностью лишённым цвета, его чуть-чуть подкрашивают для придания настроения: для тёплого настроения подкрашивают в коричневый, для “глянцево-журнального” настроения - в синий. Количество подкраса совсем маленькое, совсем чуть-чуть, как петрушка в супе.
Start by grading the image into nice blue using all color wheels (Lift, Gamma, Gain), and distribute the wheels in a clockwise fashion between each other!
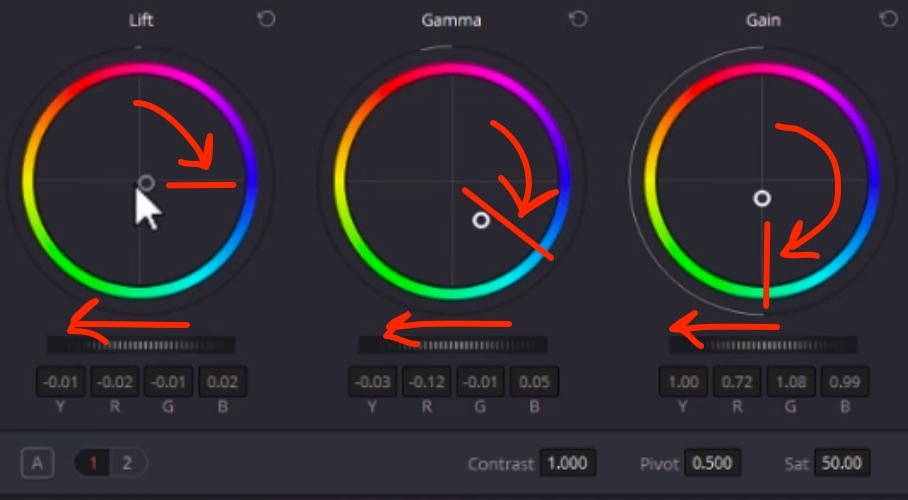
All colors in the image turn blue, but shadows have to stay neutral: user the Log wheels to fine tune: Shadow, Midtone, Highlight wheels between Low Range (default lower than 33% = shadows) and High Range (default higher than 66% = highlights). Turn the Shadow wheel to blue counterpart to make shadows neutral. Lower the Low Range (around 10%) so that midtones are not affected;
THEN mask out skin and other “warm elements” in the picture (in parallel node) and grade them into the opposite color - yellow-orange;
Use the Log wheels to balance the colors: make a soft bridge between warm skin and cold background by turning Shadow wheel to green a bit, Highlight to magenta;
Balance the footage colors, so the color work together, and not appear as isolated elements: one cheater method to do this is to radically darken the background. Since with teal&orange we get the maximum color contrast, it is better to make the light contrast stronger as well. Another method is to make subtle changes - bring the overcolored ares back by lowering saturation, for example.
Color Wheels → Color Boost (number in the below section) - increases/decreases the saturation of the MOST SATURATED colors in the image. Helps if you have some over-saturated colors which you want to level down, without touching the rest if the image.
Add Saturation to high values, then subtract Color Boost to remove color spills.
Example: vegetables in a white glass bowl will pass their color to the bowl. To keep it white, subtract Color Boost.
В плёночном кино грейдинг являлся этапом PRE-Production. Это связано с необходимостью подбора правильной плёнки, дающей нужную гамму цветов. Для проявки плёнки проявочные машины (пример - российская машина МПМ—16—3М), которые работали по заданному СТАНДАРТУ.
Videocard sends a signal to the monitor, divided in 2 components: COLORSPACE (color) and GAMMA (light)
Initial colorspace is a triangle-like model of all colors which are discriminated by the human eye (mathematical model):
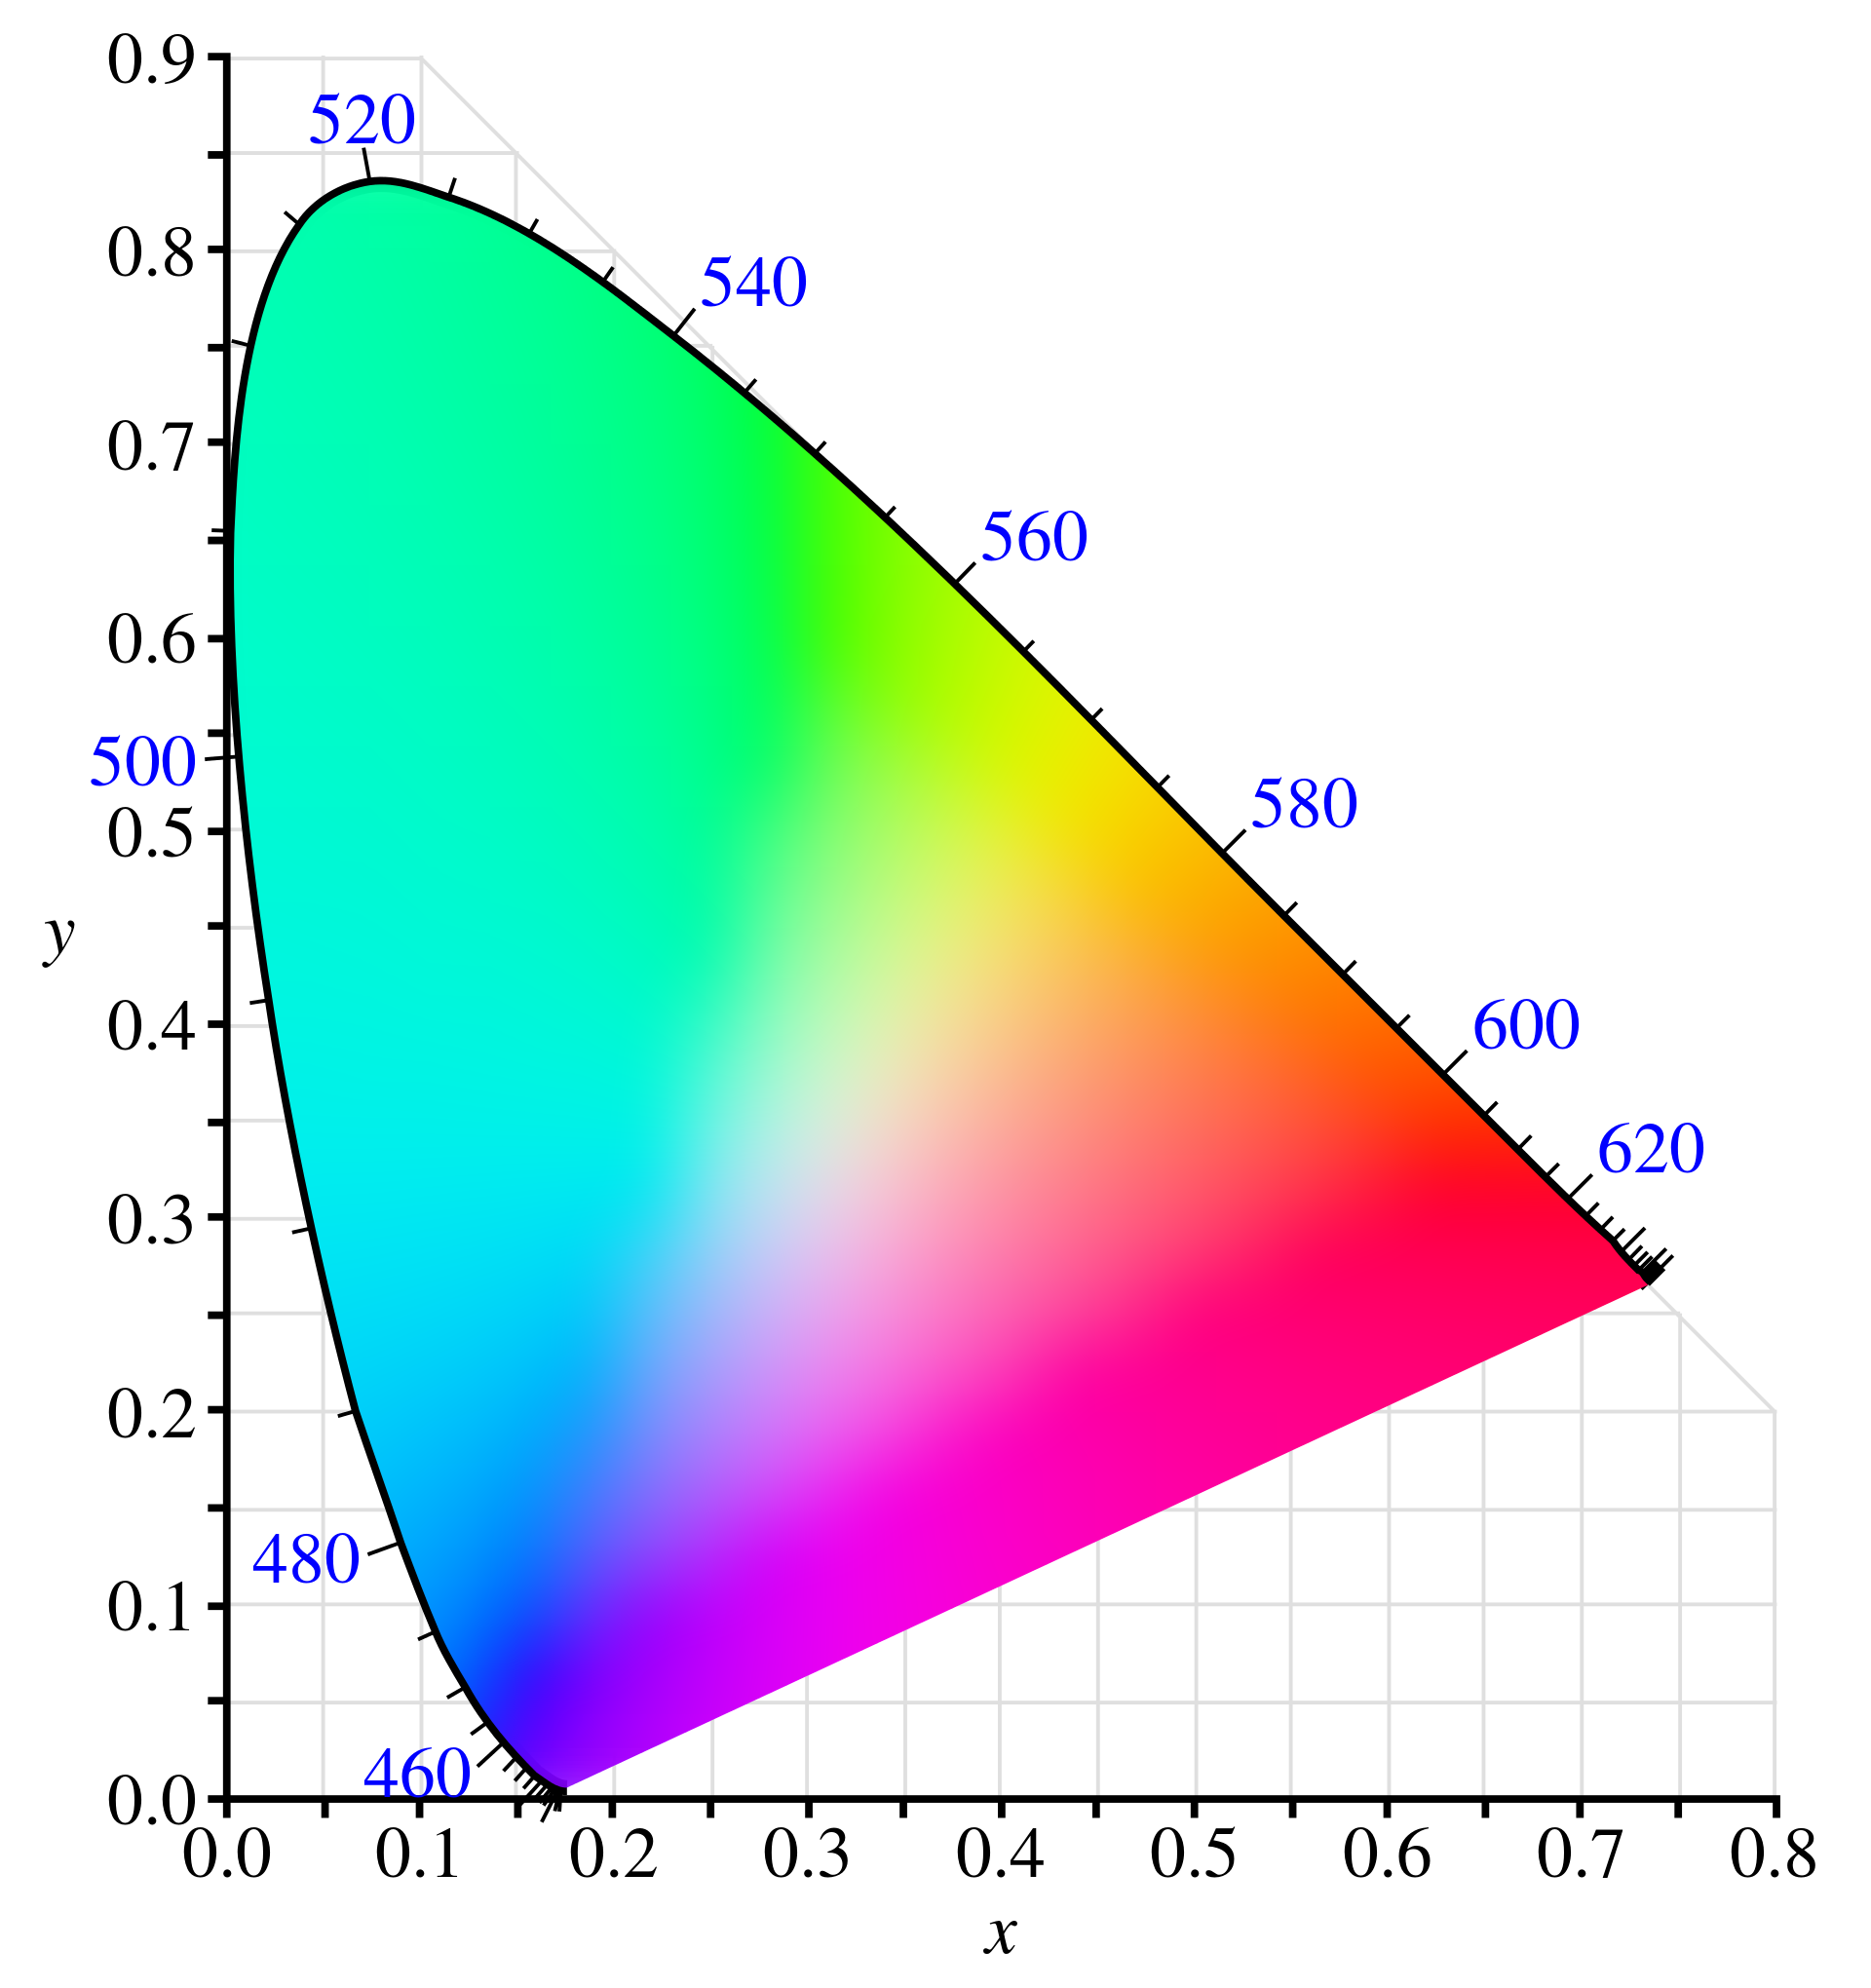 Different color spaces encompass different sets of colors as compared to this model:
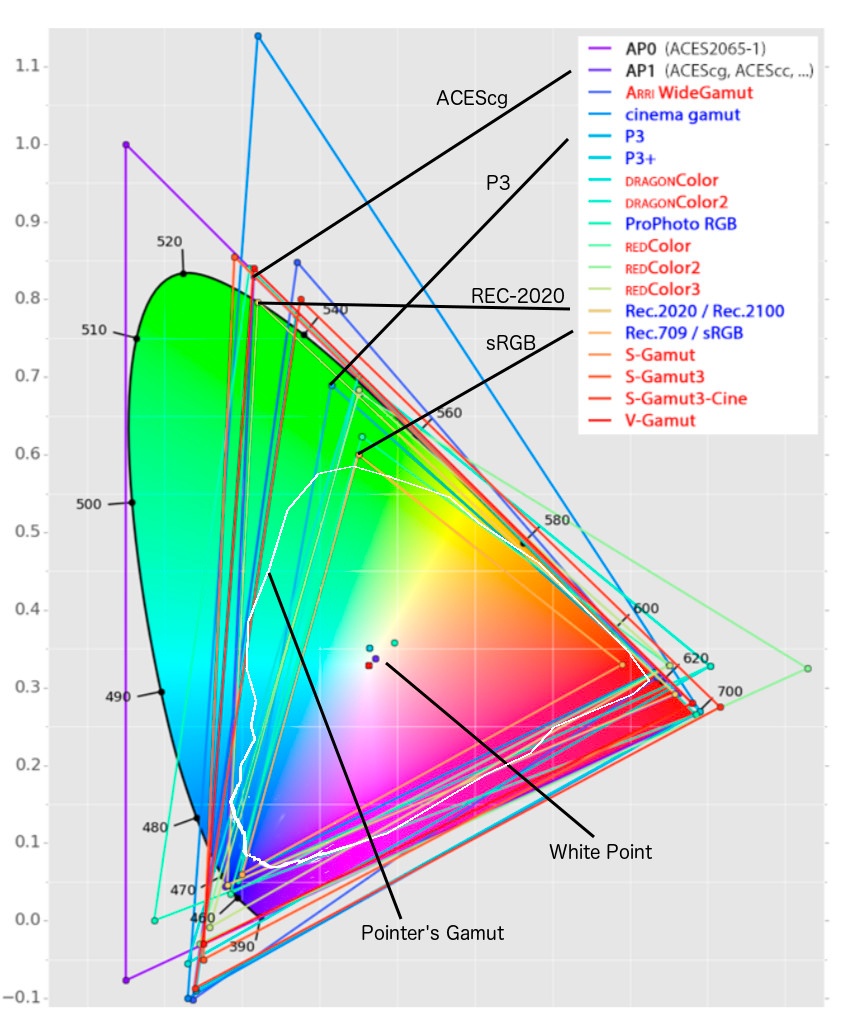 rec709 - came with digital TV, P3 - used for digital cinema theater, rec2020 - UHDTV / new 4K video standard.
Digital cameras see the world in a linear fashion. If we have a room with 1 lamp and we bring in a second lamp, camera will register 2x increase of light. Human eye will register around +20% increase of light.
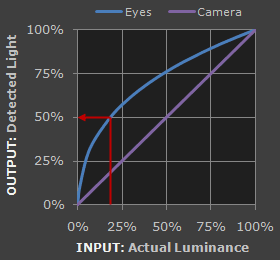 Transfer function - math function to compress the light data of an image and then use this file to restore the whole dynamic range seen by the human eye.
REC709 GAMMA 2.4 is the native format for DaVinci Resolve, Adobe Premiere etc. If you throw a different colorspace file in DaVinci, you must tell it what it is and convert: Color room → Library → ResolveFX Color → Color Space Transform.
Fir SONY SLog3 shoot with +2 or +3 F-stops higher to quell noise, then choose:
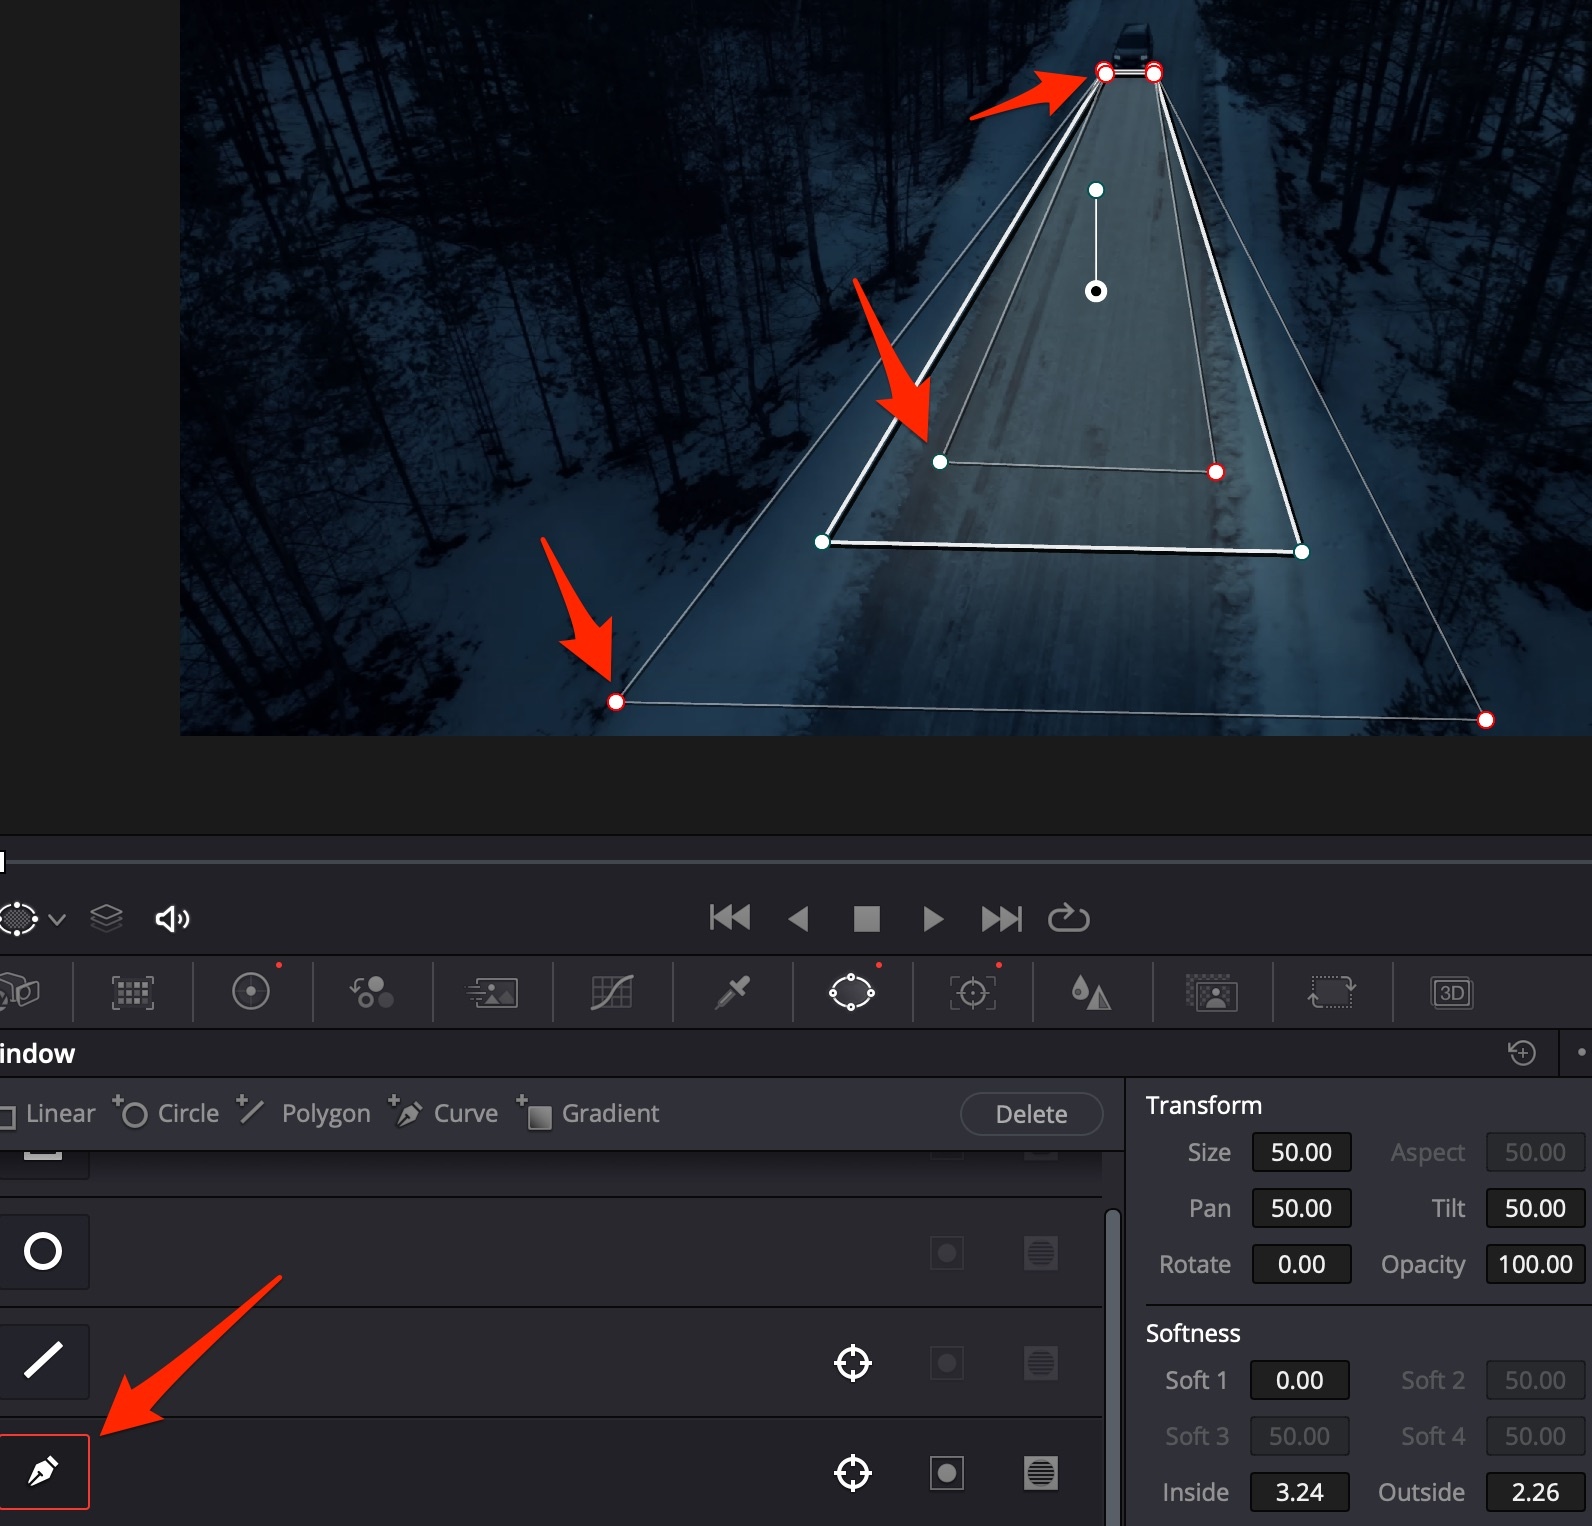
Always use the curved mask: it is the only one that has soft transitions, which can be changed individually for different sides:
Davinci Resolve Studio 18+ brings Object Mask to select parts of a person.
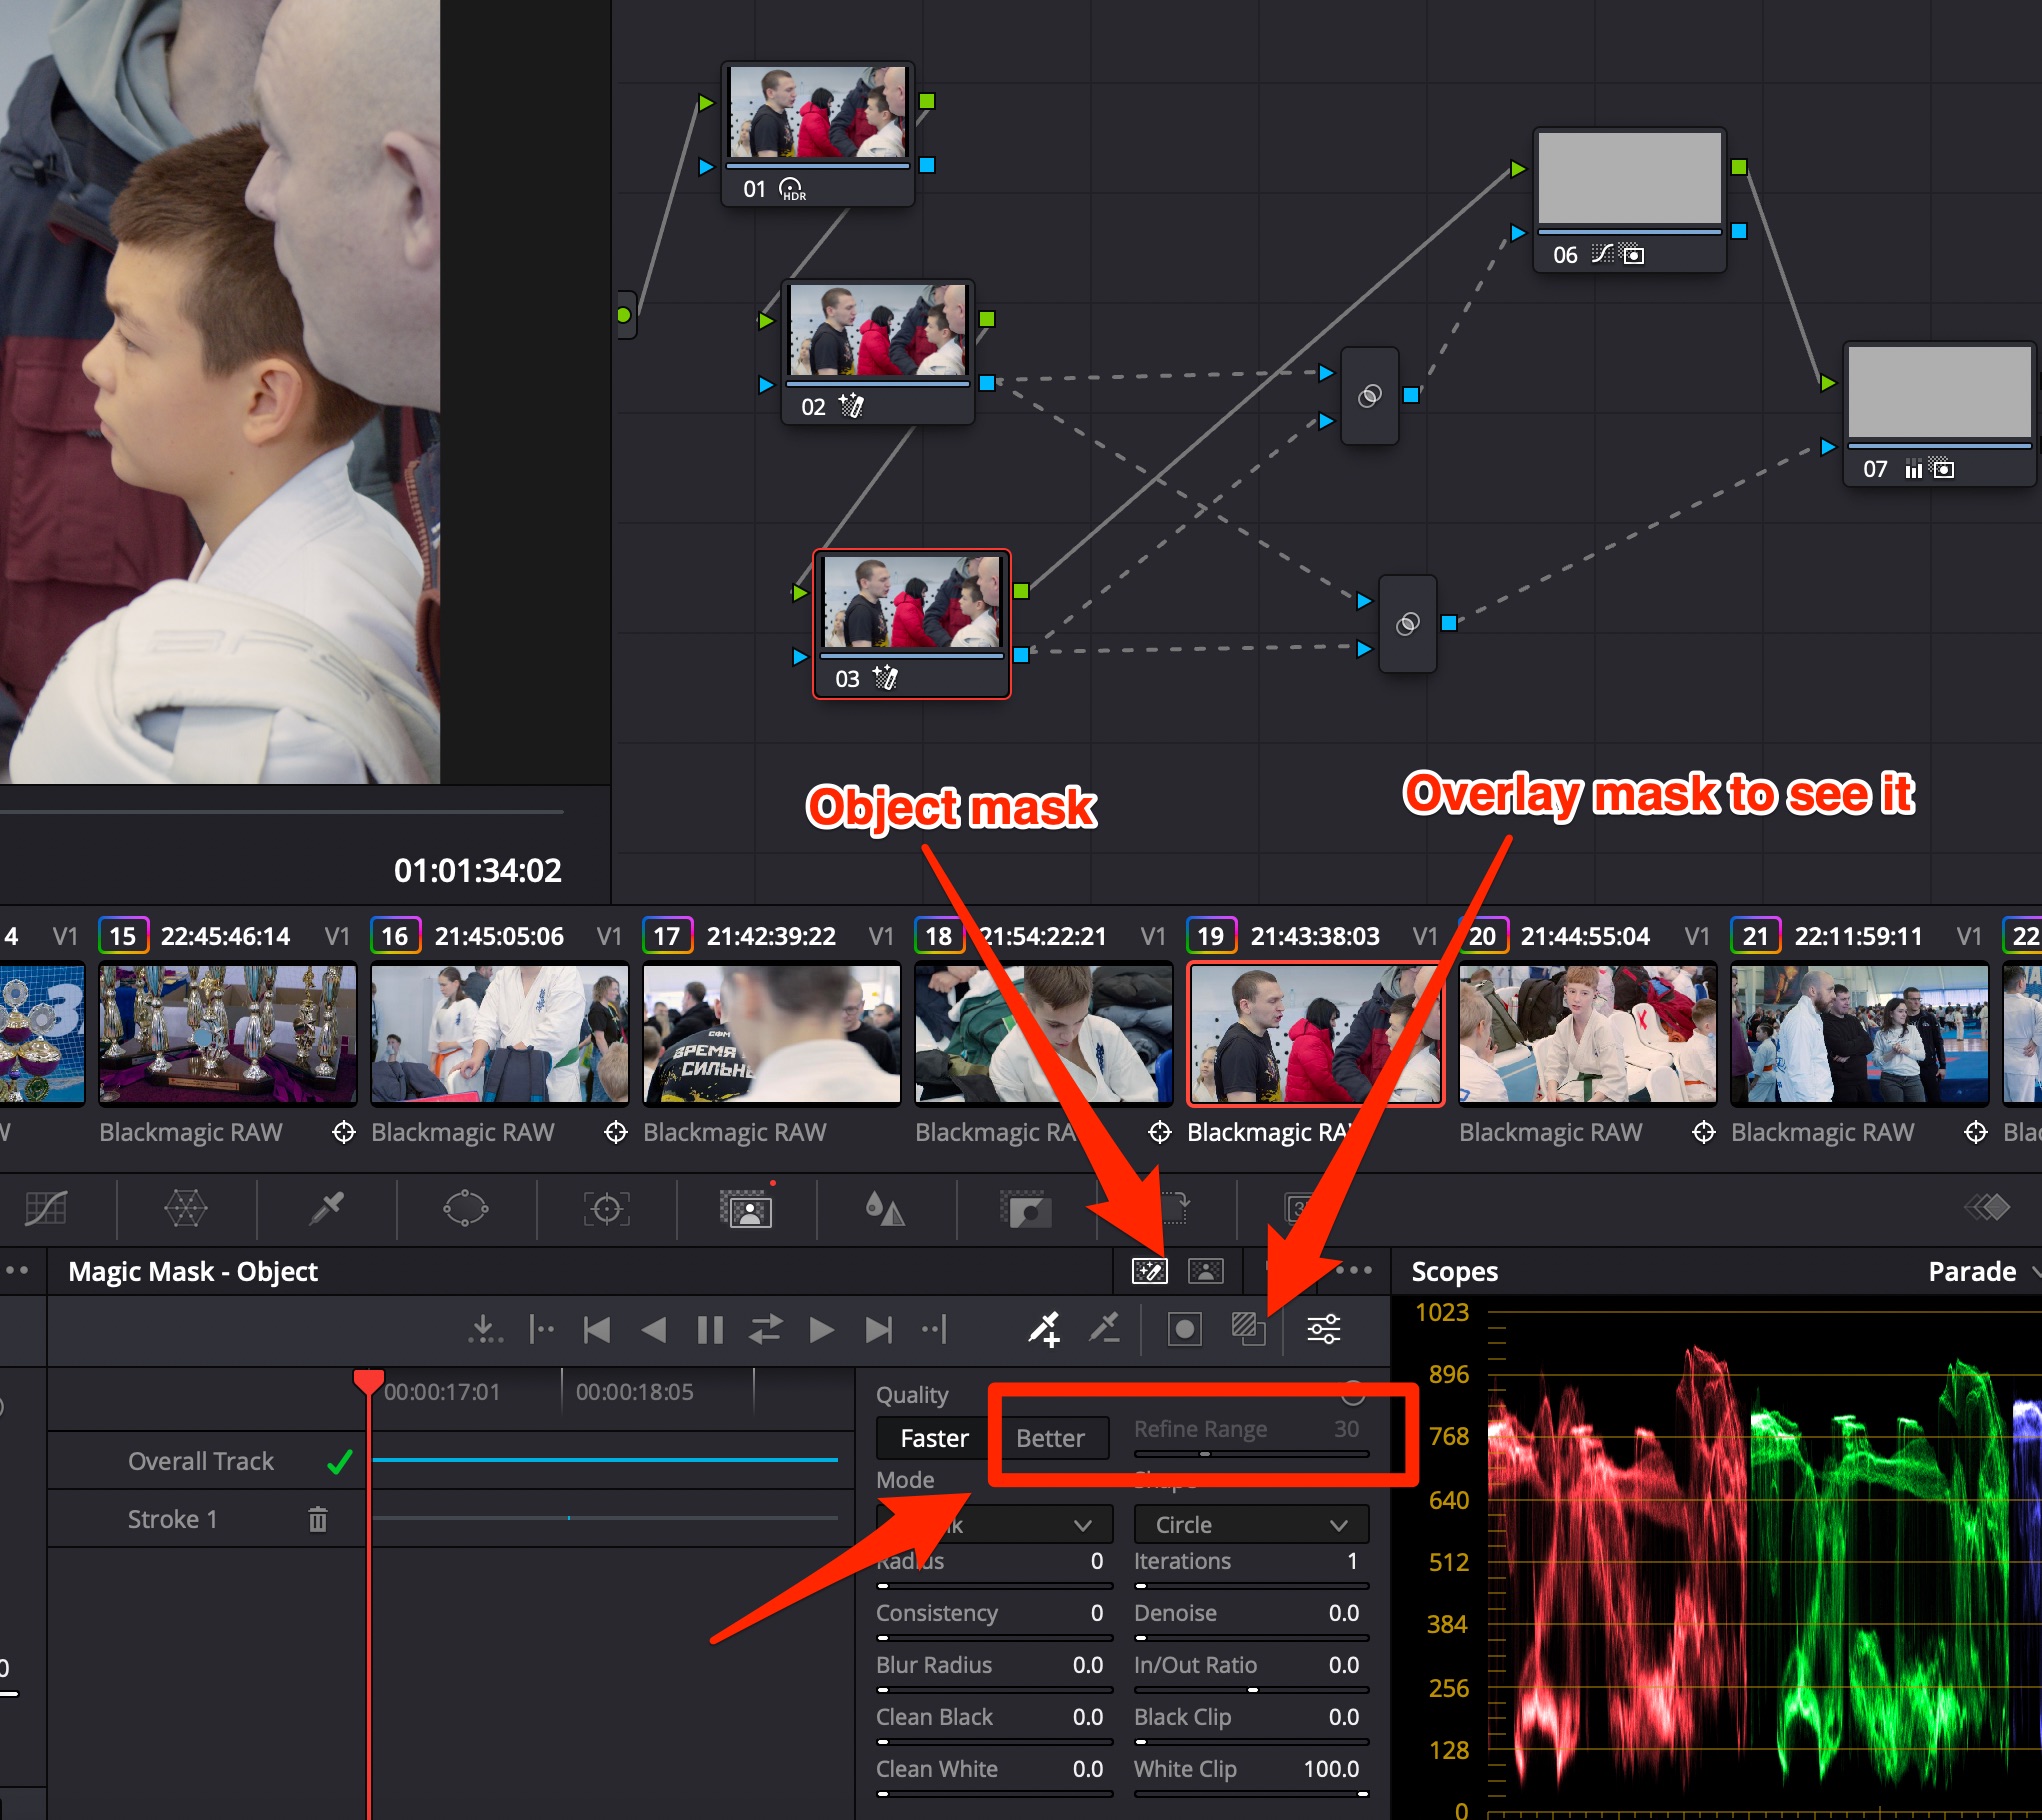 Draw lines with dropper+ over face & other parts of a person to highlight them. Use dropper- to leave other objects out of the mask. Use Better quality with Refine Edge BEFORE calculating the mask.
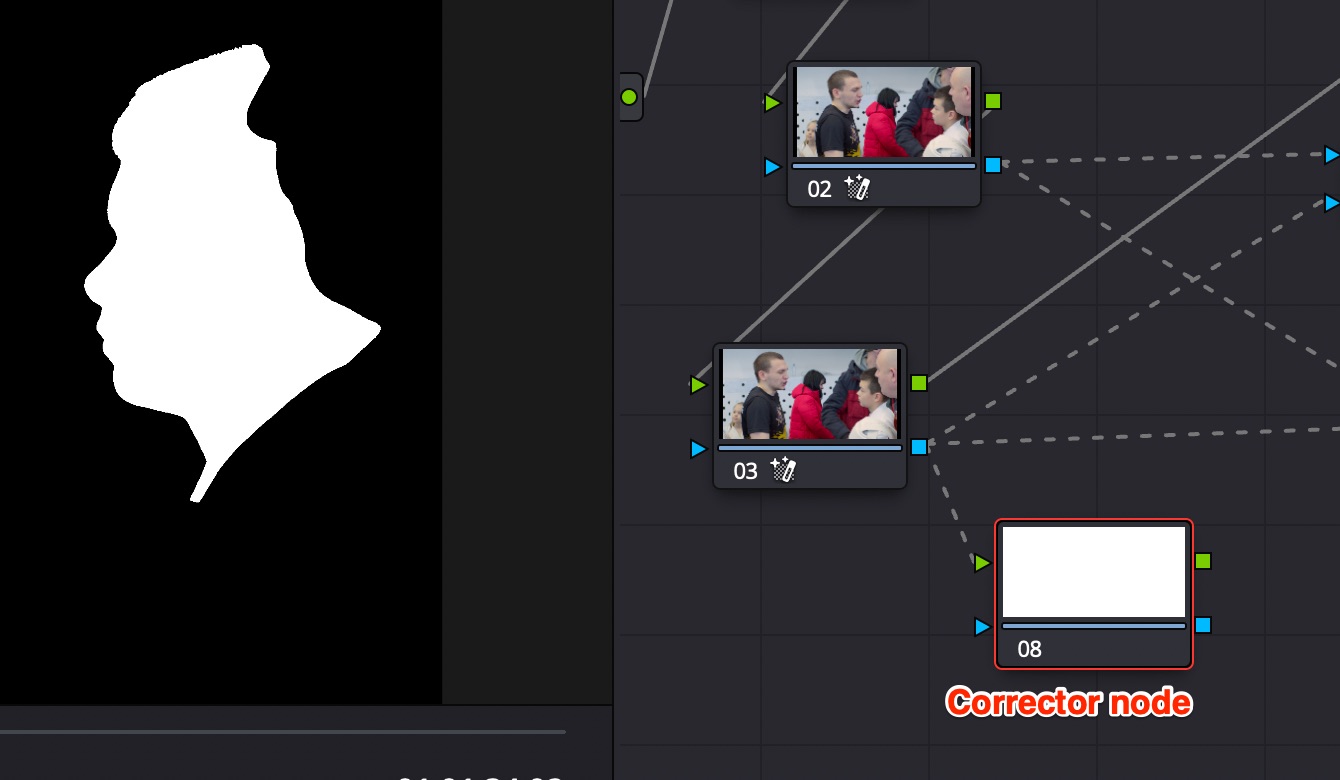
You can see the mask using Corrector node.
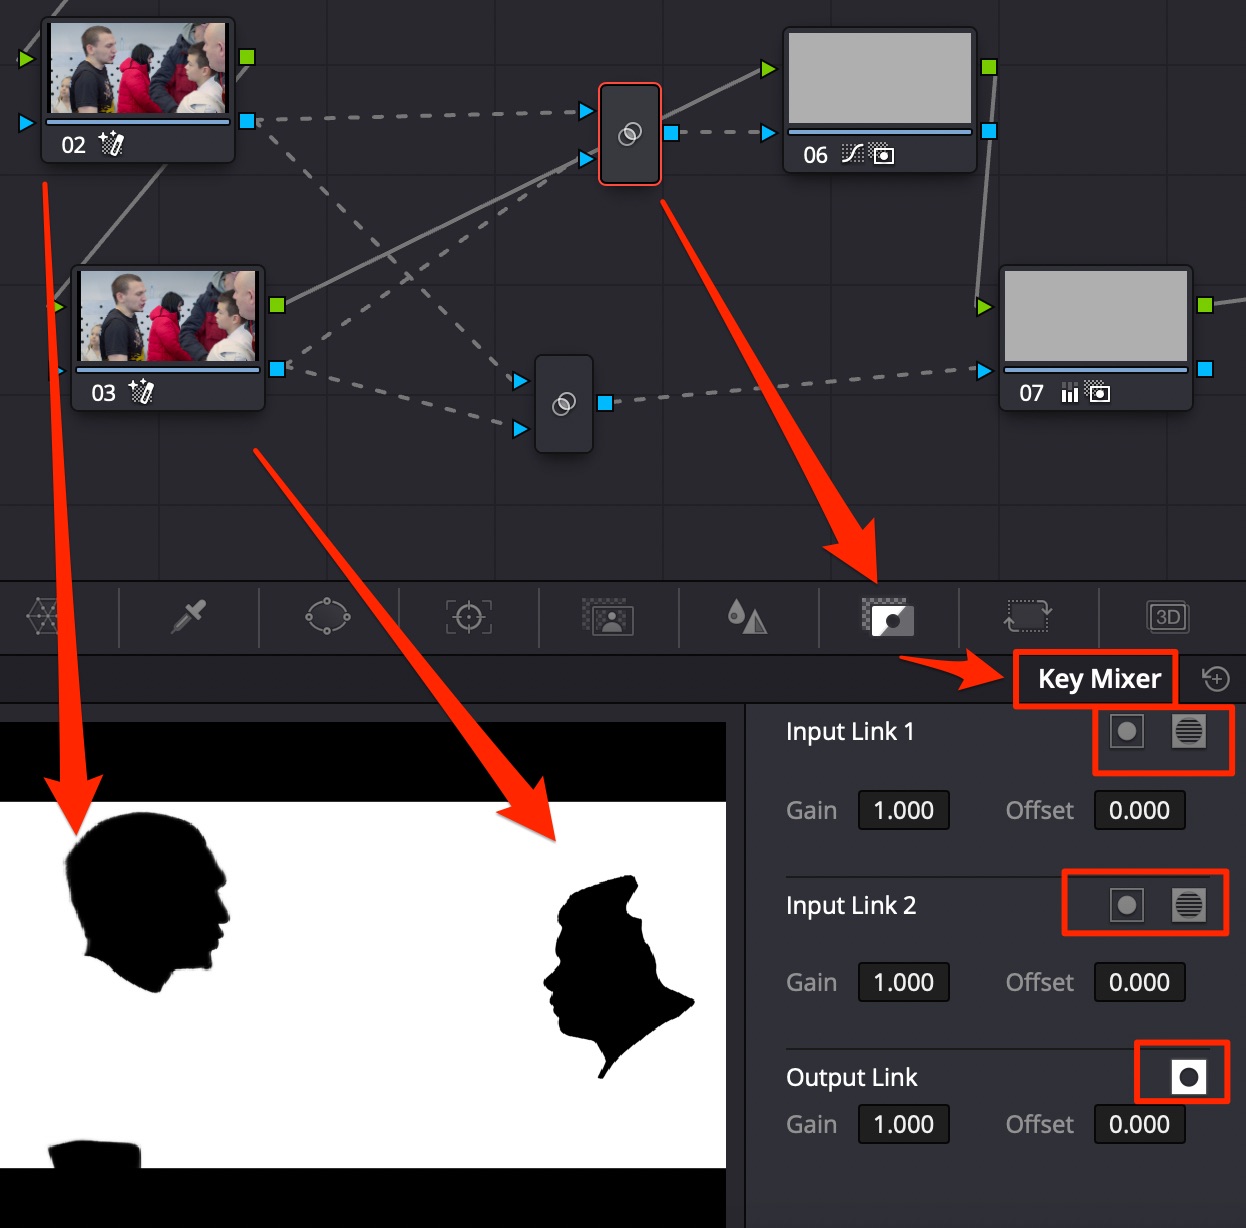
Use Key Mixer node to combine several masks (you can input more than 2, links are added in Key Mixer node automatically upon connection), invert them using button in Key Mixer config.
Most of the noise is in red channel. Use DaVinci Resolve Studion version with 2 types of de-noise.
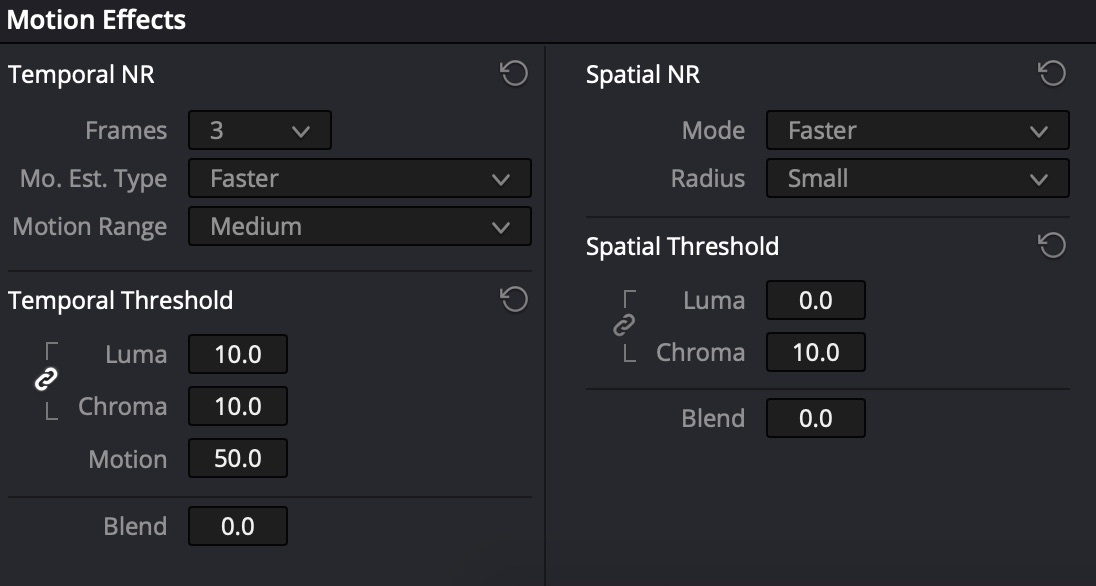
Unlock Chroma != Luma. Raise Chroma=6-7
Moire on buildings and other landscape objects is countered by motion blur.
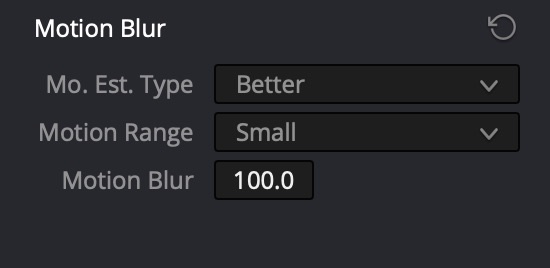
Mo. Est. Type: Better, Motion Range=Small, Motion Blur=100 (maximum).
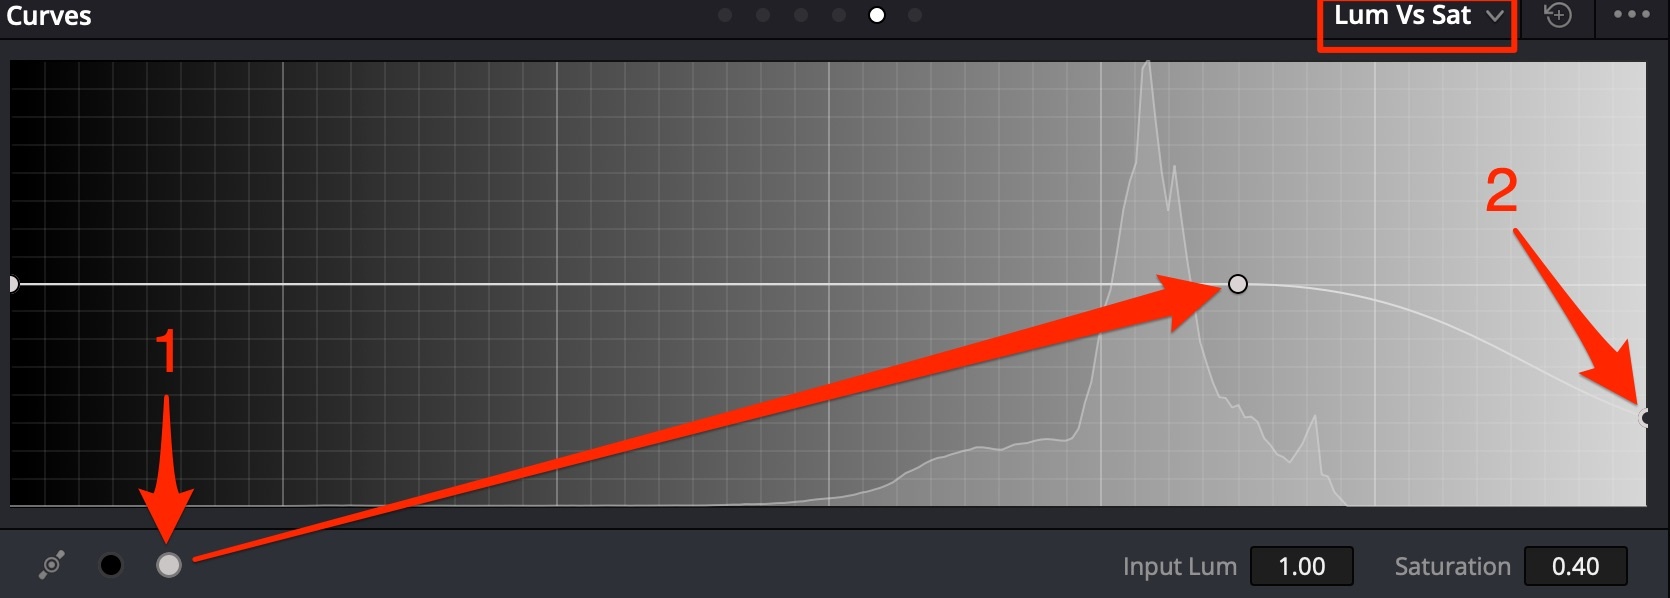
They can be restored using several methods:
Typically such things appear when shooting on 8bit cameras. Use Lum Vs Sat Curve to fix.
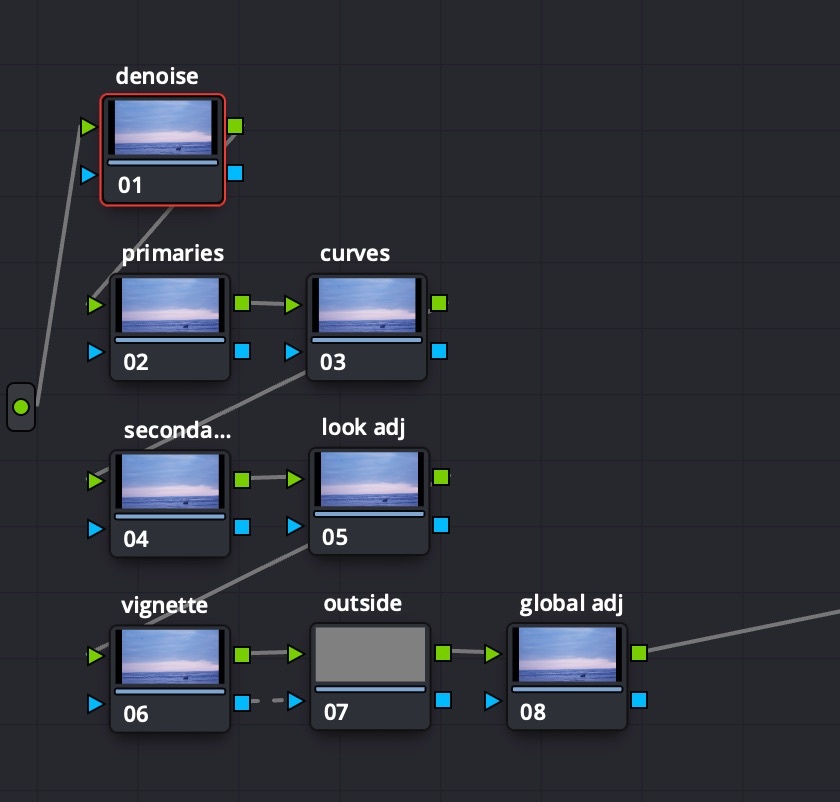
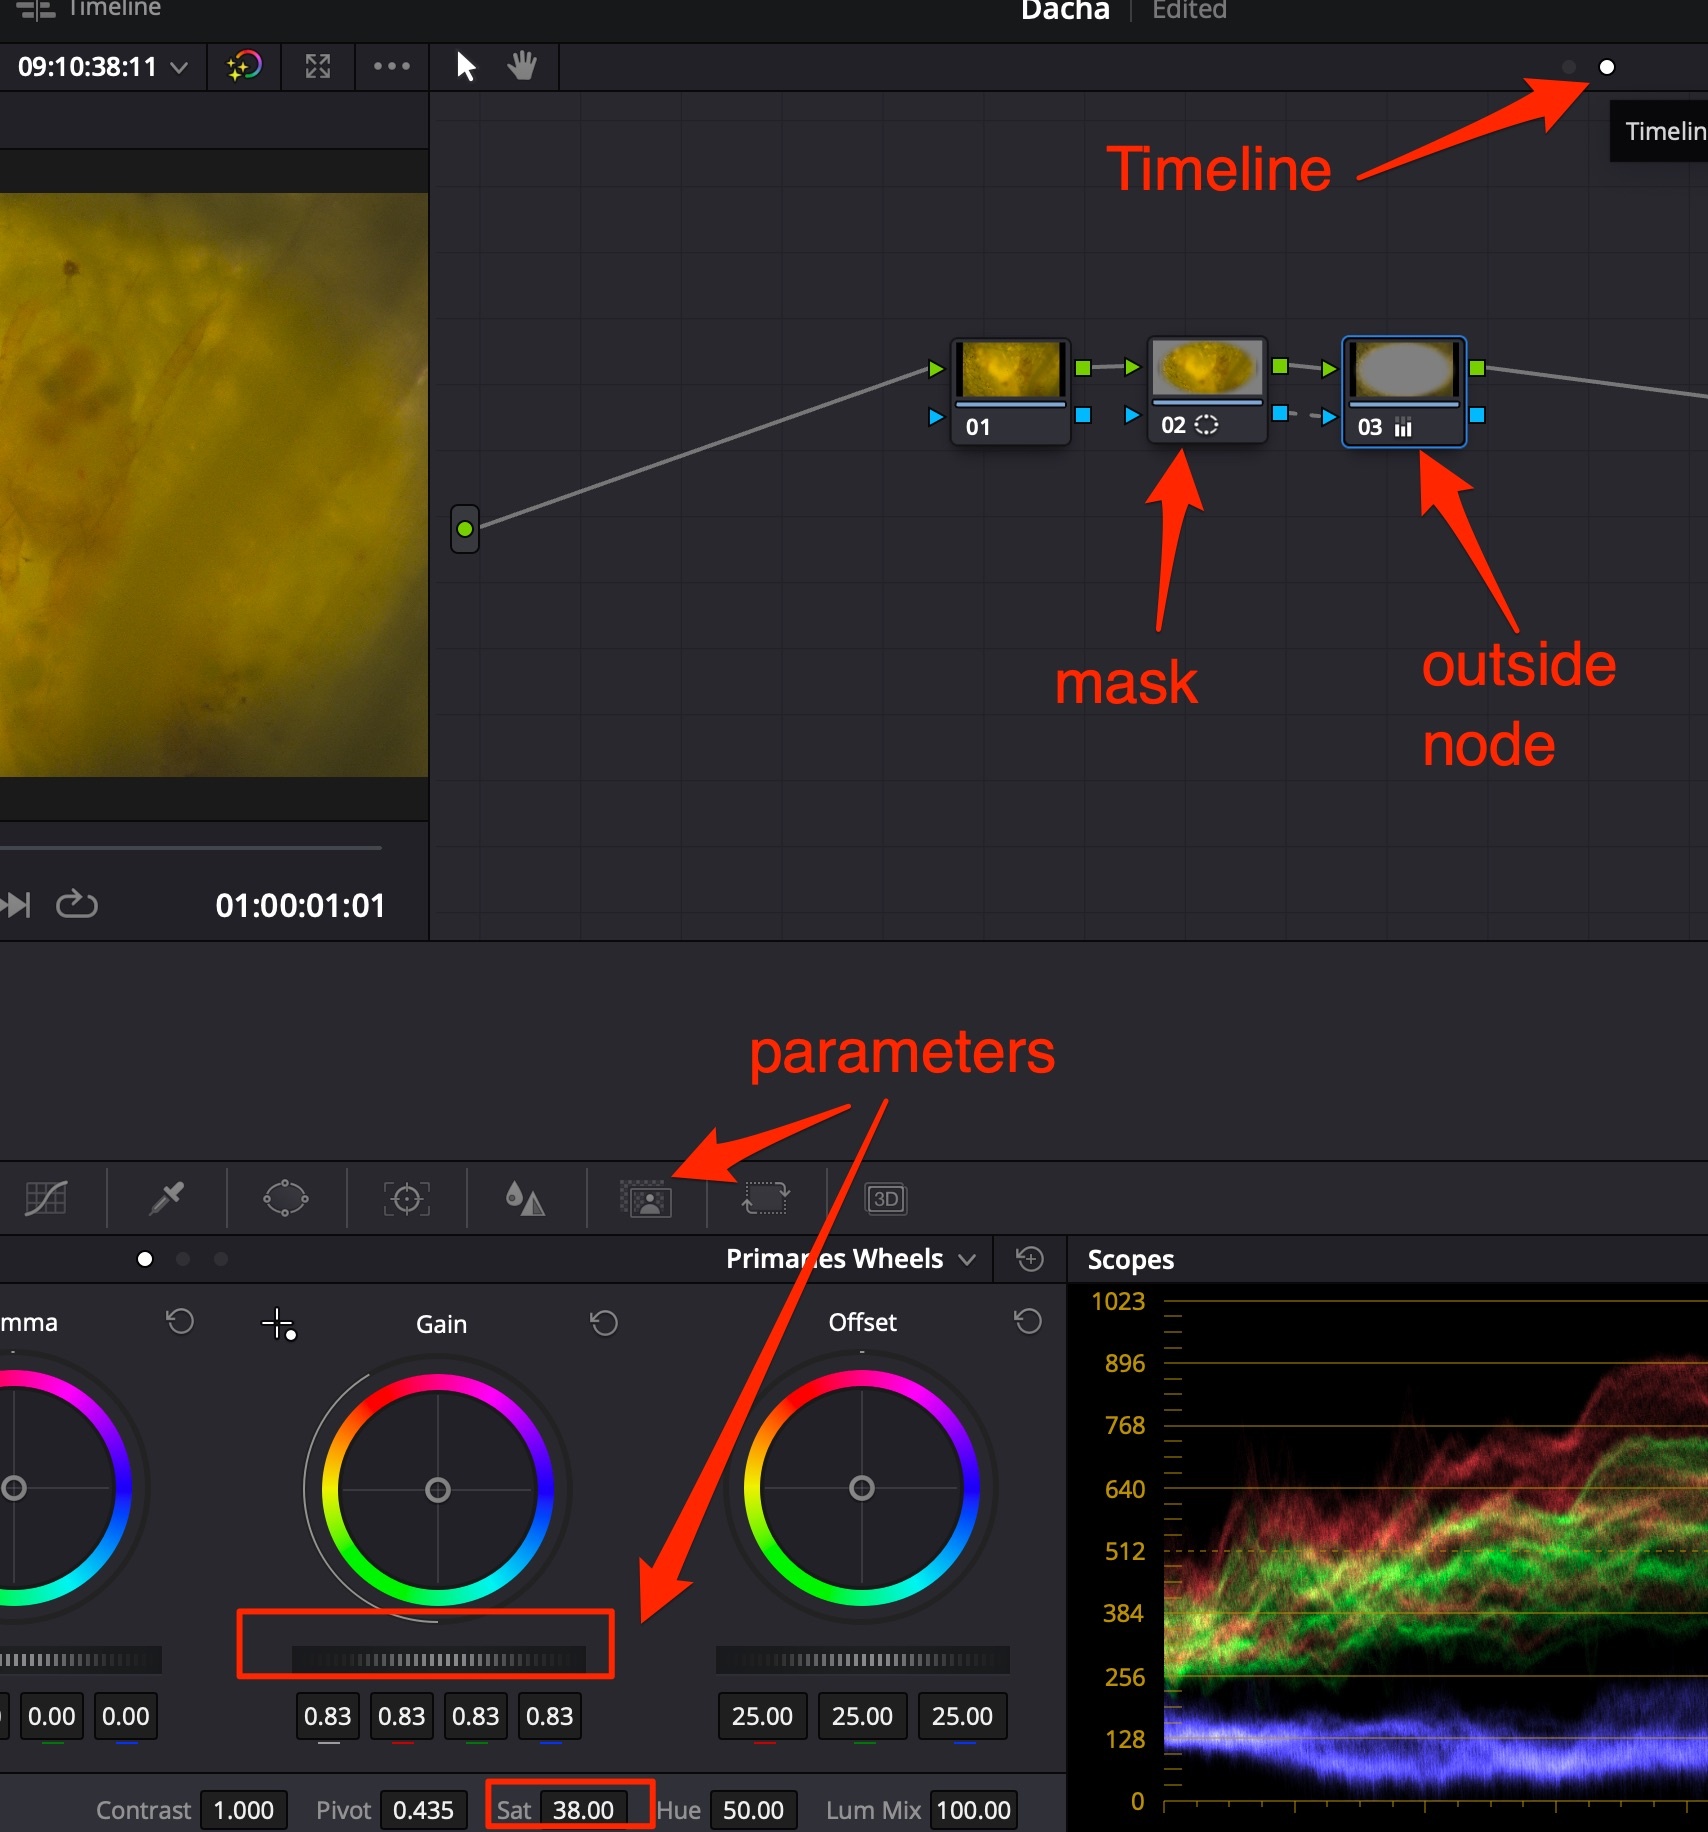
Color Correction structure contents:
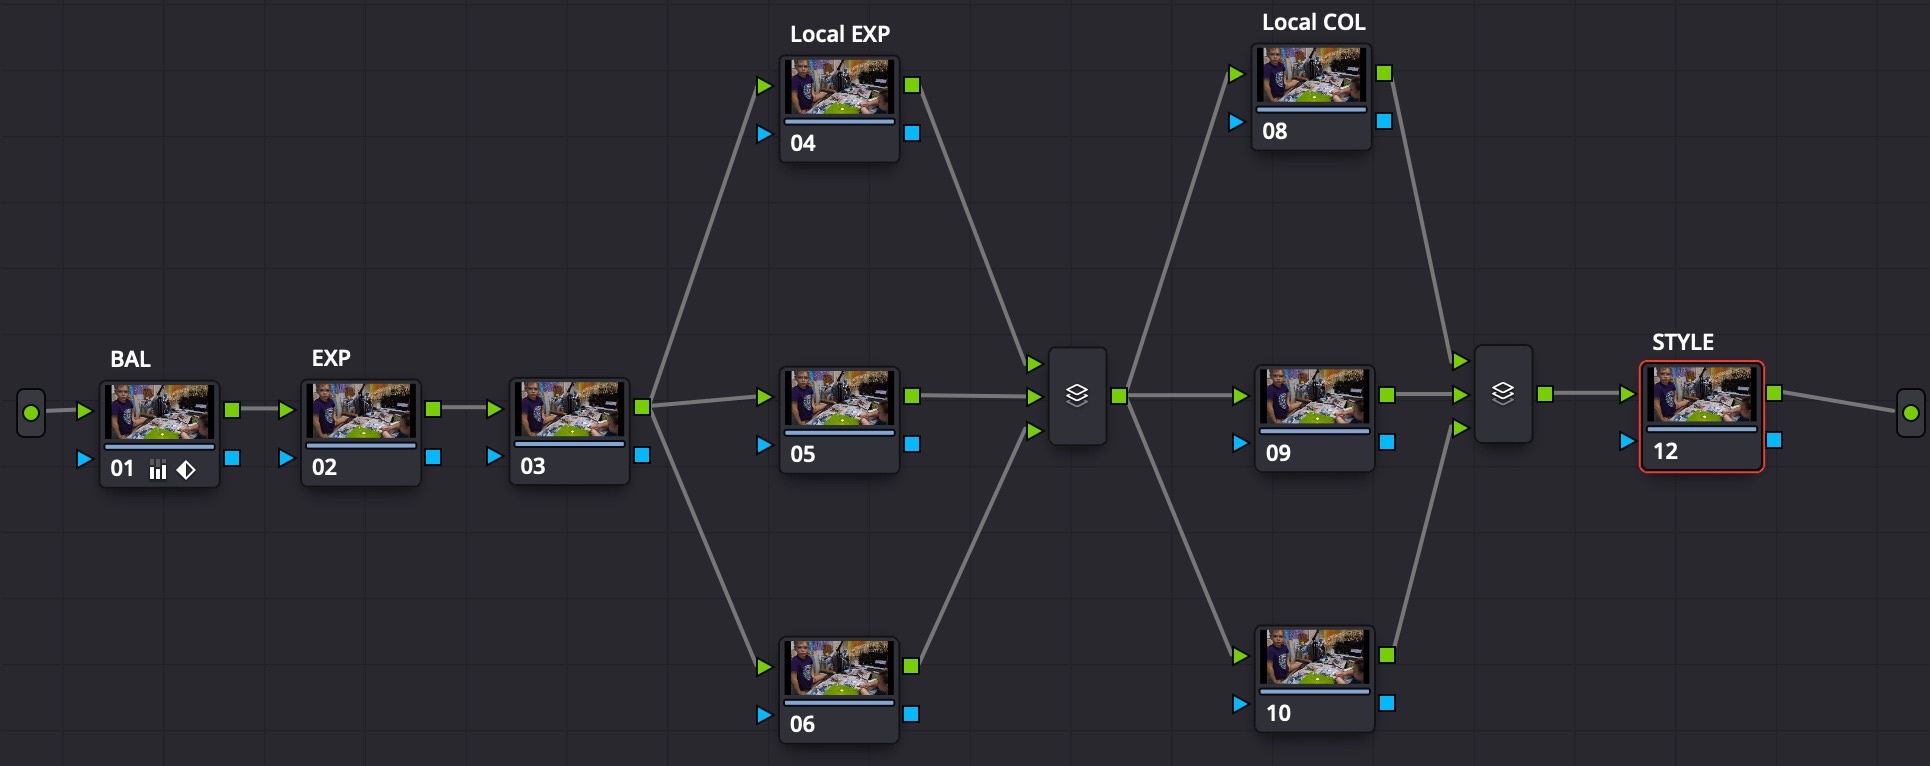 Color Grading structure contents:
Changes in parallel nodes are made to the image with the same intersection, as if the nodes were in sequence (Serial type). The difference is that all parallel nodes read data from one initial node, while in serial sequence the next node reads data from previous node with all corrections applied on the previous step.
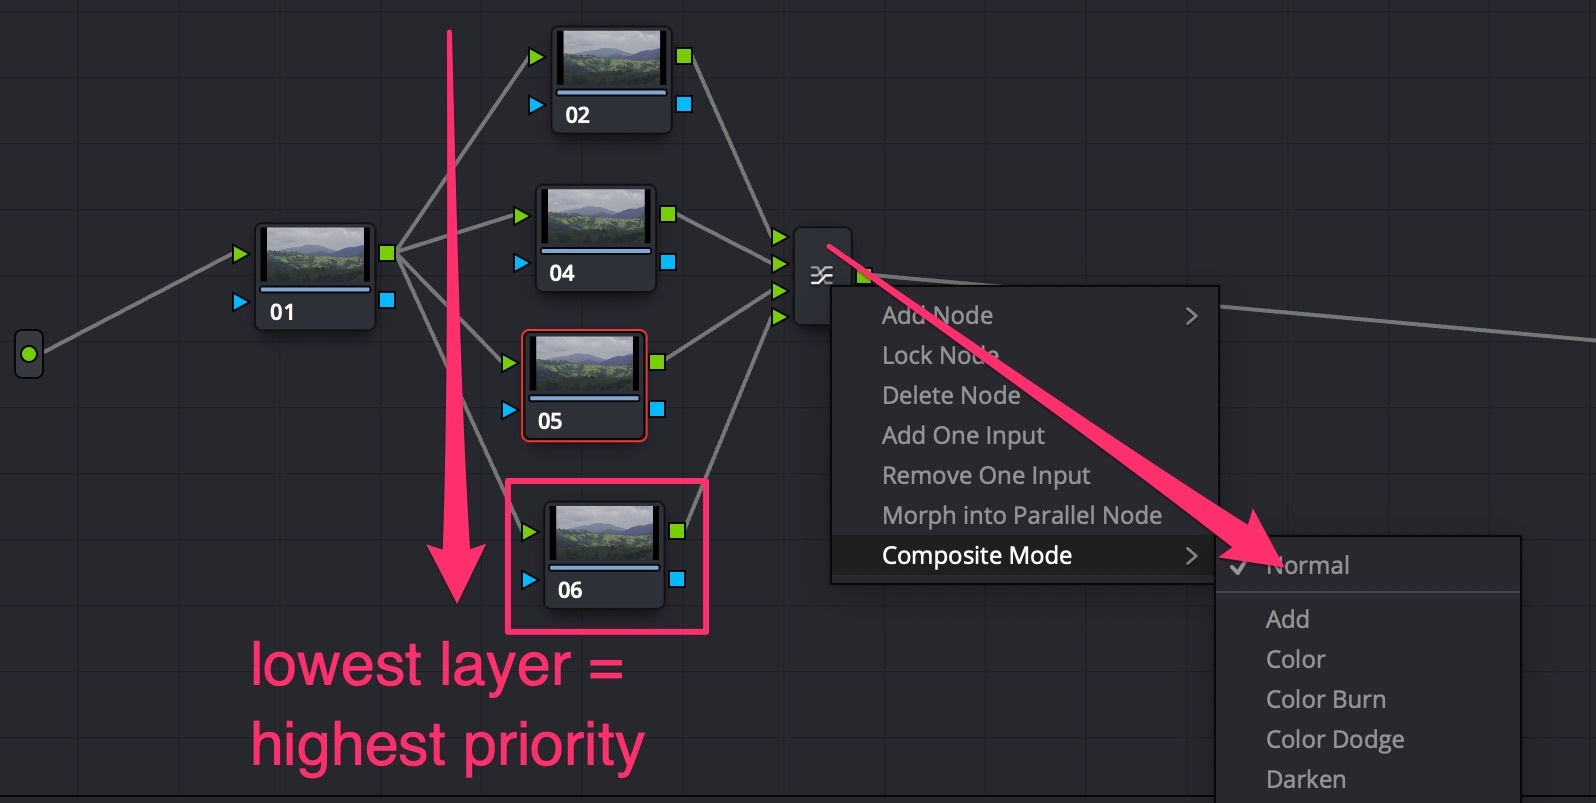
Layers are parallel nodes, but work in opposite direction: lowest layer has the highest precedence. Layers can be composited using connecting node settings.
Instruments sequence also matters: in the Color Wheels section, Lift/Gamma/Gain wheels are applied BEFORE the general Offset wheel.
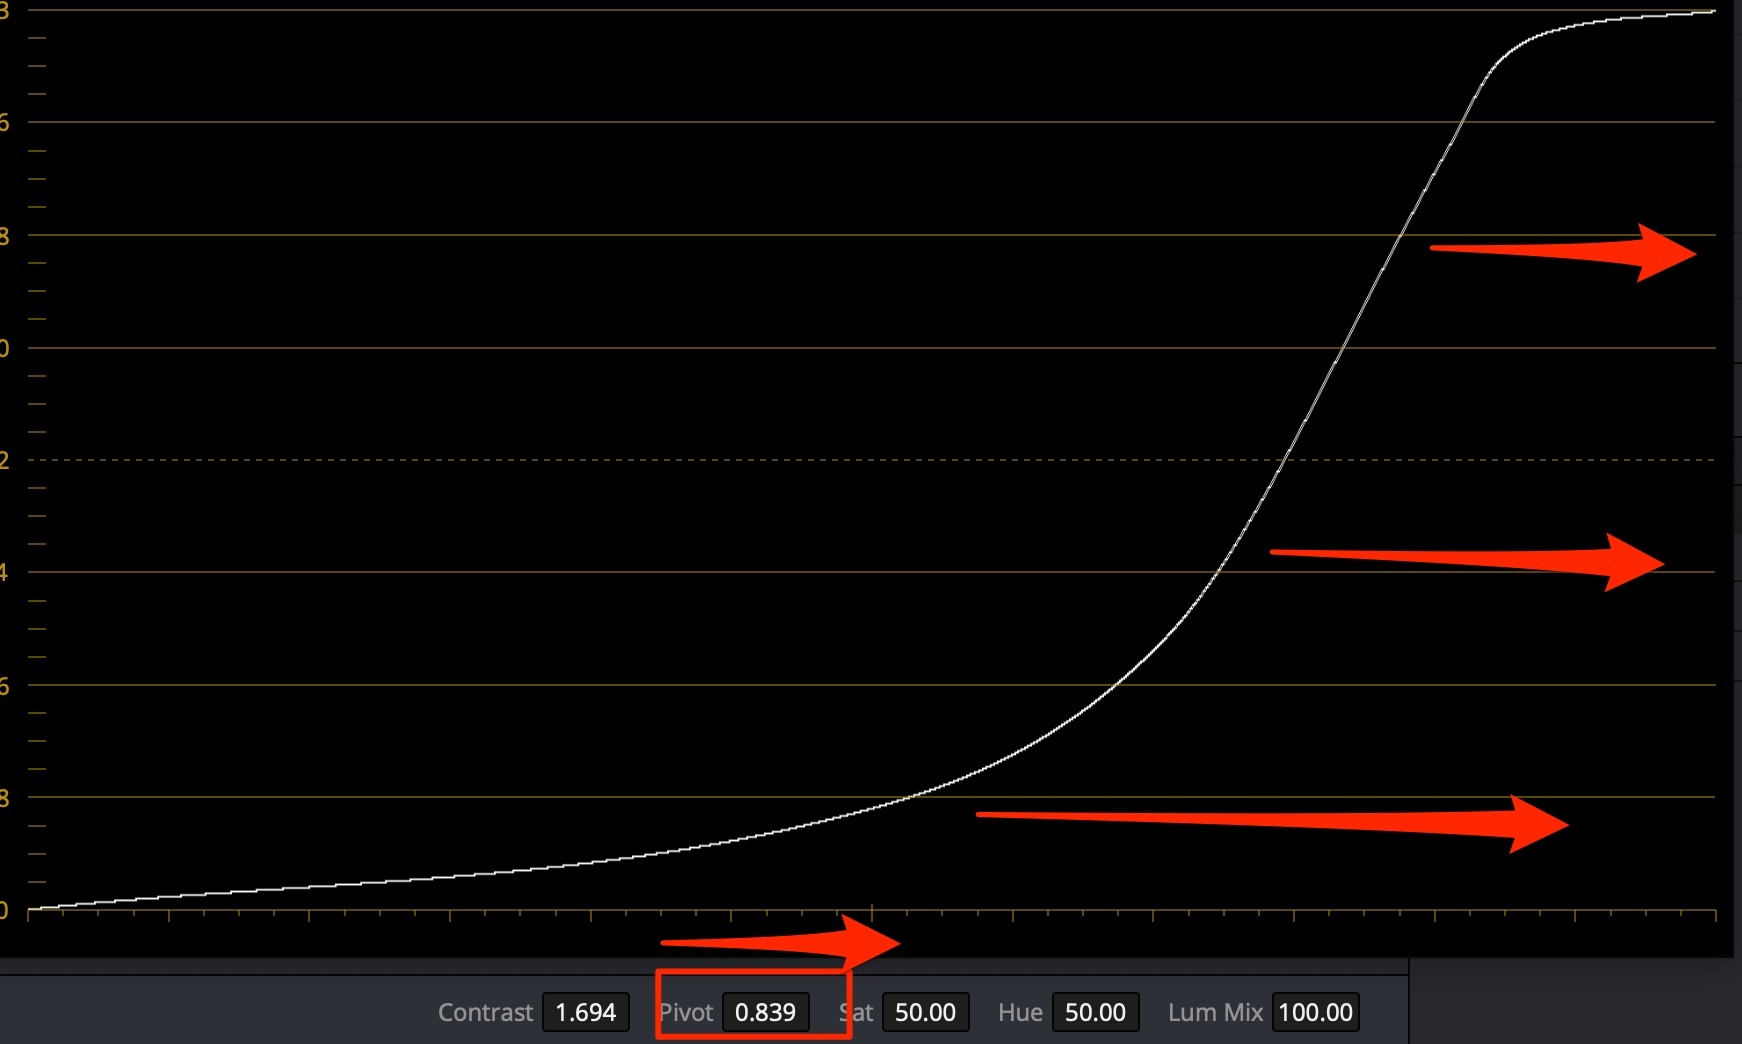
When you use a node to make stronger contrast on a footage, you basically stretch the image info between Dark & Light boundaries. If you create a second node after the “contrast creation” one, you will be changing the resulting stretched image data, and the changes will be more subtle and soft.
For dark skin (african-american) use contrast+pivot to the left to lighten up, while maintaining contrast:
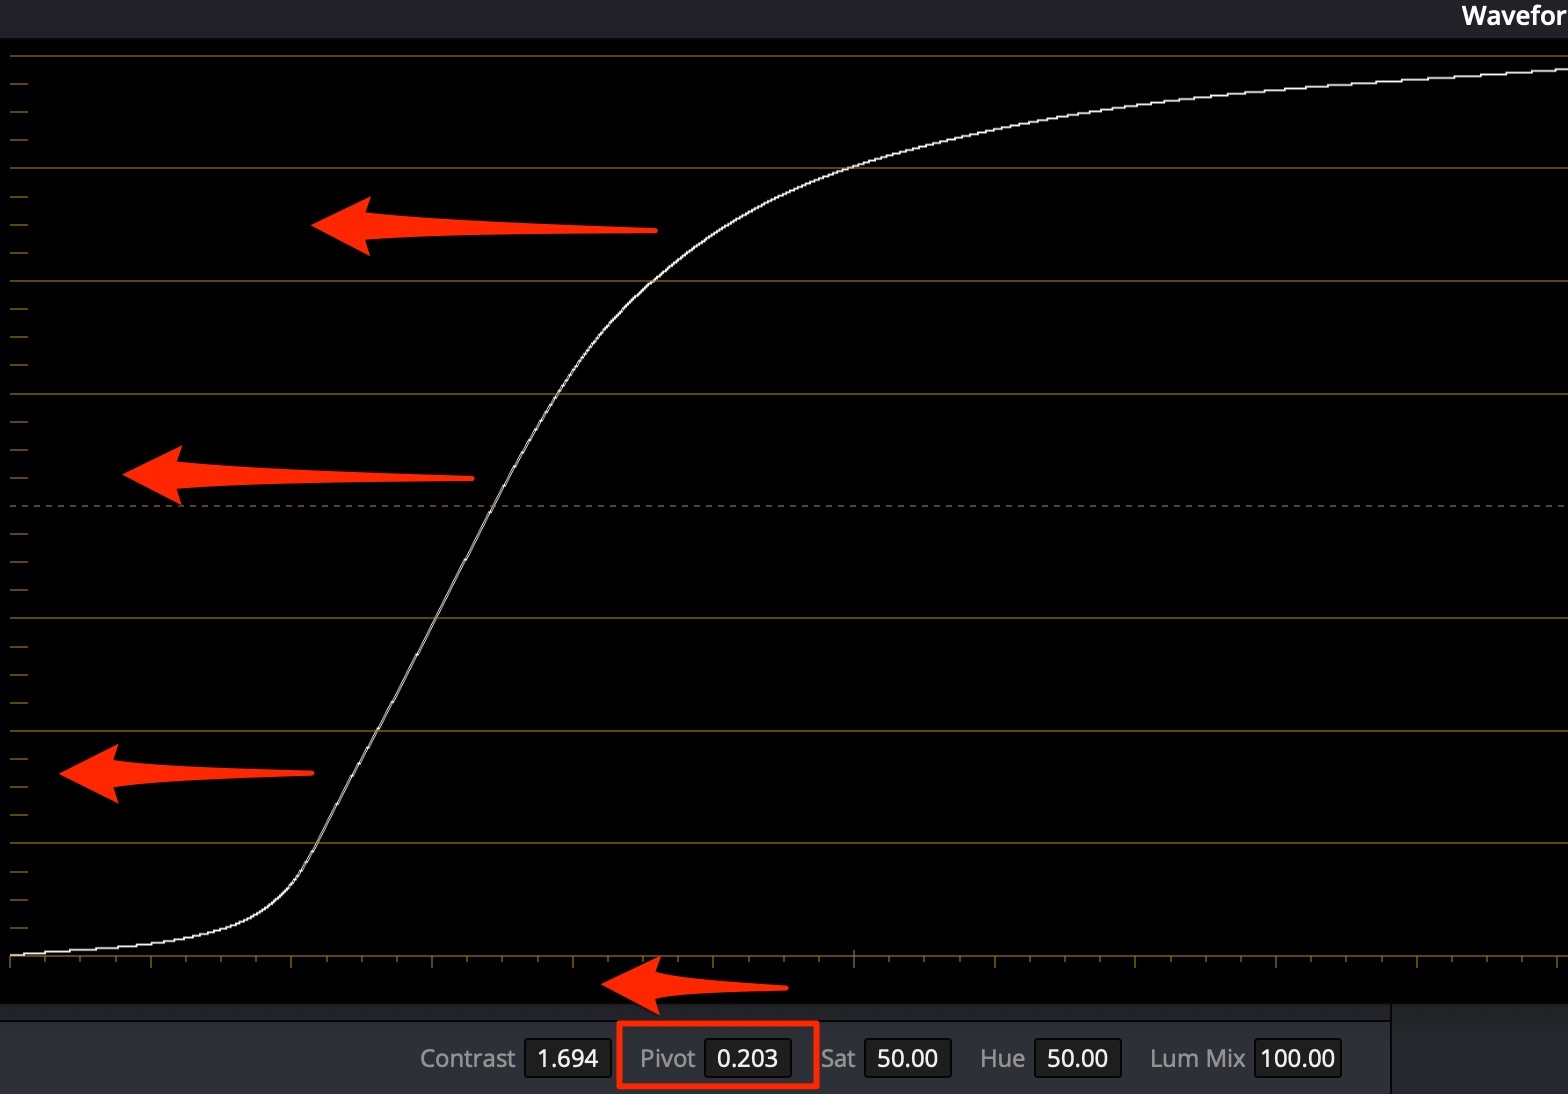
For pale skin (caucasian) use contrast+pivot to the right to darken, while maintaining contrast:
If you lift the lower midtones, you need to make up for Saturation loss - raise it.
Use Glow OpenFX plugin on skin selection to add a bit of skin light (Shine Threshold = ~0.6)
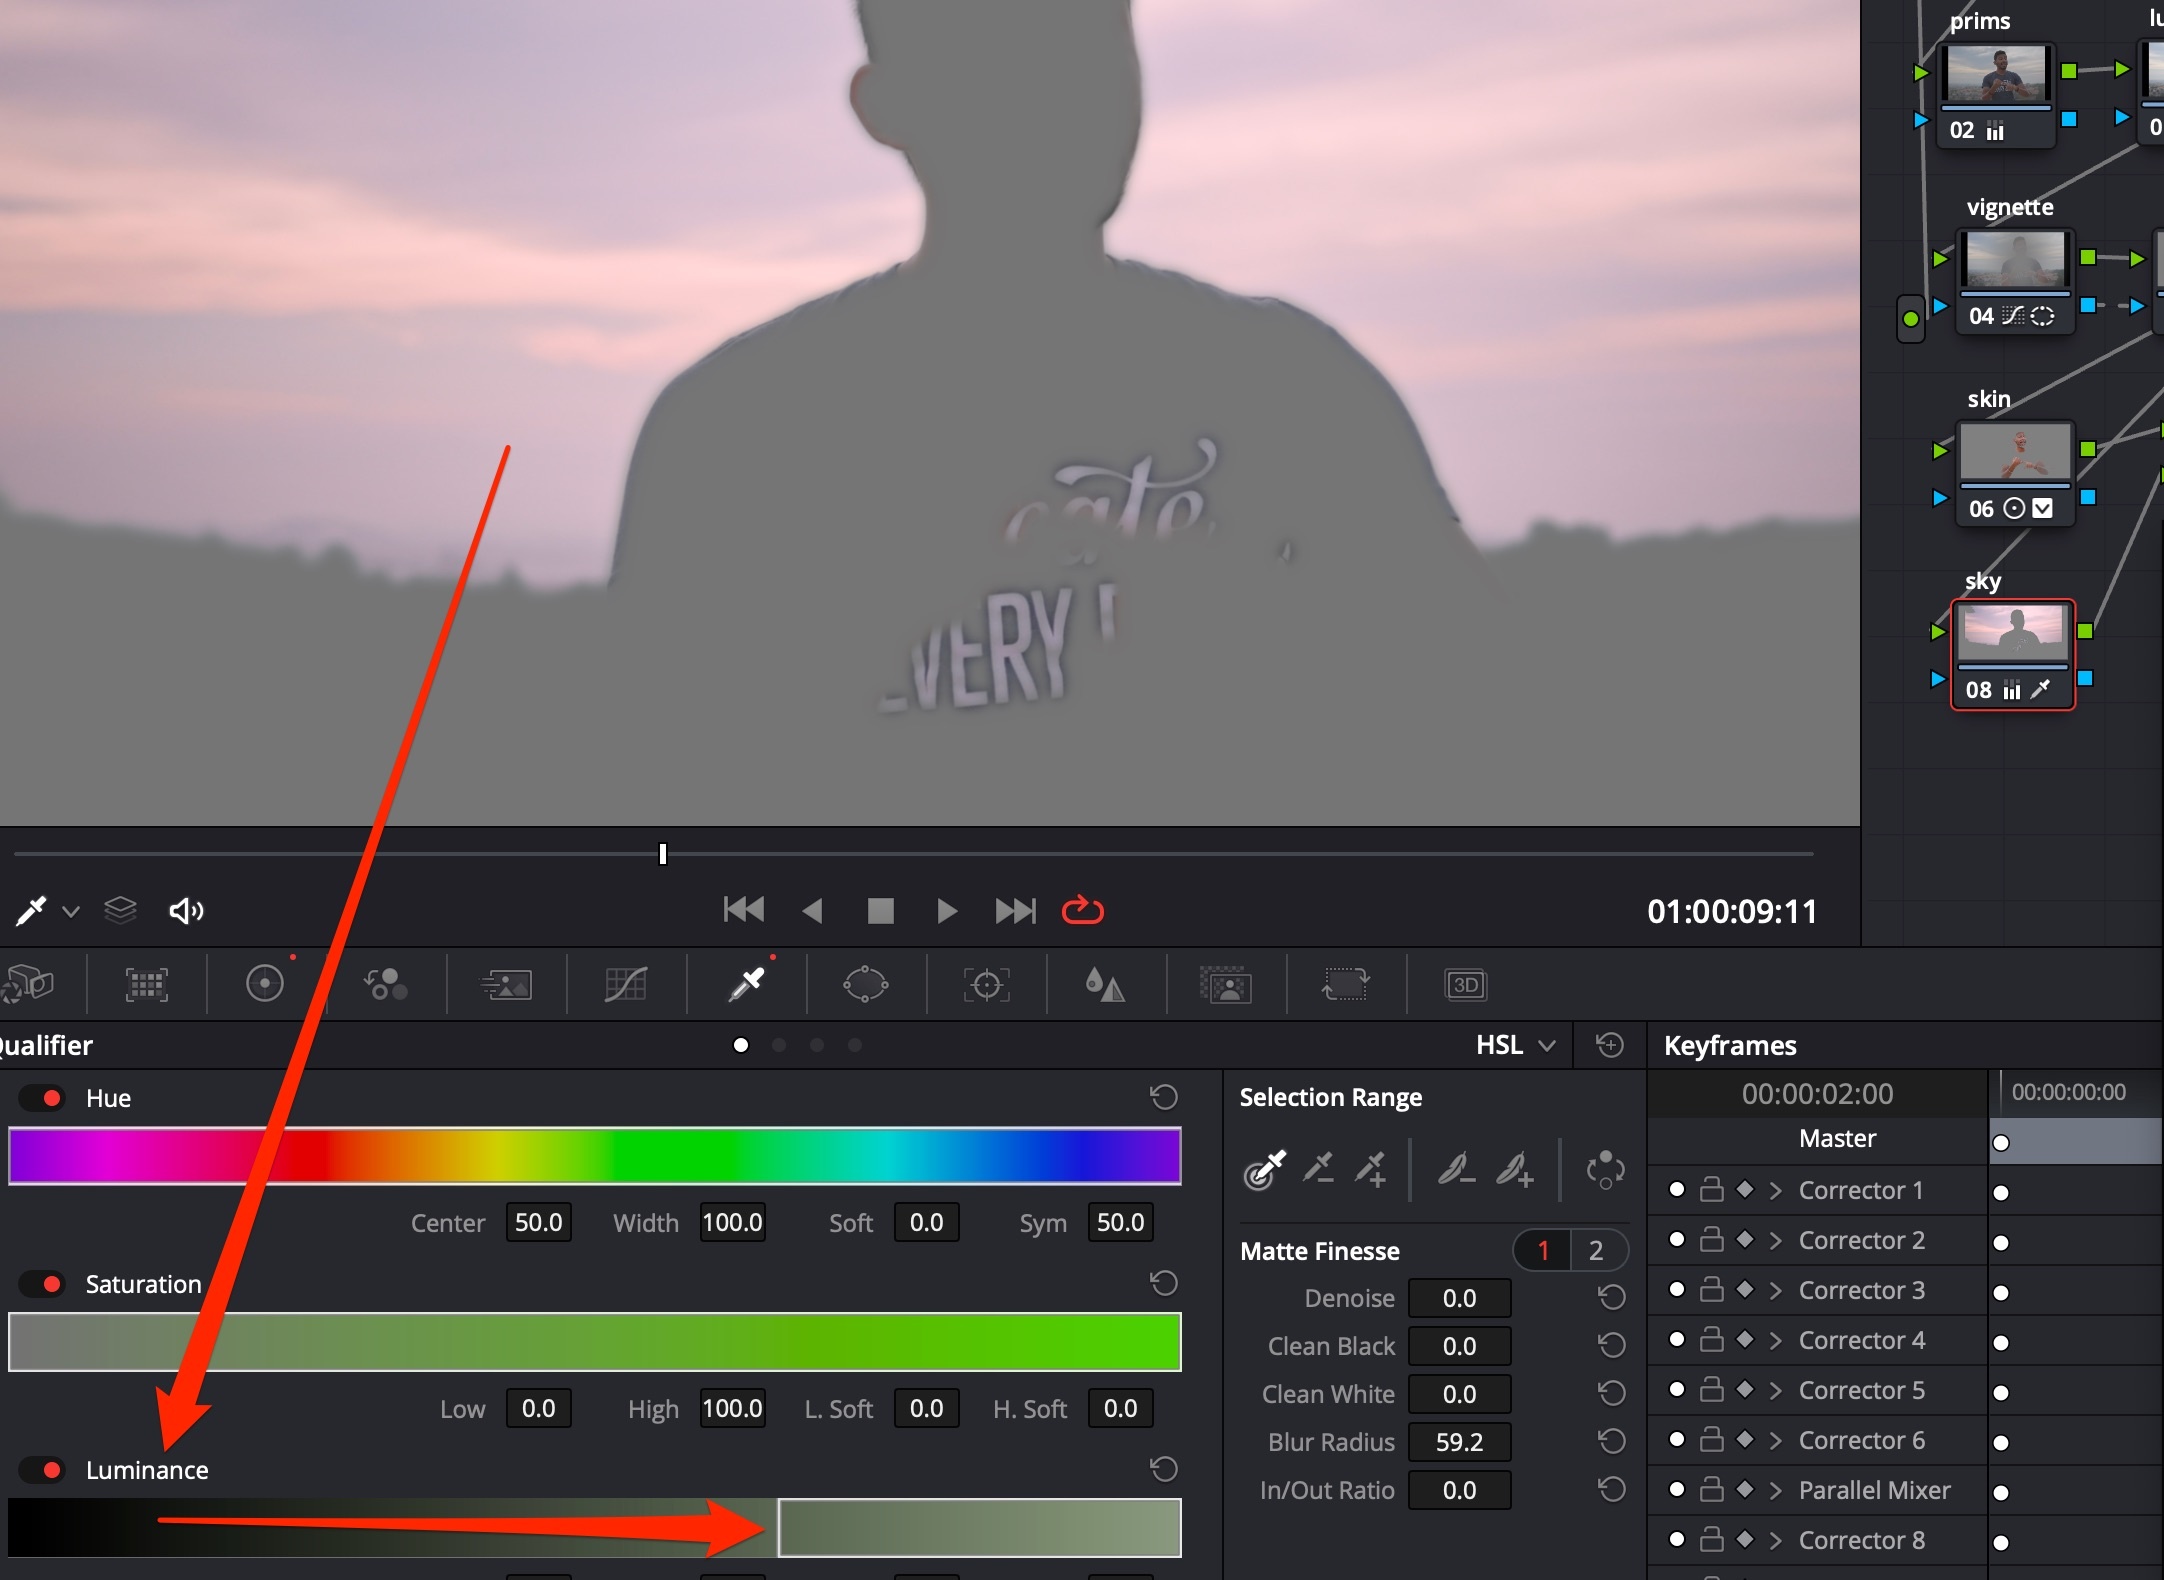
Skin tones are “Midtones”. So use Qualifier and masks to select the skin, and subtract the eyes & brows & mouth.
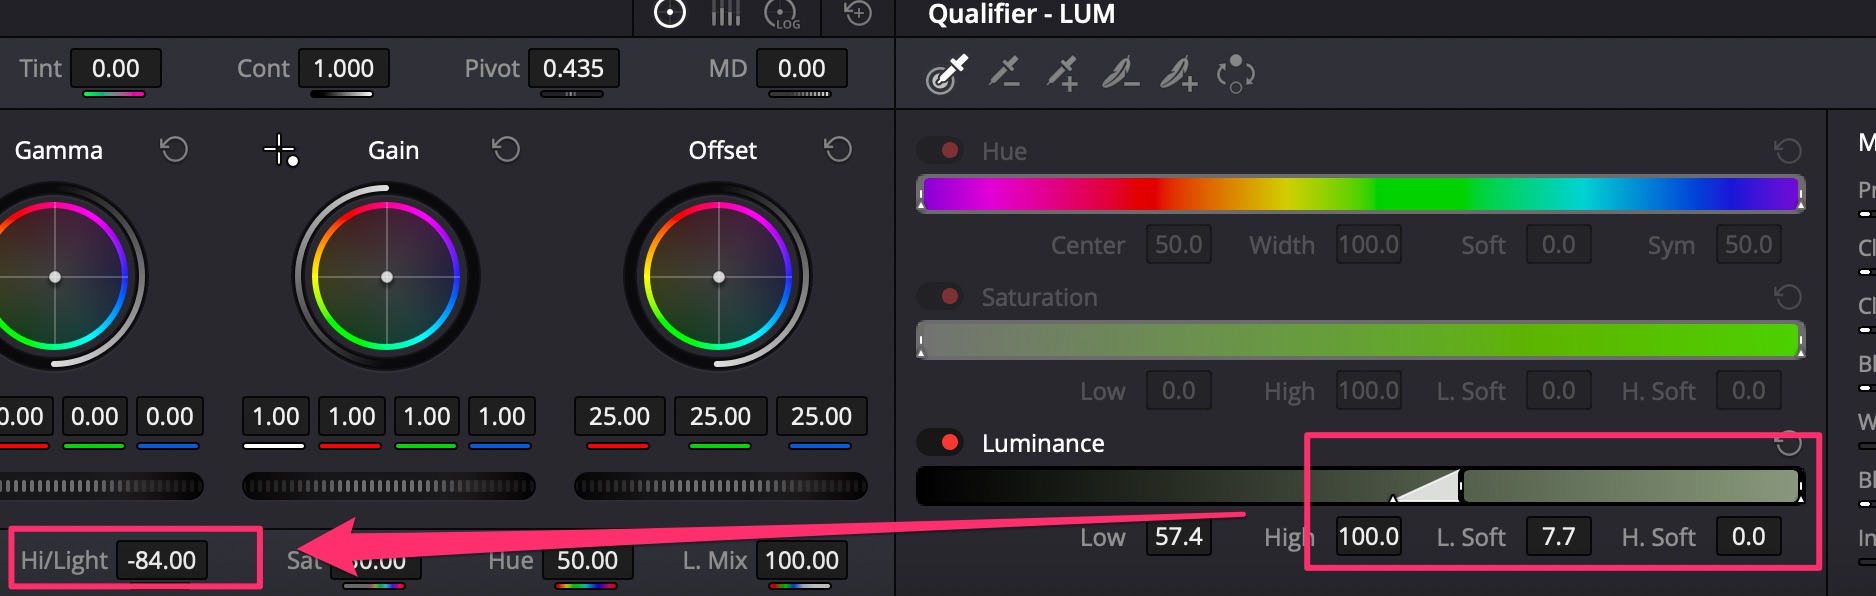
Use Luminance qualifier for the cleanest sky selection.
 Способ 2 лучше чем 1, т.к при способе 1 по углам создаются чёрные области с растушёвкой, в то время как при способе 2 происходит “multiply” видеопотока на себя с коррекцией = такой способ даёт менее “грязный” результат.
External links:
Для Insta360 X2 - видео 6K@30FPS:
Разрешение:
Проксирование (Optimized Media and Render Cache):
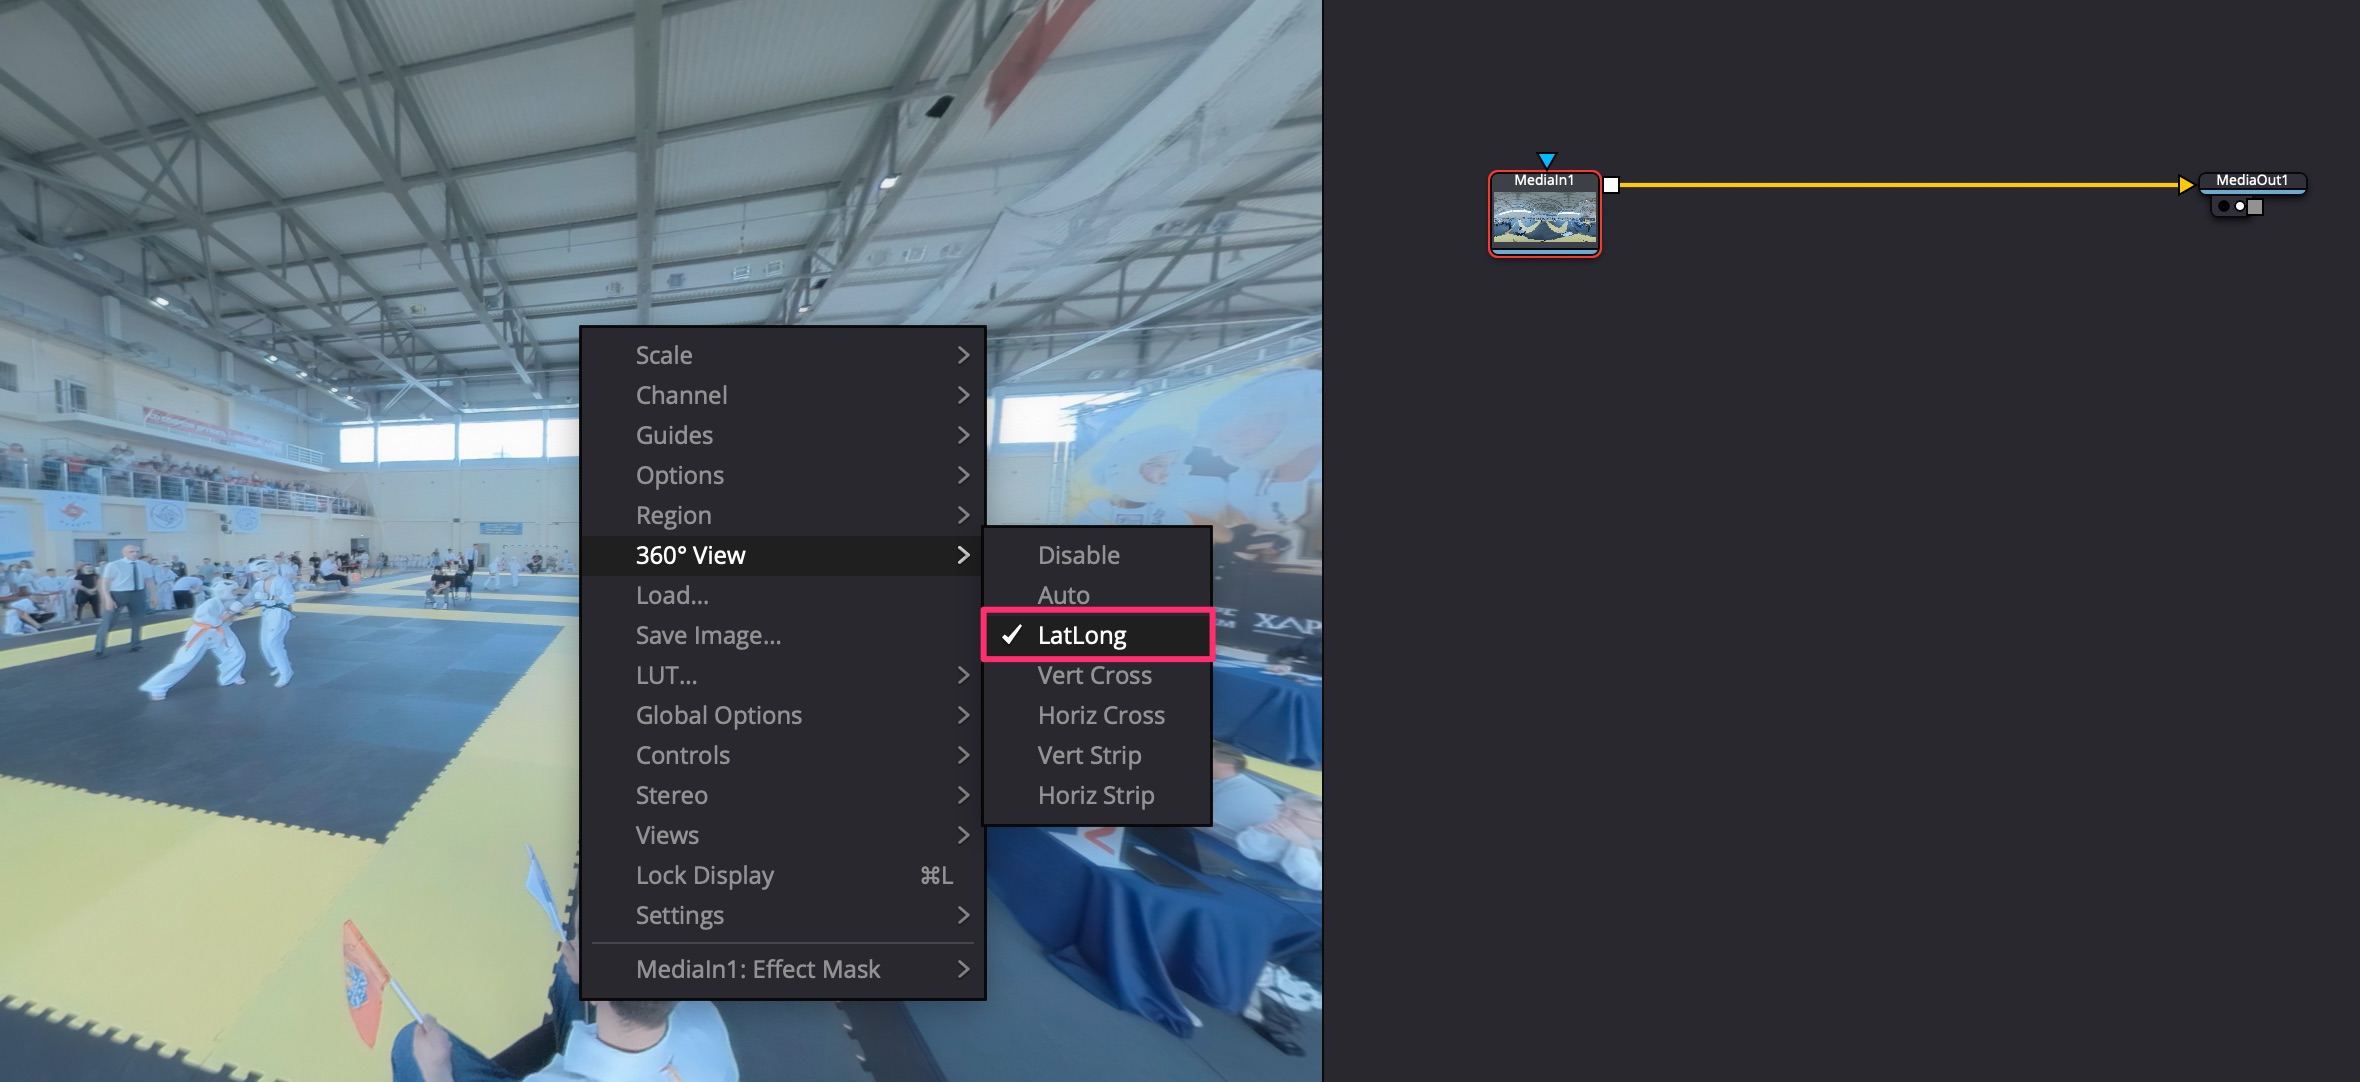
Положить видео VR360 на timeline. Далее перейти в комнату Fusion, нажать правой кнопкой на видео в окне и выбрать 360 View -> LatLog. После этого можно панорамировать с помощью ALT+средняя кнопка мышки.
 Когда закончил панормирование, можно нажать правой кнопкой на видео в окне и выбрать Settings -> Reset Defaults
Для ускорения просмотра выбрать режим отображения Proxy и отключить высокое качество.
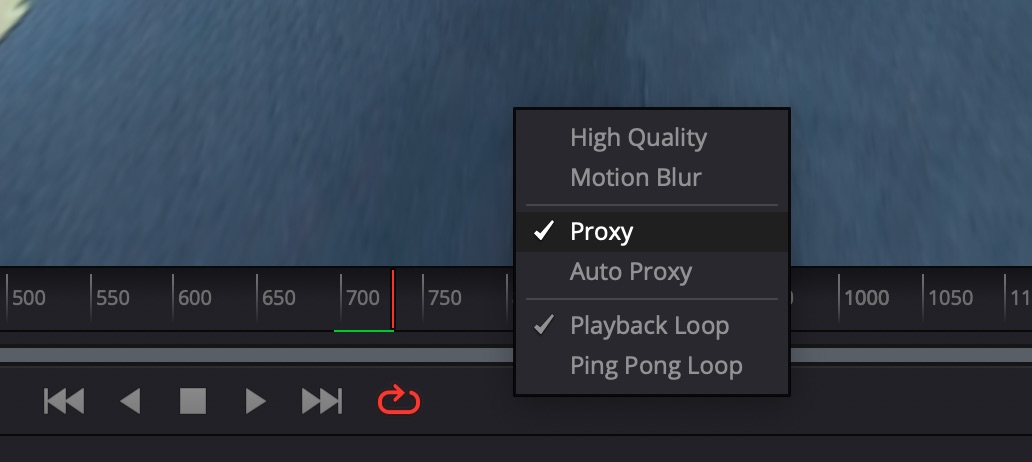 Также в главном меню выбрать Playback -> Timeline Proxy Resolution -> Half.
Для начальной ориентации камеры нужно добавить ноду PanoMap. Далее перевести отображение обоих окон с видео на эту ноду. Выбрать просмотр в одном из окон 360 View -> LatLog. С помощью настроек PanoMap поменять ориентацию по осям.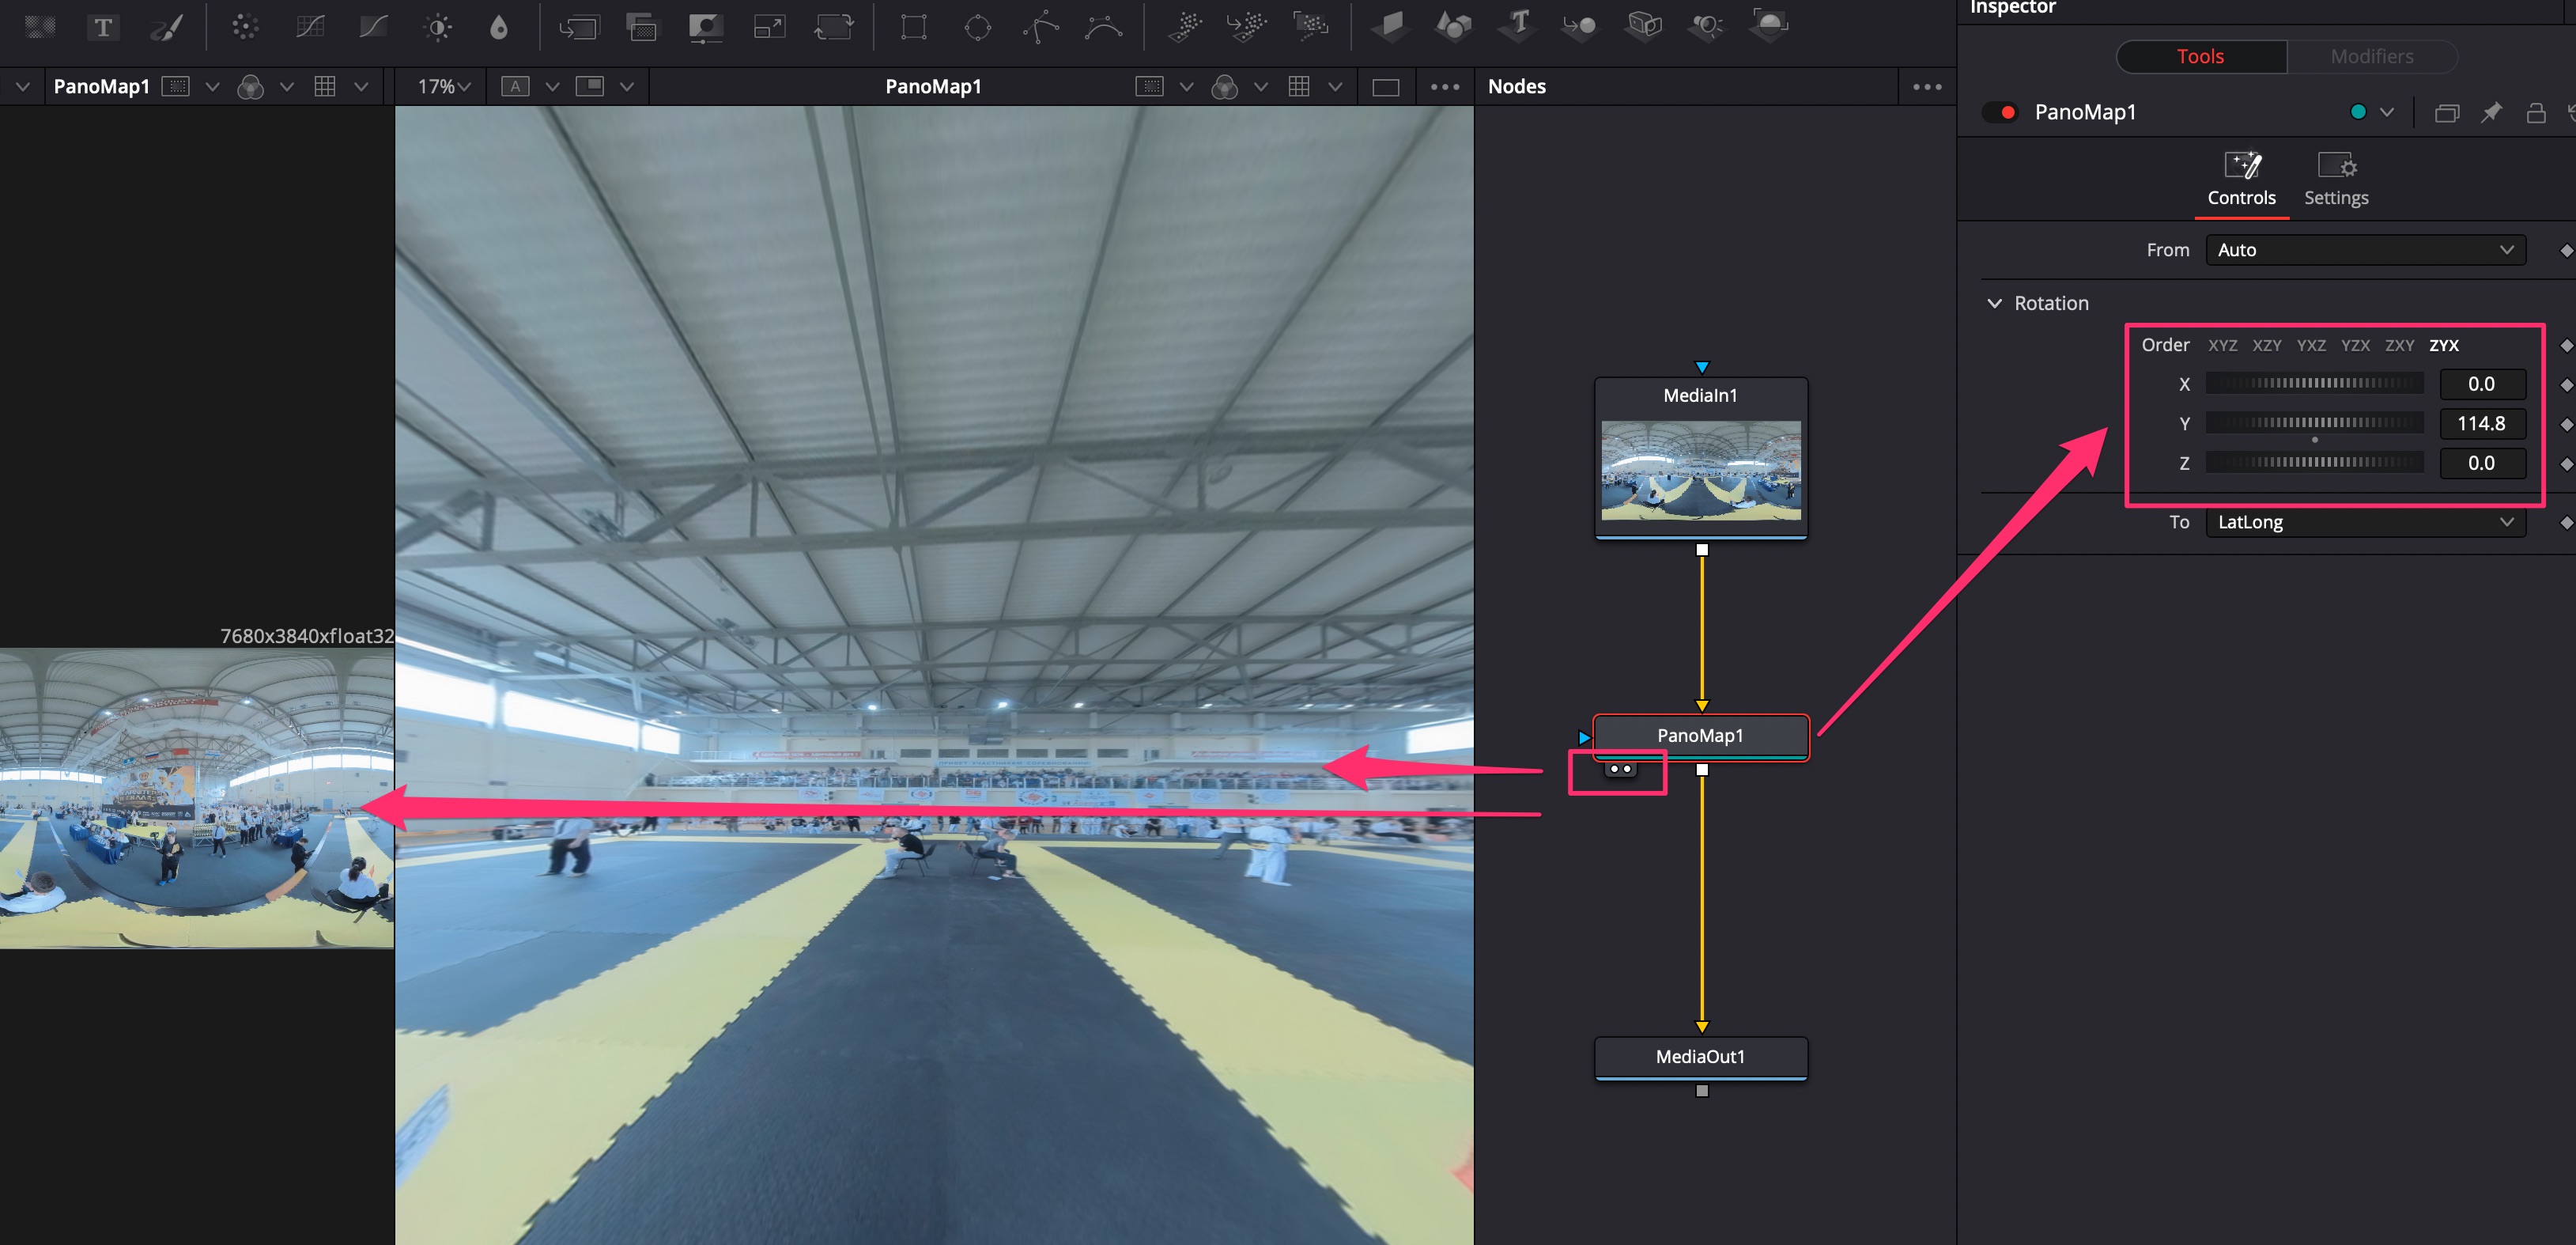 При съёмке с дрона может быть завал горизонта: исправить можно путём анимации осей. XYZ в настройках PanoMap.
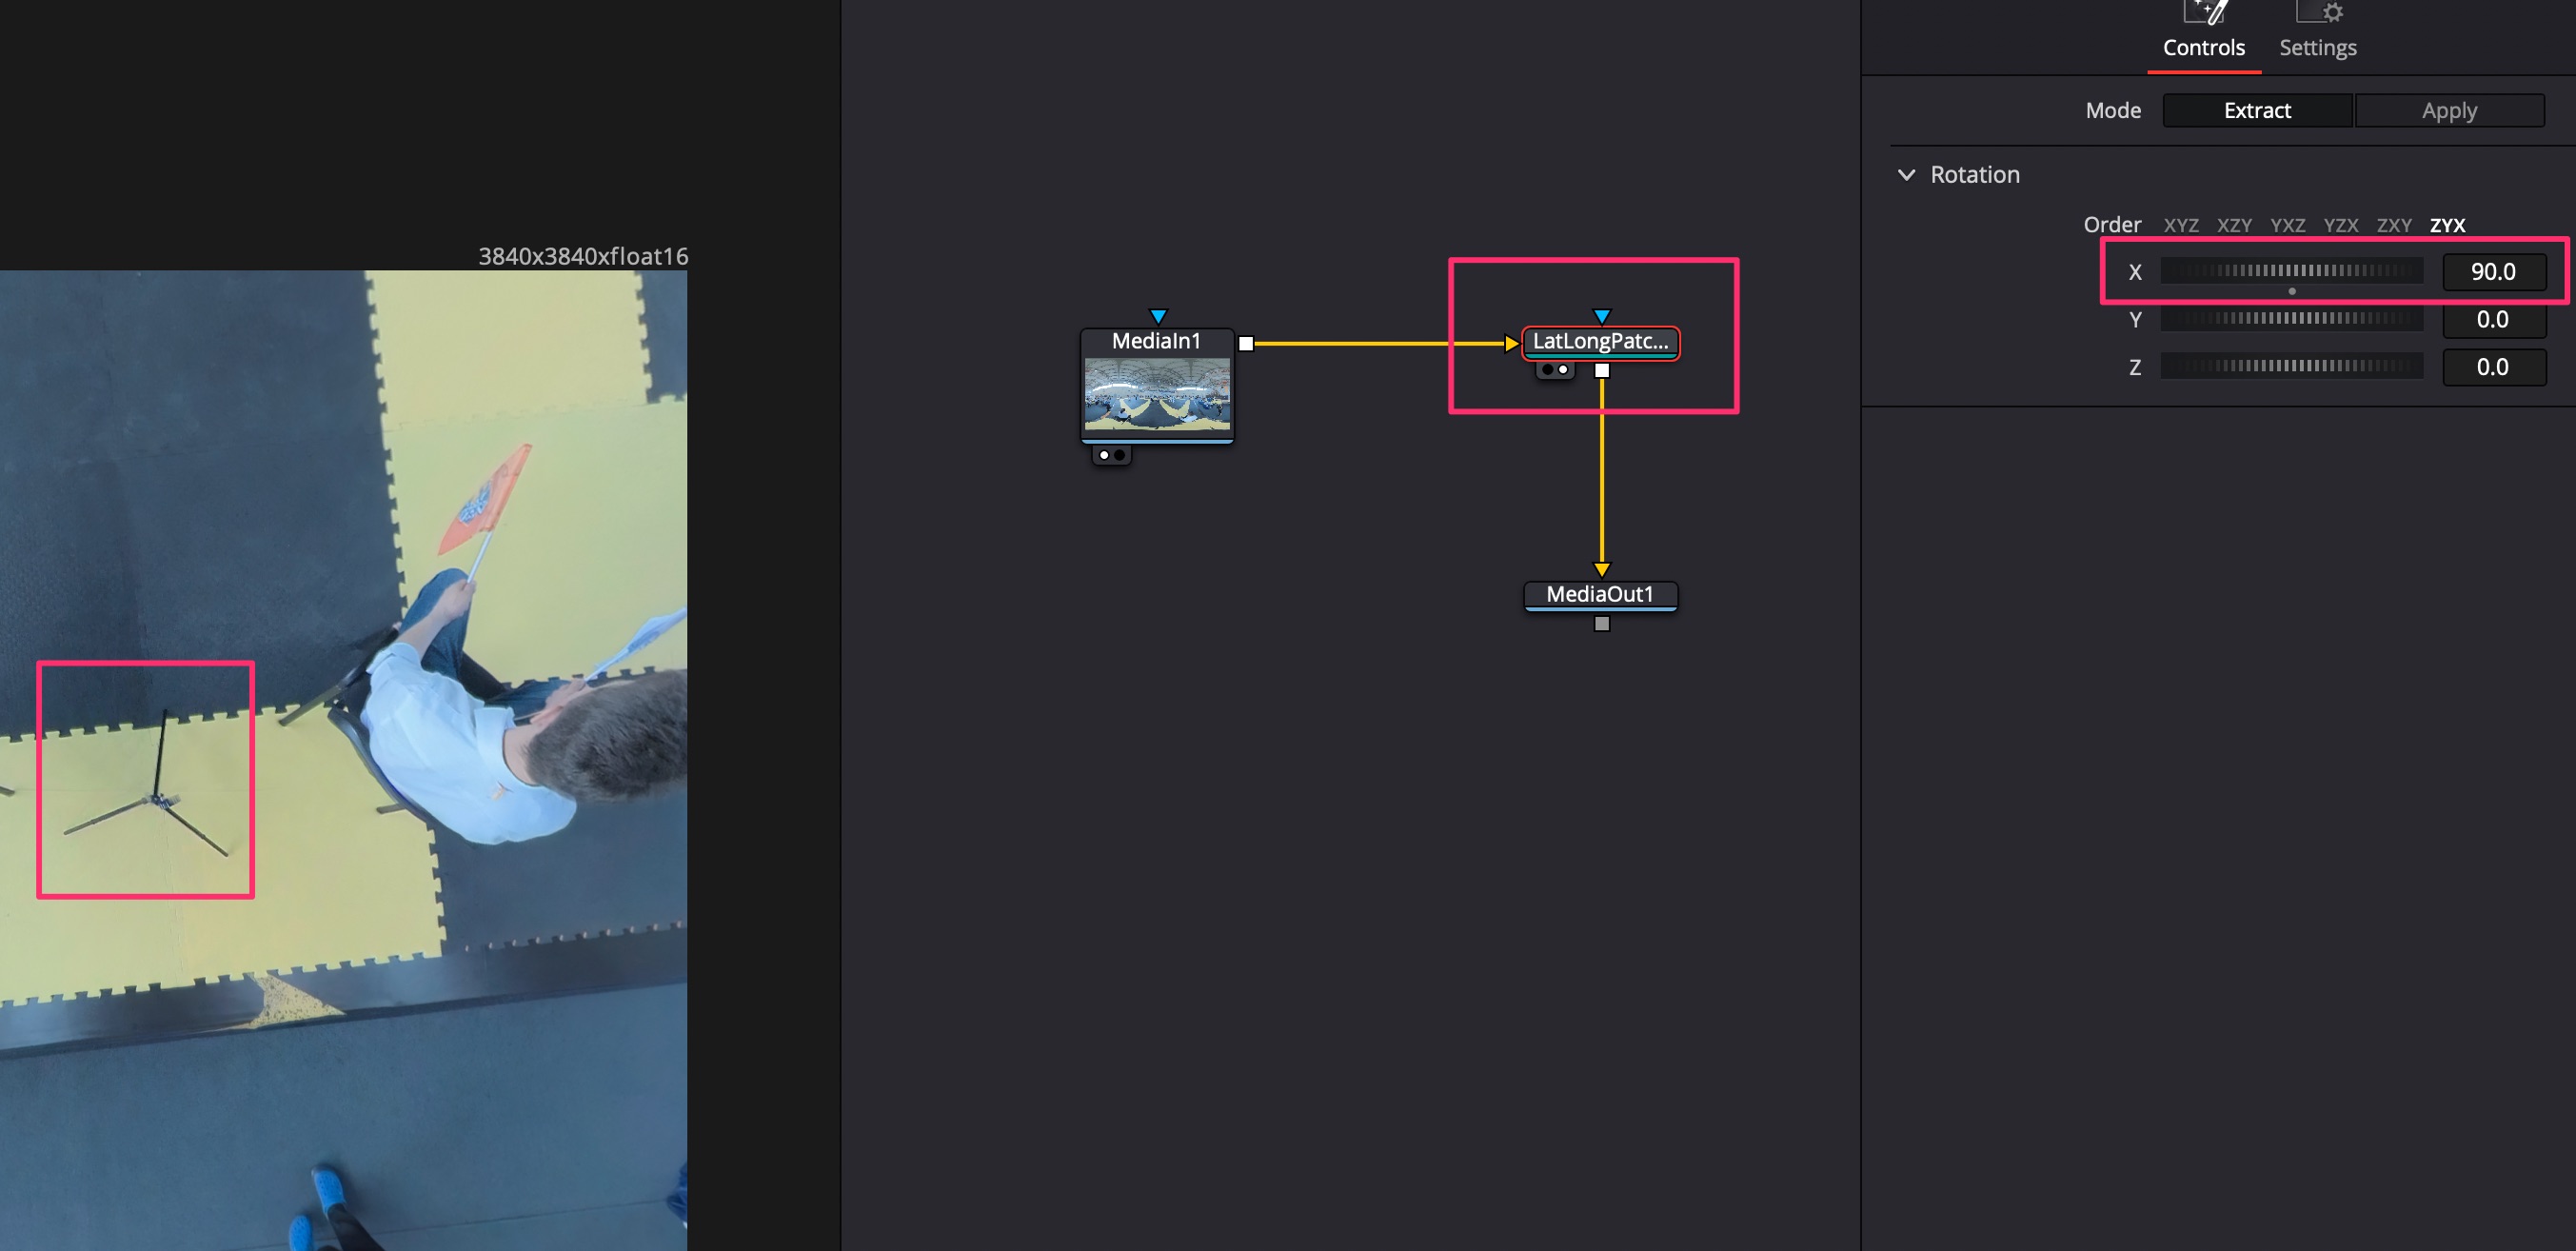
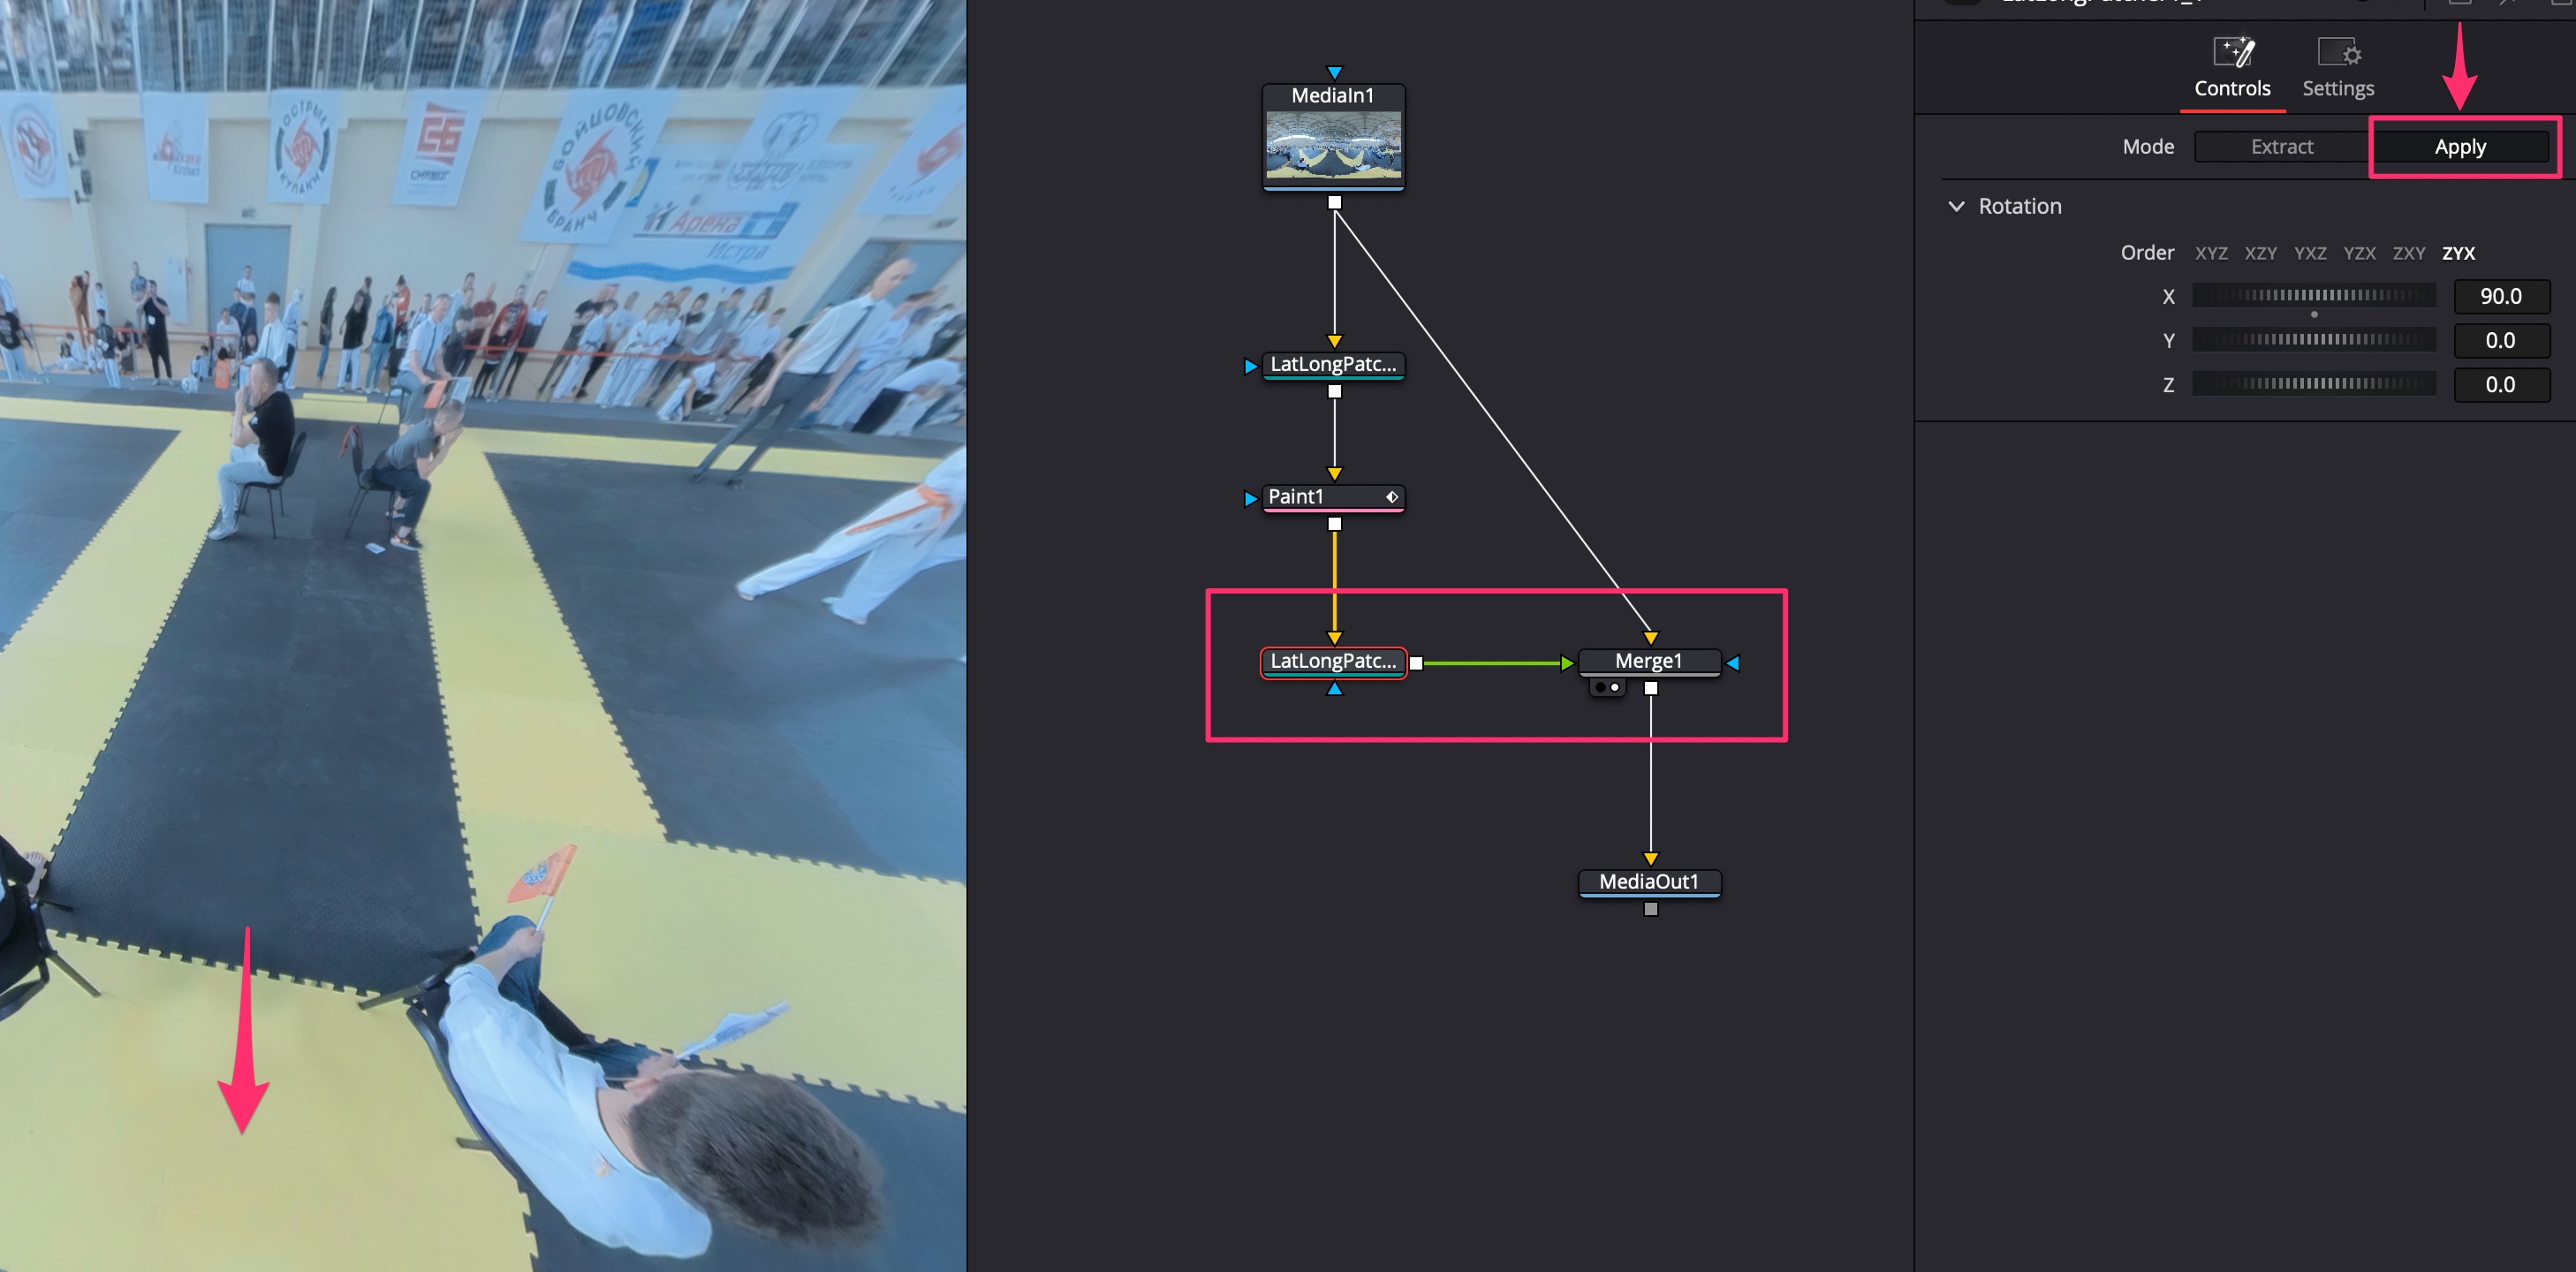
Добавить в Fusion ноду Lat Long Patcher. По оси X направить чётко вниз/вверх, чтобы было видо основание штатива или дрон.
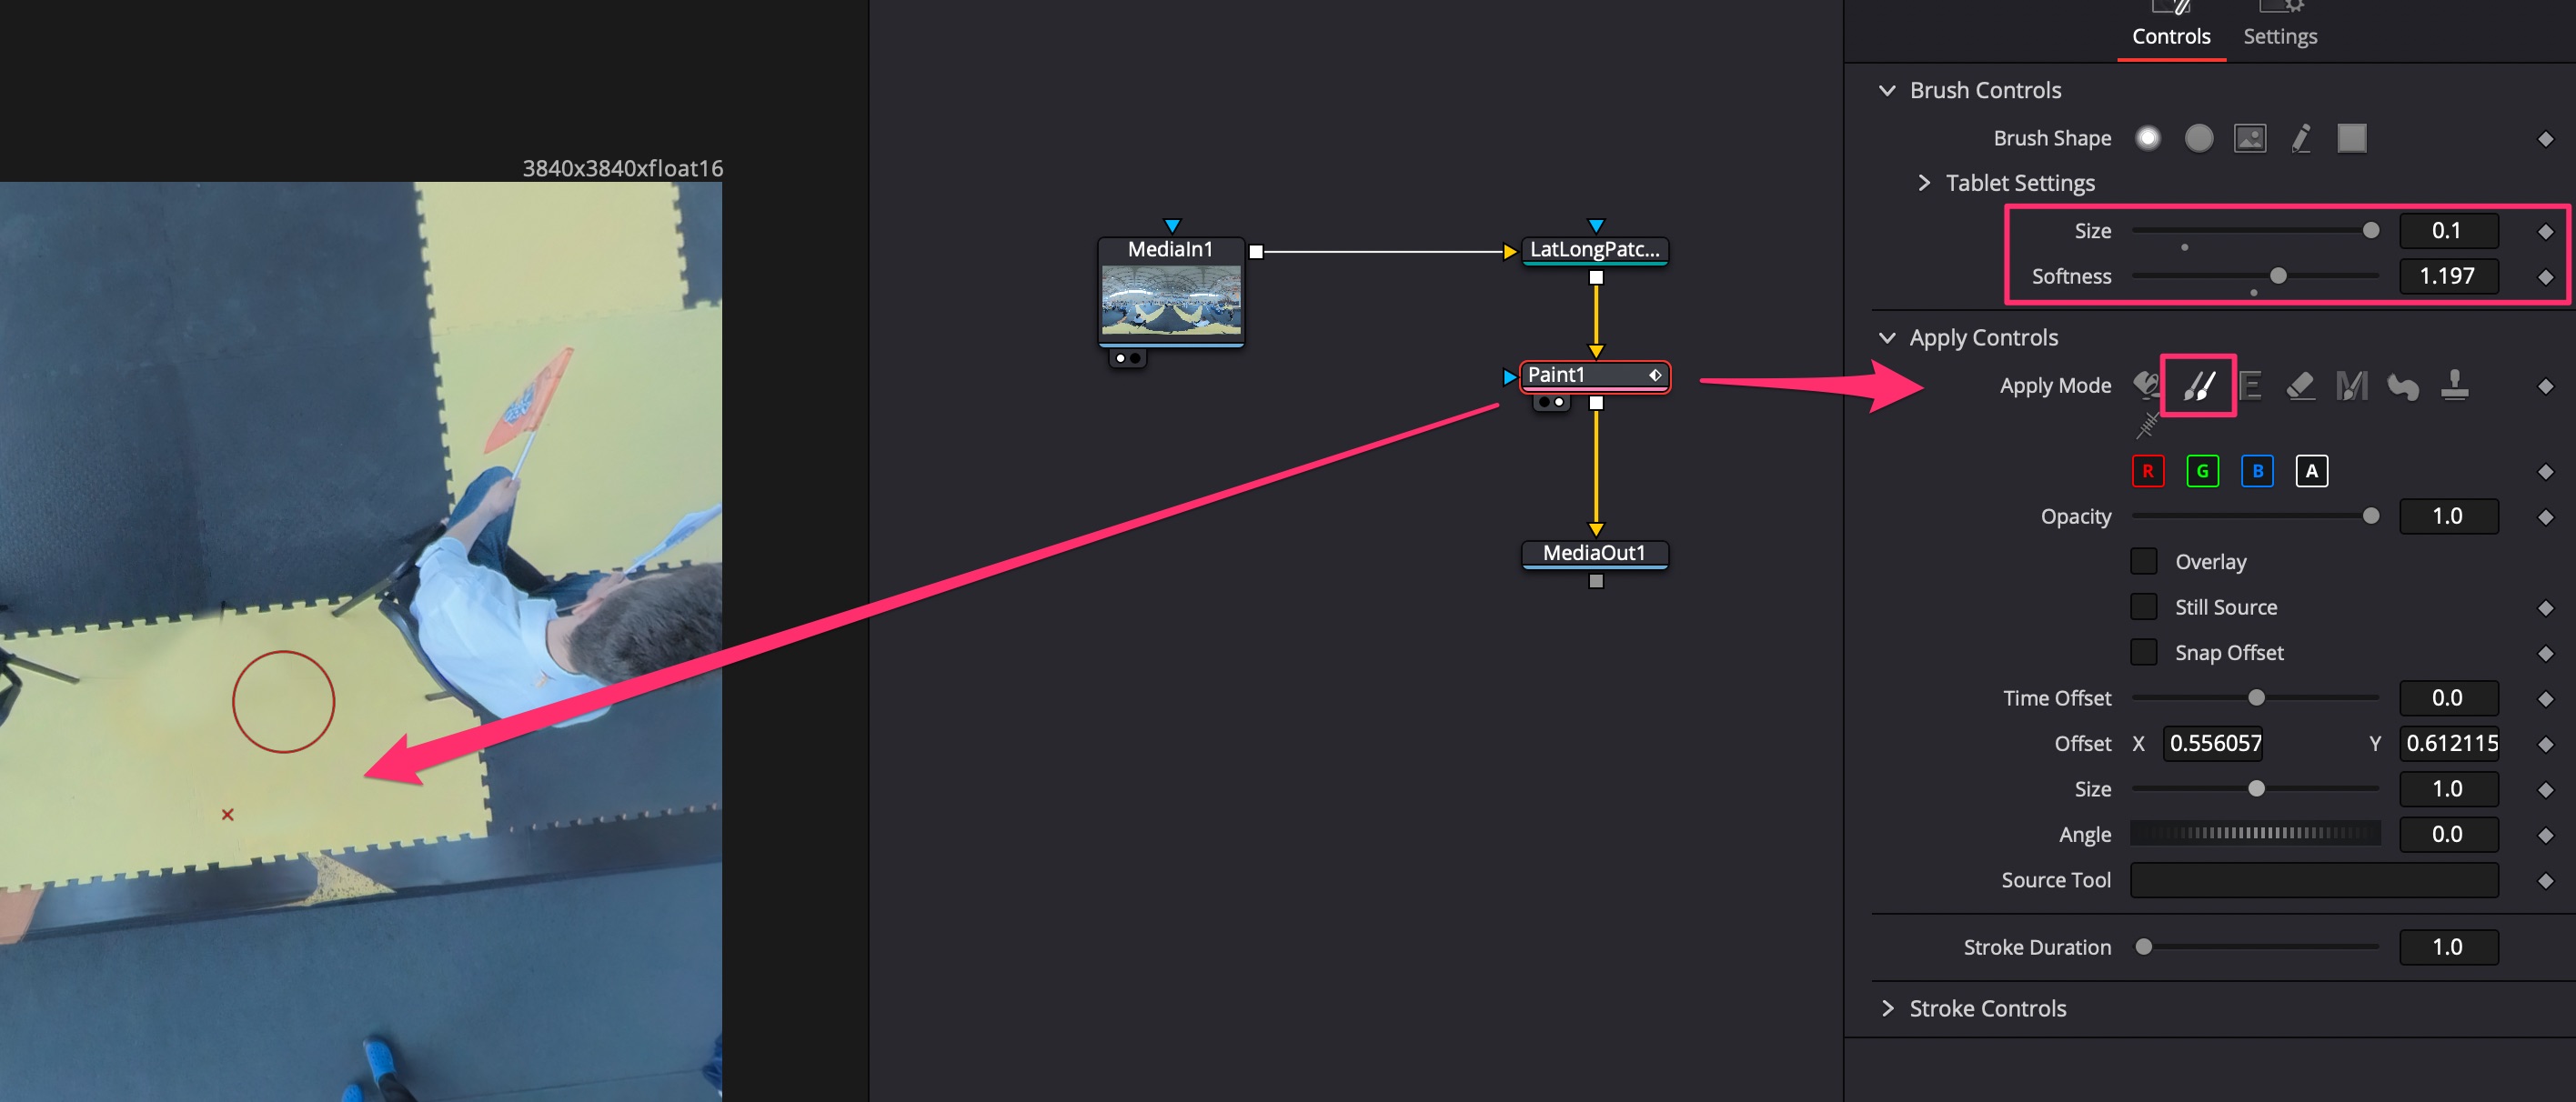
Добавить ноду Paint. Выбрать в окне видео Stroke, в настройках ноды Paint выбрать режим Clone, размер кисти большой и повысить гладкость. С помощью ALT обозначить точку для клонирования и закрасить крестовину штатива или дрон.
 Скопировать ноду Lat Long Patcher после Paint, поменять у неё в настройках режим Mode=Apply. После этого добавить ноду Merge и соединить в неё вторую ноды MediaIn, Lat Long Patcher и результат вывести на Media Out. Объект должен пропасть в кадре.
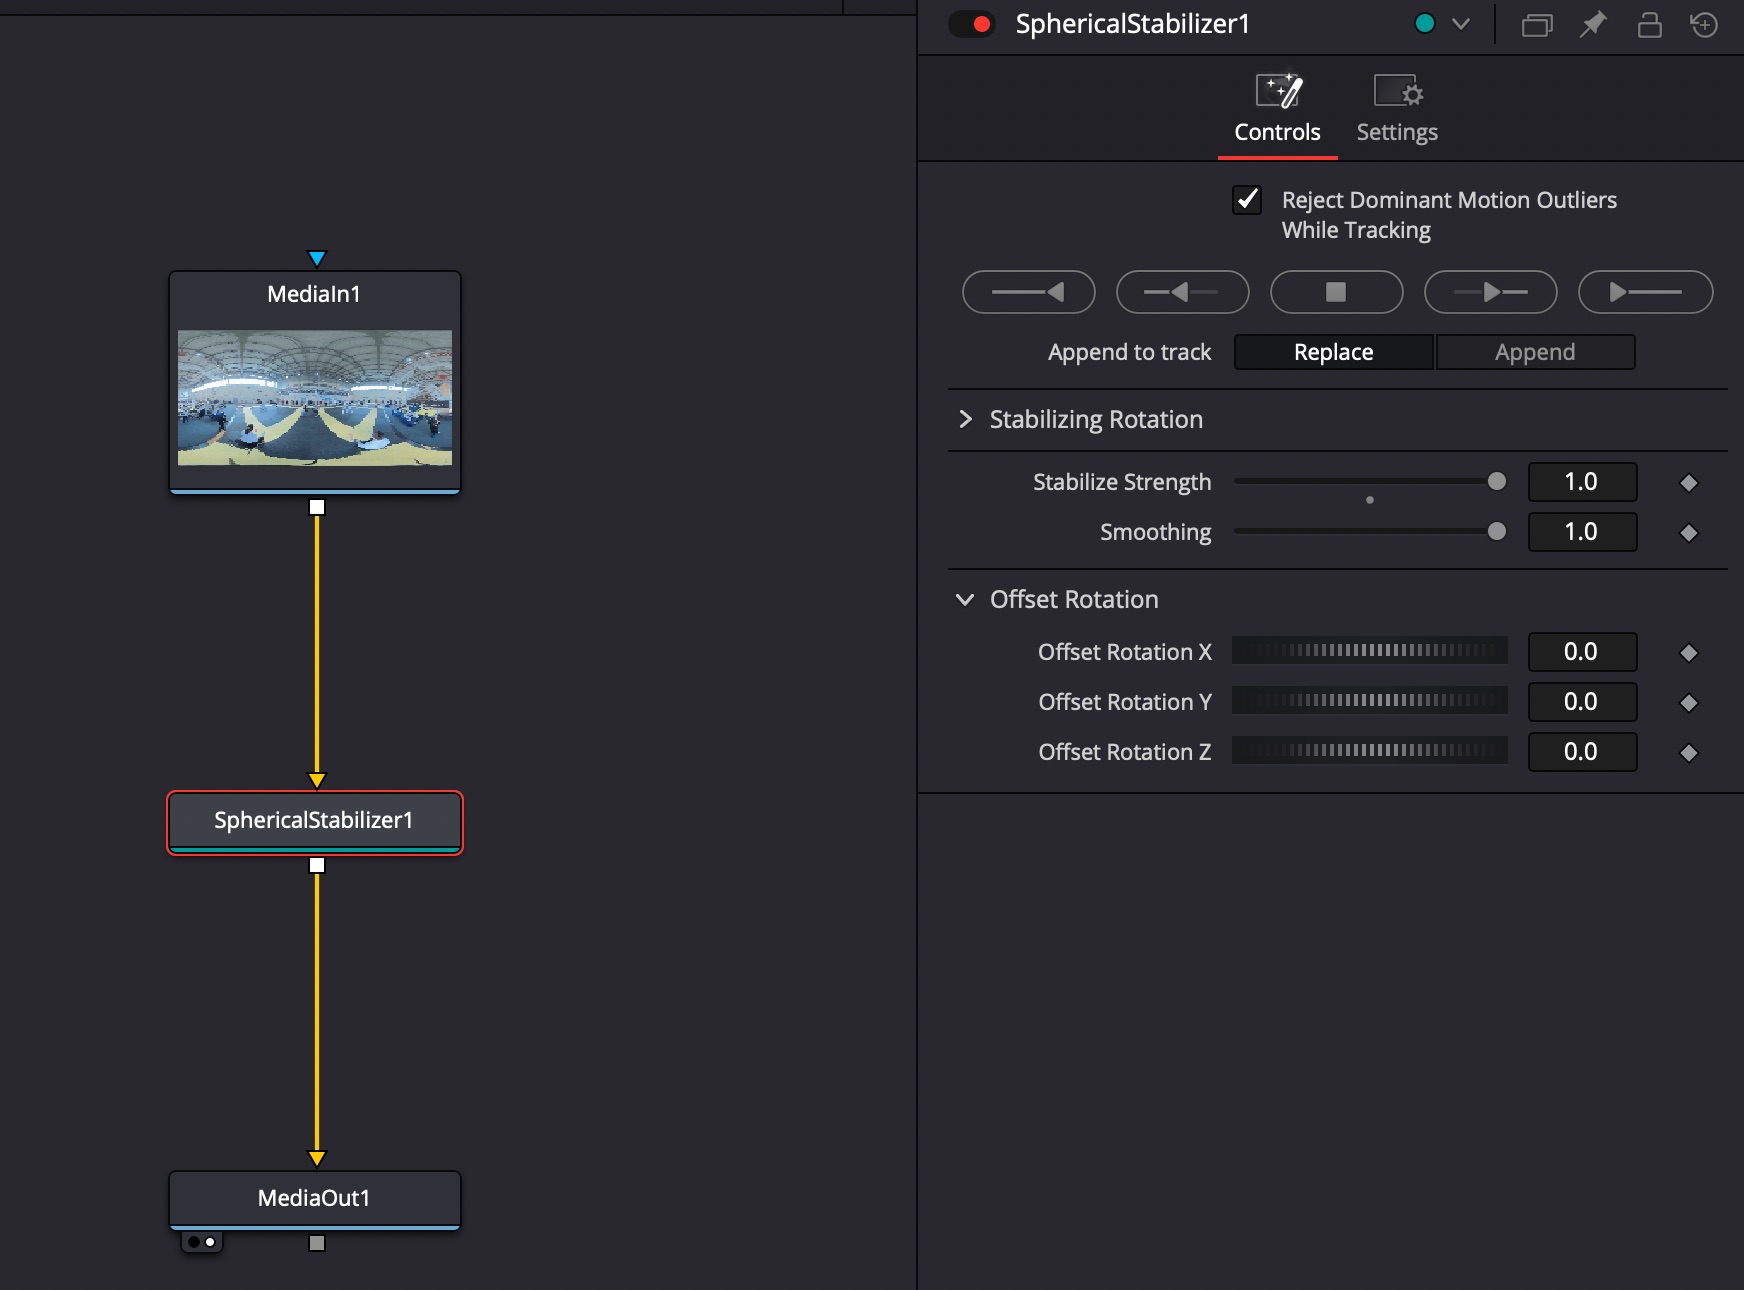
В команте Fusion добавить ноду Spherical Stabilizer. Stabilize Strength = 1, Smooting = 1. Произвести трекинг всего видео.
Для 6К - 8К видео выбирать кодек H.265.
Битрейт Quality = 100000 Kb/s для большей плавности картинки. Для шлема Oculus Quest 1 нужно указывать не более чем Quality = 60000 Kb/s.
Warning
Включить Advance Settings -> Force Sizing to highest quality, Force debayer to highest quality.
DaVinci Resolve не делает инъекции метаданных в видео, поэтому для публикации на Youtube нужно это сделать отдельно (для Facebook этого делать не нужно - можно просто закачать видео, и оно будет VR360).