Configuration
Global View Settings
Save Monitor Space
- Menu Workspace → Turn OFF Show Page Navigation
Dual Monitor Config
Note
Requires DaVinci Studio license.
- Use second monitor for interface: menu Workspace → Dual Screen = ON;
- Use second monitor for full-screen view of video: menu Workspace → Video Clean Feed=
.
Timeline Config
Turn ON Timeline -> Selection follows playhead
Database and files
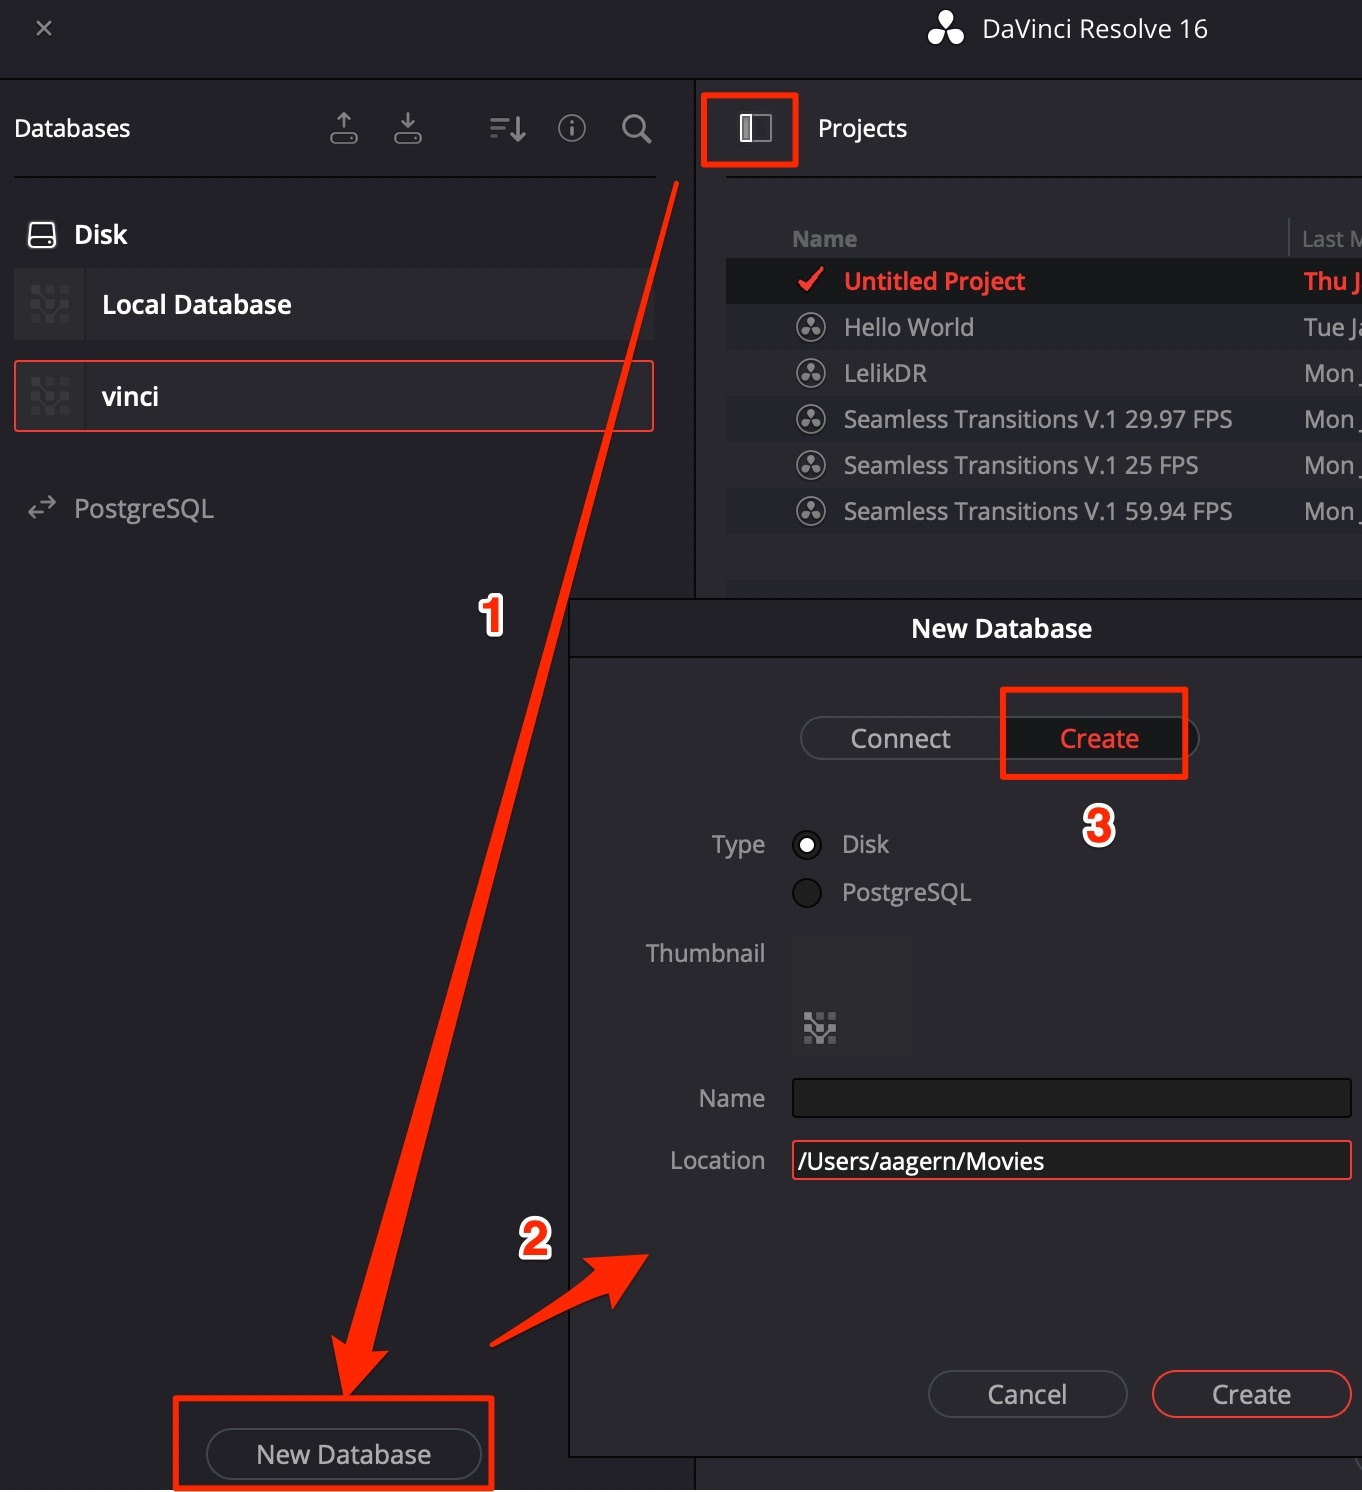
Create a new database from scratch. Choose PostgreSQL or disk files.
It is recommended to create a separate database + folders for video, pictures, cache etc. for each global project, like Youtube-channel.
Folder structure on disk:
-PROJECT
–Database
–Cache
–SourceMedia (source video)
–Gallery (color correction templates)
–Output (master videos)
–Backups
Project Settings
- Timeline resolution - the resolution in which the project will be edited. This is NOT the resolution, in which the project will be rendered. So you can edit the whole project in FullHD or 2048x1080DCI faster mode and then render it in 4K UHD or 4096x2160 DCI - DaVinci Resolve will mathematically scale all masks & effects to match the higher resolution on final render. Blackmagic does warn that such scale may cause some approximation;
- Timeline resolution - may be changed in process of work. Convenient to choose before work;
- Timeline frame rate - cannot be changed in process of work. Need to choose wisely! For example, transitions correction layers may be only made for specific frame rate (29.97 FPS);
- Playback frame rate the same as timeline frame rate, but is the playback rate of the connected reference monitor;
- Video Monitoring section contains parameters for the connected reference monitor;
- Optimized media resolution - may be changed later, but better to change right away to save performance and space on disk = Half/Quarter from original;
- Optimized Media Format / Render Cache Format - fastest codec on Win = DNxHR LB, on macos = ProRes LT/Proxy;
- Enable all checkboxes in this section to save performance the most;
- Cache files location - insert folder Cache made earlier;
- Gallery stills location - insert folder Gallery made earlier;
Save current settings as a preset: go to Presets tab in Project Settings, choose Save As.. After saving the preset, choose it with a right mouse click and choose Save As User Default Config.
Image Scaling
Mismatched resolution files = Scale full frame with crop, this setting greatly helps in conform process, if material was re-scaled before color correction.
Color Management
Broadcast Safe: turn ON to help monitor colors to be safe for TV broadcast.
- -20 - 120 - most lenient option
- 0 - 100 - most strict option
Check current colors in Color room go in menu View → Display Safe Broadcast Exceptions
Get the colors back to safe with either using HUE vs SAT instrument, or Gamut Mapping OpenFX plugin (Gamut mapping method = Saturation Compression, lower Saturation Max level).
Global Preferences
These preferences work for the whole system and all projects.
System - Memory & GPU
- Resolve Memory usage - give all available memory to DaVinci, if no games played or apps used same time as DaVinci;
- Fusion Memory Cache - needed for Fusion compositing rendering and playback in real time;
- GPU - leave Auto in case no problems. For macOS choose = Metal, for PC Intel/AMD card = OpenCL, for NVIDIA choose CUDA. GPU Selection Mode needed for several GPU cards on one computer: one can be used for interface, the other for rendering etc. Are 2 better than 1, should you connect both? Actually this depends on type of cards - does not give significant speed in notebook setup with external videocard, if both the external card and the inner card of the notebook are connected: this gives a few bonus seconds faster render but makes the notebook unusable during render process. Also inner notebook card gets connected to interface and previews, which makes them work slower.
System - Media Storage
- Create shortcuts for all folders actively used in the project;
System - Decode Options
Needed for work with RAW. Enable all checkboxes - for the GPU to use hardware Debayer on RAW material.
System - Audio Plugins
The folder containing 3rd party VST plugins for Fairlight, in case DaVinci did not find them itself.
User - Color
- Always perform copy and paste on selected nodes. Should be turned ON to do copy-pasting in DaVinci.
User - Project Save and Load
- Live Save checkbox. This makes DaVinci save any change, like FCPX;
- Configure Project backups: every 6 min, every 1 hour, every 1 day.
- Choose Backup location folder, created previously.
